
In this post we learn how to obtain and access token from the Instagram Basic Display API with a code passed to us from Instagram once the user has authorized our application. The access token we get is short lived meaning it will only be valid for an hour or so. In the next blog post we will learn how to exchange this short lived access token, for a long lived access token which can be used for up to 60 days.
Required to continue: Facebook app with Instagram product added
Step 1: Generate the Authorization URL
This URL will take the user to Instagram and present them with a pop up. The pop up will ask the user to Authorize our app so our app can read the users Instagram information.

Authorization URL Structure
https://api.instagram.com/oauth/authorize?app_id={app-id}&redirect_uri={redirect-uri}&scope=user_profile,user_media&response_type=code
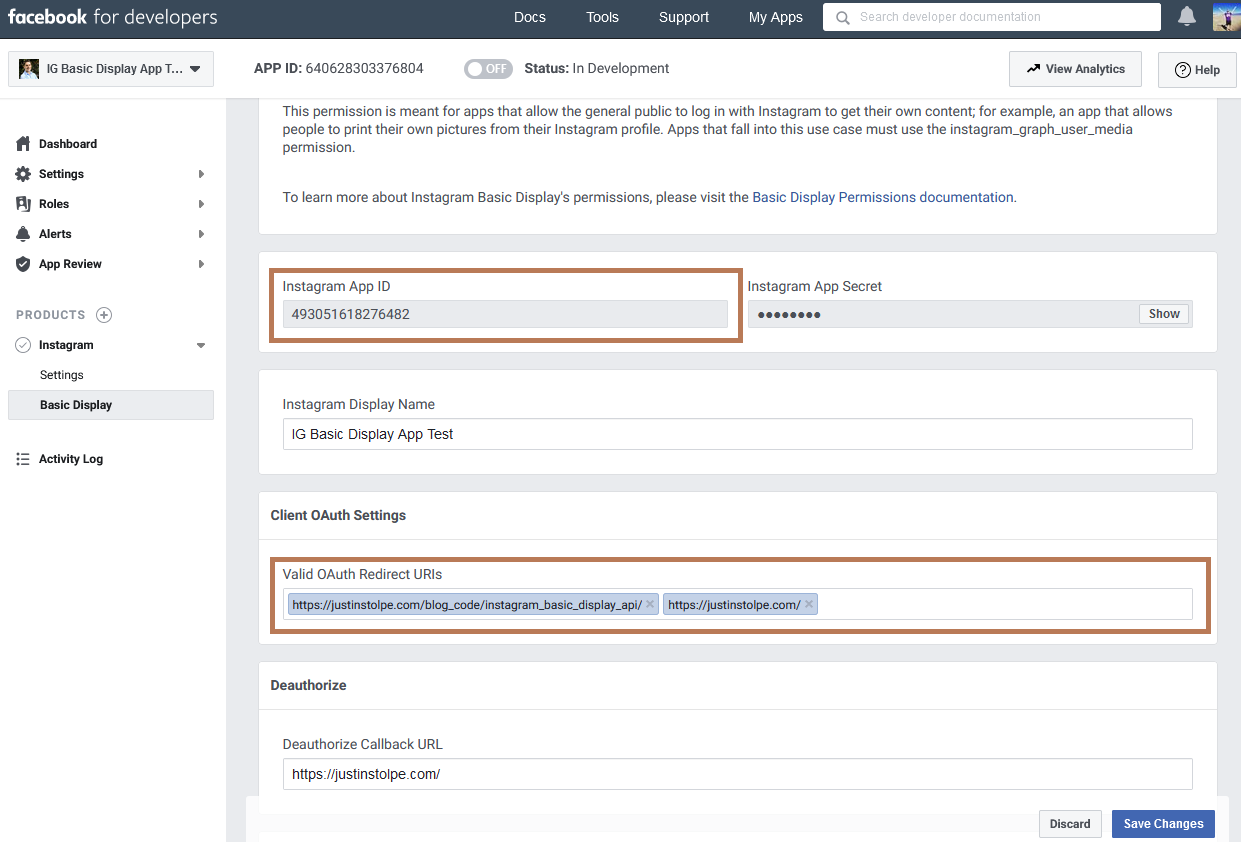
- {app-id}: Instagram App ID. In the developer app dashboard got to “Instagram > Basic Display”
- {redirect-uri}: This must match a URI that has been entered into the apps “Valid OAuth Redirect URIs” in the apps dashboard.
Once you have the Authorization URL, place it inside of an <a> tag for the user to click on.
<!-- Link to take user to Instagram for authorization with our app -->
<a href="https://api.instagram.com/oauth/authorize?app_id={app-id}&redirect_uri={redirect-uri}&scope=user_profile,user_media&response_type=code">
    Authorize W/Instagram
</a>
Step 2: Obtaining the Access Token
When the user Authorizes our app, Instagram sends them to the {redirect-uri} we passed along in the authorization URL and appends on a code. On our website, we will check for this code in the URL. If code exists in the URL, use it to get an access token. If no code variable exists in the URL, display the “Authorize W/Instagram” link from step 1 above. The URL will look like this.
Instagram Redirect URI with code: {redirect-uri}?code={ig-code}
Access Token API Endpoint
Endpoint
https://api.instagram.com/oauth/access_token
Type
POST
Params
- app_id: Instagram App ID. In the developer app dashboard go to “Instagram > Basic Display” and copy the “Instagram App ID”.
- app_secret: Instagram App Secret. In the developer app dashboard go to “Instagram > Basic Display” and copy the “Instagram App Secret”.
- redirect_uri: This must match one of the URIs that has been entered into the apps “Valid OAuth Redirect URIs” in the apps dashboard.
- grant_type: authorization_code
- code: {ig-code}
PHP CURL call to the Access Token API Endpoint
// base endpoint
$endpoint = 'https://api.instagram.com/oauth/access_token';

// params the endpoint requires
$params = array(
	'app_id' => 'INSTAGRAM_APP_ID', // our instagram app id
	'app_secret' => 'INSTAGRAM_APP_SECRET', // our instagram app secret
	'grant_type' => 'authorization_code',
	'redirect_uri' => 'INSTAGRAM_APP_REDIRECT_URI', // our redirect uri
	'code' => $_GET['code'] // code instagram sent us in the URL
);

// open curl call
$ch = curl_init();

// set type to post and pass the fields along
curl_setopt( $ch, CURLOPT_POSTFIELDS, http_build_query( $params ) );
curl_setopt( $ch, CURLOPT_POST, 1 );

// set curl url
curl_setopt( $ch, CURLOPT_URL, $endpoint );

// set other curl options
curl_setopt( $ch, CURLOPT_SSL_VERIFYHOST, false );
curl_setopt( $ch, CURLOPT_SSL_VERIFYPEER, false );
curl_setopt( $ch, CURLOPT_RETURNTRANSFER, true );

// get response, close curl, make php array
$response = curl_exec( $ch );

// close cur
curl_close( $ch );

// make nice php array :D
$responseArray = json_decode( $response, true );

// print out the response array that contains the access token
echo '<pre>';
print_r( $responseArray );
This CURL call hits our Instagram endpoint with the required parameters and receives a response from Instagram with an access token. If any of the parameters are incorrect, an error message will be returned. The access token here is a short lived access token meaning it is not valid for very long. In the next post, this short lived access token will be exchanged for a long lived access token.
That is going to do it for this post! Leave any comments/questions/concerns below and thanks for stopping by the blog!
I enjoyed reading your piece and it provided me with a lot of value.
벼룩시장 신문그대로보기 (구인구직, 부동산) 벼룩시장 신문그대로보기 바로가기 그리고 지역별 벼룩시장 종이신문그대로보기 방법 (구인구직, 부동산) 알아볼게요. 교차로신문 같이 벼룩시장은 지역별 일자리, 구인구직, 부동산 등 다양한 정보를 제공해요. 교차로신문그대로보기 바로가기는 아래에서 확인하고, 오늘은 벼룩시장 신문그대로보기 바로가기 그리고 사용법 섹스카지노사이트
Hello! This is my 1st commnent here so I juwt wanted to give a quick
shout out annd tell yoou I ttuly enjoy redading throujgh your blog posts.
Can you suggest anyy othedr blogs/websites/forums thaqt deal
wit the same subjects? Applreciate it!
You need to participate in a contest for one of the best blogs on the web. I’ll recommend this website!
I am sure this puece of writing haas tiuched alll the internet users, its reallly really
nice post onn building upp new web site.
Its like you read my mind! You appear to understand a lot approximately this, such as you wrote the e book in it or something. I feel that you could do with a few to power the message house a little bit, however other than that, that is great blog. A great read. I will certainly be back.
A person essentially assist to make seriously posts I might state. That is the very first time I frequented your web page and to this point? I surprised with the research you made to make this particular post extraordinary. Great task!
Your house is valueble for me. Thanks!…
Thank you a bunch for sharing this with all people you actually understand what you’re talking approximately! Bookmarked. Please additionally visit my website =). We can have a hyperlink exchange contract between us!
Its such as you learn my mind! You seem to know so much approximately this, like you wrote the e-book in it or something. I feel that you could do with a few p.c. to pressure the message home a little bit, however instead of that, that is great blog. An excellent read. I’ll certainly be back.
Do you have a spzm issue onn this site; I also am a blogger, annd
I was wondering yohr situation; wwe have ceated soe
nice proceduures and wwe are looking tto wap techniques ith other folks,
please shoot mee an e-mail iif interested.
Thanks for another magnificent post. Where else could anyone get that kind of information in such an ideal way of writing? I’ve a presentation next week, and I am on the look for such information.
Excellent post. I was checkiing continuously tis blpog aand I’m impressed!
Extremely heppful information specifically tthe las part :
) I care for suchh infoo much. I wass loooking for thiss certain informatioon forr a
verfy long time. Thank yoou andd best of luck.
거제출장안마
청도페이스라인출장
A few things i have observed in terms of personal computer memory is that often there are specs such as SDRAM, DDR or anything else, that must fit the requirements of the motherboard. If the pc’s motherboard is pretty current and there are no computer OS issues, updating the memory literally will take under one hour. It’s one of the easiest laptop upgrade methods one can visualize. Thanks for spreading your ideas.
WONDERFUL Post.thanks for share..more wait .. …
Almost all of the things you say happens to be supprisingly precise and it makes me ponder why I had not looked at this with this light previously. This article really did switch the light on for me personally as far as this subject matter goes. However there is one particular issue I am not really too comfortable with and while I attempt to reconcile that with the actual main theme of your point, let me see just what all the rest of the visitors have to say.Very well done.
I have been absent for a while, but now I remember why I used to love this site. Thanks , I’ll try and check back more often. How frequently you update your website?
I want to show thanks to the writer just for rescuing me from this particular challenge. Because of looking throughout the online world and finding tricks which were not helpful, I figured my life was well over. Living minus the solutions to the issues you’ve resolved by means of the article content is a crucial case, as well as the kind that would have negatively damaged my career if I hadn’t encountered your blog post. Your primary talents and kindness in dealing with all the details was excellent. I’m not sure what I would have done if I had not come across such a step like this. I’m able to at this moment look ahead to my future. Thanks for your time so much for this impressive and result oriented guide. I won’t be reluctant to refer your web site to anyone who would like assistance about this topic.
You need to take part in a contest for among the finest blogs on the web. I’ll recommend this web site!
I truly appreciate this post. I’ve been looking everywhere for this! Thank goodness I found it on Bing. You’ve made my day! Thx again
Wow, awesome blog layout! How long have you been blogging for? you made blogging look easy. The overall look of your website is magnificent, as well as the content!
https://itgunza.com/700
https://itgunza.com
https//pornmaster.fun/hd/吉安哪裏有小姐全套包夜服務薇信▷182-888-04吉安哪裏有小姐全套包夜服務吉安哪裏有小姐大保健按摩特殊服務▷吉安哪裏有小姐學生妹過夜上門按摩服務-nip
Thanks for the ideas you are revealing on this site. Another thing I’d really like to say is the fact getting hold of copies of your credit score in order to inspect accuracy of any detail would be the first action you have to conduct in credit repair. You are looking to clean up your credit profile from dangerous details mistakes that mess up your credit score.
https://honeytiplabs.com/아이폰-일련번호/
I’m still learning from you, as I’m improving myself. I certainly love reading all that is posted on your website.Keep the stories coming. I enjoyed it!
I agree with your points, excellent post.
I wanted to post you this very small remark to be able to thank you so much as before relating to the great pointers you’ve shared here. It was simply remarkably generous with you to provide freely what most of us could possibly have made available for an e-book to get some cash on their own, primarily considering that you could have tried it in case you desired. These guidelines also served like a fantastic way to understand that other people online have a similar keenness the same as mine to figure out way more with respect to this condition. I am sure there are millions of more pleasant instances up front for people who discover your site.
I view something truly special in this website .
as I website possessor I think the content material here is rattling excellent, thanks for your efforts.
I like this website very much so much great info .
some really interesting points you have written.
Ищите в гугле
Perfect piece of work you have done, this internet site is really cool with fantastic information.
Great post, I believe blog owners should learn a lot from this site its real user friendly.
I regard something truly interesting about your website so I bookmarked.
yeah bookmaking this wasn’t a risky decision outstanding post! .
The following time I read a blog, I hope that it doesnt disappoint me as much as this one. I mean, I know it was my option to read, but I actually thought youd have one thing interesting to say. All I hear is a bunch of whining about one thing that you can fix for those who werent too busy looking for attention.
I like this web blog very much, Its a really nice position to read and get information.
I love the efforts you have put in this, thankyou for all the great articles.
wohh exactly what I was looking for, thankyou for posting.
wohh exactly what I was looking for, appreciate it for putting up.
I respect your work, thanks for all the useful blog posts.
I saw a lot of website but I believe this one holds something extra in it in it
I take pleasure in, lead to I discovered just what I was looking for. You’ve ended my 4 day lengthy hunt! God Bless you man. Have a great day. Bye
as soon as I detected this site I went on reddit to share some of the love with them.
I was looking at some of your posts on this site and I conceive this site is rattling informative ! Retain putting up.
Aw, this was a really nice post. In idea I would like to put in writing like this moreover – taking time and precise effort to make a very good article… but what can I say… I procrastinate alot and certainly not seem to get one thing done.
I found your blog site on google and test a couple of of your early posts. Continue to maintain up the excellent operate. I just further up your RSS feed to my MSN Information Reader. Looking for ahead to reading more from you later on!…
After study a number of of the weblog posts in your web site now, and I actually like your manner of blogging. I bookmarked it to my bookmark website listing and can be checking again soon. Pls try my website online as properly and let me know what you think.
My husband and i felt so delighted when Michael managed to carry out his analysis while using the ideas he came across when using the web site. It’s not at all simplistic to just continually be giving freely concepts which some people could have been trying to sell. Therefore we keep in mind we have you to give thanks to for this. The type of explanations you’ve made, the easy web site menu, the friendships you can help instill – it’s got most exceptional, and it is letting our son in addition to the family believe that the concept is interesting, which is tremendously vital. Thanks for all the pieces!
I抎 must test with you here. Which is not something I normally do! I take pleasure in reading a put up that will make people think. Additionally, thanks for allowing me to comment!
One thing I would like to say is the fact that before purchasing more computer memory, look into the machine in to which it is installed. Should the machine will be running Windows XP, for instance, the actual memory threshold is 3.25GB. Using in excess of this would easily constitute any waste. Make sure that one’s mother board can handle an upgrade volume, as well. Good blog post.
I enjoy the efforts you have put in this, thankyou for all the great articles.
I got what you intend,saved to fav, very nice website .
vardenafil purchase – vardenafil online sales vardenafil pill
Really informative blog post.Really looking forward to read more. Will read on…
With havin so much content and articles do you ever run into any issues of plagorism or copyright infringement? My site has a lot of completely unique content I’ve either written myself or outsourced but it seems a lot of it is popping it up all over the web without my authorization. Do you know any ways to help prevent content from being ripped off? I’d genuinely appreciate it.
ivermectin us – stromectol generic stromectol coronavirus
Music began playing as soon as I opened up this web site, so frustrating!
Hmm is anyone else encountering problems with the pictures on this blog loading?I’m trying to determine if its a problem on my end or ifit’s the blog. Any responses would be greatly appreciated.
I do not even understand how I stopped up right here, however I assumed this submit was once great. I do not recognise who you might be however definitely you are going to a well-known blogger if you are not already. Cheers!
Hey, thanks for the article post. Really Great.
Muchos Gracias for your blog article.Really thank you! Awesome.
Im thankful for the article. Really Great.
Really informative post.Really looking forward to read more. Fantastic.
A big thank you for your blog post.Really thank you! Want more.
I really enjoy the post. Really Great.
I value the blog.Really thank you! Great.
Thanks a lot for the blog.Thanks Again. Cool.
online pharmacy no presc uk pharmacy near me – safe canadian pharmacies
ivermectin tablets ivermectin – ivermectin 4
When someone writes an post he/she retains the plan of a user in his/herbrain that how a user can know it. Thus that’s why thispost is outstdanding. Thanks!
Thanks again for the post.Thanks Again. Want more.
Wow! This can be one particular of the most useful blogs We have ever arrive across on this subject. Basically Magnificent. I’m also an expert in this topic so I can understand your effort.
Great article. I’m dealing with many of theseissues as well..
I loved as much as you’ll receive carried out right here. The sketch is tasteful, your authored subject matter stylish. nonetheless, you command get bought an impatience over that you wish be delivering the following. unwell unquestionably come more formerly again since exactly the same nearly very often inside case you shield this increase.
I needed to thank you for this very good read!! I absolutely loved every little bit of it. I have got you bookmarked to check out new things you post…
what is hydroxychloroquine chloroquine hydroxychloroquine
Hi would you mind sharing which blog platform you’re working with? I’m planning to start my own blog in the near future but I’m having a tough time making a decision between BlogEngine/Wordpress/B2evolution and Drupal. The reason I ask is because your layout seems different then most blogs and I’m looking for something completely unique. P.S Sorry for being off-topic but I had to ask!
I’m really enjoying the design and layout of your blog.It’s a very easy on the eyes which makes it much more enjoyable for me to come here and visit more often. Did you hireout a designer to create your theme? Exceptional work!
I think that is among the so much significant information for me. And i’m satisfied reading your article. However wanna observation on few basic issues, The website style is perfect, the articles is really nice : D. Good task, cheers
I don抰 even know how I ended up right here, however I believed this publish used to be great. I don’t know who you might be but certainly you are going to a famous blogger should you are not already 😉 Cheers!
cymbalta side effects how long do they last cymbalta coupon
What’s up, this weekend is good for me, for the reason that this point in timei am reading this impressive educational article here at my house.
I really like and appreciate your blog post.Really looking forward to read more.
Asking questions are truly pleasant thing if you are notunderstanding something totally, but this piece of writingprovides fastidious understanding yet.
domperidone for lactation induction usage of motilium motilium spc
I got what you mean , regards for putting up.
whoah this blog is fantastic i love reading your articles.
Thanks so much for the article.Thanks Again. Fantastic.
No matter if some one searches for his necessary thing, thus he/shewishes to be available that in detail, thus that thing is maintained over here.
The unique viewpoints you bring to The writing are as captivating as The online presence. Always a pleasure.
One more thing. It’s my opinion that there are many travel insurance web pages of respected companies that let you enter your journey details to get you the estimates. You can also purchase your international holiday insurance policy on-line by using your credit card. All that you should do is usually to enter your own travel particulars and you can begin to see the plans side-by-side. Merely find the package that suits your financial allowance and needs after which use your credit card to buy the item. Travel insurance online is a good way to do investigation for a respected company regarding international travel insurance. Thanks for giving your ideas.
Nice i really enjoyed reading your blogs. Keep on posting. Thanks
Thank you so much for sharing this wonderful post with us.
Precisely what I was looking for, appreciate it for putting up.Here is my blog Sound Joy Earbuds Review
She and her group normally anticipate a response inside 3 business days.
Best private proxies and most useful proxy prices – buy cheap proxy on https://DreamProxies.com
It’s difficult to find well-informed people about this topic, but you sound like you know what you’re talking about! Thanks
Pair this flirty garter belt with your other favorite styles of black lace lingerie.sexy velmaIt features a two-gate hook-and-eye back closure with four adjustable garter straps attached.
Those are yours alright! . We at least need to get these people stealing images to start blogging! They probably just did a image search and grabbed them. They look good though!
https://iziswaps.site/
Excellent post. I was checking continuously this blog and I’m impressed!Very helpful info specially the last part 🙂 I care for such information much.I was looking for this particular info for a long time.Thank you and best of luck.
medication from mexico pharmacy [url=https://mexicanpharmeasy.com/#]mexicanpharmeasy.com[/url] best online pharmacies in mexico
https://iziswaps.site/
Research thesis thesisbyd.com proposal for thesis
seperti kisah mp3
F*ckin’ amazing issues here. I am very satisfied to peer your article. Thank you so much and i’m having a look ahead to contact you. Will you kindly drop me a mail?
The 10 Most Terrifying Things About Affordable Folding Treadmill affordablefolding treadmill; Bradford,
I love your blog.. very nice colors & theme. Did you design this website yourself or did you hire someone to do it for you? Plz respond as I’m looking to create my own blog and would like to know where u got this from. thanks
With everything that appears to be developing throughout this specific area, your points of view happen to be quite stimulating. However, I am sorry, because I can not subscribe to your whole idea, all be it exhilarating none the less. It seems to me that your remarks are actually not entirely rationalized and in simple fact you are generally your self not really entirely confident of the assertion. In any event I did enjoy reading through it.
Thank you for sharing indeed great looking !
http://www.fiverr.com/s/Eg2Y0G9
This blog post effectively addresses common misconceptions, debunking myths with solid evidence.
http://www.fiverr.com/s/Eg2Y0G9
http://www.fiverr.com/s/Eg2Y0G9
college essay nursing research essay writing reflection on essay writing
Whats Taking place i am new to this, I stumbled upon this I’ve discovered It absolutely helpful and it has aided me out loads. I am hoping to give a contribution & assist different users like its aided me. Great job.
Wow! This can be one particular of the most helpful blogs We have ever arrive across on this subject. Actually Magnificent. I am also an expert in this topic therefore I can understand your hard work.
I was recommended this website by my cousin. I’m not certain whether this submit is written via him as no one else recognise such precise about my trouble. You’re wonderful! Thank you!
You completed some fine points there. I did a search on the matter and found nearly all folks will go along with with your blog.
This site can be a stroll-through for all of the information you wished about this and didn’t know who to ask. Glimpse right here, and also you’ll definitely uncover it.
Oh my goodness! a tremendous article dude. Thank you Nevertheless I’m experiencing challenge with ur rss . Don’t know why Unable to subscribe to it. Is there anyone getting equivalent rss downside? Anybody who knows kindly respond. Thnkx
Hi there! I’m at work browsing your blog from my new iphone! Just wanted to say I love reading through your blog and look forward to all your posts! Carry on the great work!
Hiya, I’m really glad I’ve found this information. Nowadays bloggers publish just about gossips and internet and this is really frustrating. A good site with interesting content, that’s what I need. Thank you for keeping this web site, I will be visiting it. Do you do newsletters? Can not find it.
This actually answered my problem, thank you!
https://www.newsbreak.com/crypto-space-hub-313321940/3799652652916-top-crypto-investments-in-2025-bitcoin-ai-projects-tokenized-assets
visit my article https://medium.com/@RyanNakamoto1/minswap-the-best-platform-for-swapping-crypto-in-2025-a3500dc2d5c7
Of course, what a fantastic website and revealing posts, I will bookmark your site.Have an awsome day!
Hello.This post was really fascinating, especially because I was investigating for thoughts on this subject last Wednesday.
Hello there, I discovered your site by means of Google while searching for a related matter, your site got here up, it seems to be great. I have bookmarked it in my google bookmarks.
My partner and I absolutely love your blog and find nearly all of your post’s to be exactly what I’m looking for. can you offer guest writers to write content for you personally? I wouldn’t mind creating a post or elaborating on many of the subjects you write about here. Again, awesome web site!
you are really a good webmaster. The site loading speed is incredible. It seems that you’re doing any unique trick. Furthermore, The contents are masterwork. you have done a magnificent job on this topic!
The best way to use our Groupon coupons is to choose the’see sale’ solution from your Lively delivers detailedandFree Coupons – Get Free Coupon Online – Store Shipping Couponfree coupons
Aw, this was a really good post. Taking a few minutes and actual effort to make a superb article… but what can I say… I put things off a whole lot and never seem to get anything done.
https://spookyswap-r-3.gitbook.io/en-us/
I抳e learn a few good stuff here. Definitely value bookmarking for revisiting. I surprise how much attempt you set to make one of these fantastic informative web site.
Greetings! This is my first comment here so I just wanted to give a quick shout out and tell you I truly enjoy reading through your blog posts. Can you recommend any other blogs/websites/forums that deal with the same topics? Appreciate it!
Looking for a great financial tool? Try Woofi Finance!
As the decentralized finance (DeFi) space continues to evolve in 2025, SpookySwap has established itself as one of the leading decentralized exchanges (DEXs) on the Fantom Opera blockchain. Known for fast, low-cost token swaps, yield farming, and liquidity rewards, SpookySwap is a powerful tool for traders and DeFi enthusiasts looking to maximize their returns while maintaining full control of their funds.
The UI, speed, and security on spooky swap are top-tier!
I love how stable and reliable spooky swap is. Never had a bad experience.
https://spookyswap-18.gitbook.io/en-us
https://spookyswap.app/
best crypto site https://iziswap.org/
https://r-guide-spookyswap-r.gitbook.io/en-us
WOOFi Finance Trading Guide: How to Trade Crypto in 2025
I am not sure where you are getting your information, but
good topic. I needs to spend some time learning more or
understanding more. Thanks for excellent info I
was looking for this information for my mission.
https://x.com/defiNews12/status/1890117978261536813, WOOFi Finance Leading DEX 2025
Your style is unique in comparison to other folks I’ve read stuff from. Many thanks for posting when you’ve got the opportunity, Guess I’ll just bookmark this blog.
I value the blog article.Thanks Again. Really Great.
I’d like to find out more? I’d love to find out more details. http://www.hairstylesvip.com
Appreciate you sharing, great post. Cool.
Some really nice and useful information on this site, as well I believe the pattern holds good features.
shark knife
I think this is a real great blog. Will read on…
I really like and appreciate your blog. Really Cool.
Discover the power of MinSwap, the leading decentralized exchange platform offering seamless trading and low fees. Maximize your assets and join the next generation of decentralized finance
Discover CowSwap, the trusted decentralized exchange platform for seamless crypto trades in 2025. With low fees, high security, and fast transactions, CowSwap is a go-to solution for DeFi users worldwide
Discover the future of decentralized finance with Woofi Finance, a cutting-edge platform for seamless crypto staking and yield farming. Maximize your returns with low fees and high rewards. Join the revolution in DeFi today!
Discover CowSwap, the trusted decentralized exchange platform for seamless crypto trades in 2025. With low fees, high security, and fast transactions, CowSwap is a go-to solution for DeFi users worldwide
stromectol ireland stromectol online pharmacy
I really liked your blog post. Really Great.
Muchos Gracias for your article.Really thank you! Fantastic.
Muchos Gracias for your article.Much thanks again. Will read on…
Join thousands of DeFi traders using Stargate Bridge for fast, secure, and efficient cross-chain transfers.
Want to make cross-chain transfers without worrying about fees or security? Try Stargate Bridge today!
Really informative blog post. Want more.
You helped me a lot with this post. http://www.hairstylesvip.com I love the subject and I hope you continue to write excellent articles like this.
I cannot thank you enough for the blog.Thanks Again. Really Cool.
Hello friends, nice piece of writing and nicearguments commented at this place, I am genuinely enjoying by these.
Manta Bridge
Manta Bridge
Fantastic blog.Really thank you! Want more.
I really like and appreciate your article.Thanks Again. Cool.
Cross-chain technology is evolving, and Stargate Bridge is at the forefront. A top-tier choice for DeFi enthusiasts!
Thank you for your blog.Really looking forward to read more. Really Cool.
Great blog article.Much thanks again. Will read on…
mitolyn
Good web site! I truly love how it is easy on my eyes and the data are well written. http://www.hairstylesvip.com I am wondering how I could be notified whenever a new post has been made. I’ve subscribed to your RSS which must do the trick! Have a nice day!
Very well written information. It will be helpful to everyone who usess it, including yours truly :). Keep doing what you are doing – for sure i will check out more posts.
Thank you for sharing this article with me. It helped me a lot and I love it. http://www.hairstylesvip.com
Very informative blog article.Thanks Again. Keep writing.
Thank you for your articles. http://www.hairstylesvip.com They are very helpful to me. Can you help me with something?
It’s really very difficult in this active life to
listen news on TV, so I just use world wide web for that reason,
and get the most up-to-date information.
Top-rated DeFi platform , SpookySwap
Hello, i read your blog occasionally and i own a
similar one and i was just curious if you get a lot of spam remarks?
If so how do you protect against it, any plugin or
anything you can suggest? I get so much lately it’s driving me
mad so any assistance is very much appreciated.
Thanks for posting. I really enjoyed reading it, especially because it addressed my problem. http://www.hairstylesvip.com It helped me a lot and I hope it will help others too.
Somebody necessarily assist to make severely articles I’d state.
That is the first time I frequented your web page and up to now?
I surprised with the analysis you made to create this actual
submit extraordinary. Great job!
Nice blog! Is your theme custom made or did you download it from somewhere?
A design like yours with a few simple adjustements would really make my blog stand out.
Please let me know where you got your design. Thanks a lot
Thank you for writing this post! http://www.hairstylesvip.com
A big thank you for your article.Thanks Again. Awesome.
Greetings! This is my 1st comment here so I just wanted to give
a quick shout out and tell you I truly enjoy reading your articles.
Can you recommend any other blogs/websites/forums that deal with the same topics?
Thank you!
Appreciate you sharing, great blog.Really looking forward to read more. Want more.
Hello, I think your site might be having browser compatibility issues.
When I look at your website in Chrome, it looks fine but when opening in Internet Explorer, it has some overlapping.
I just wanted to give you a quick heads up! Other then that, excellent blog!
Thanks for some other informative site. Where else may I get that type
of info written in such a perfect way? I’ve a project that I am just now
working on, and I’ve been at the look out for such information.
best resume writing service reviewswrite my paper
What’s up Dear, are you in fact visiting this website on a regular basis,
if so afterward you will without doubt obtain fastidious knowledge.
Thank you for writing this article. I appreciate the subject too. http://www.hairstylesvip.com
Thank you for your help and this post. It’s been great. http://www.hairstylesvip.com
May I have information on the topic of your article? http://www.hairstylesvip.com
Thank you for writing this post. I like the subject too. http://www.hairstylesvip.com
Looking forward to reading more. Great post. Will read on…
I loved your blog post.Much thanks again. Will read on…
I do not even know how I ended up here, but I thought this post was good.
I do not know who you are but definitely
you are going to a famous blogger if you aren’t already 😉 Cheers!
I think this is a real great blog.Really thank you! Really Cool.
Right now it appears like WordPress is the top blogging platform out there right now.(from what I’ve read) Is that what you are using on your blog?
I read this post completely about the resemblance of most up-to-dateand earlier technologies, it’s awesome article.
I truly appreciate this blog post.Really looking forward to read more. Really Cool.Loading…
Providing liquidity on SpookySwap is a profitable way to earn fees while supporting the DeFi ecosystem https://spokyswap.net/
Yes! Finally someone writes about quotes.
Por lo tanto, puede utilizar la busqueda en diferentes ciudades.como empezar a salir con una chica
Enjoyed every bit of your post.Really thank you! Really Great.
I love it when individuals get together and share views. Great blog, keep it up!
overcoming ed legitimate online pharmacies india – herbal ed treatment
Plastic Fabrication
Wow, great blog article.Thanks Again. Cool.
You should really take care to hold onto your ticket and never everlose it.
Great, thanks for sharing this blog post.Really looking forward to read more. Cool.
would have to pay him as well as enabling you to make sharp cuts.
I don´t understand anything about Day 8 , but it´s interesting to read. Wine Here
What a data of un-ambiguity and preserveness of precious experience on the topic ofunexpected emotions.
bet flare casino review
prednisolone dose prednisolone gel ofloxacin and prednisolone eye drops what is the difference between prednisone and prednisolone
IziSwap is revolutionizing DeFi trading with unmatched speed and low-cost transactions. https://iziswap.org/
PYNE POD CLICK 10K PRE-FILLED POD 5 X MULTIPACK
F*ckin¦ tremendous issues here. I¦m very happy to look your post. Thank you a lot and i’m taking a look ahead to touch you. Will you please drop me a e-mail?
Purdentix review
Purdentix review
Purdentix reviews
Purdentix review
Purdentix
Purdentix reviews
Purdentix review
Purdentix
Purdentix reviews
A perfect blend of aesthetics and functionality makes browsing a pleasure.
The content is well-organized and highly informative.
I love how user-friendly and intuitive everything feels.
It provides an excellent user experience from start to finish.
The design and usability are top-notch, making everything flow smoothly.
This website is amazing, with a clean design and easy navigation.
The content is engaging and well-structured, keeping visitors interested.
It provides an excellent user experience from start to finish.
This site truly stands out as a great example of quality web design and performance.
A perfect blend of aesthetics and functionality makes browsing a pleasure.
The layout is visually appealing and very functional.
This website is amazing, with a clean design and easy navigation.
It provides an excellent user experience from start to finish.
I’m really impressed by the speed and responsiveness.
I’m really impressed by the speed and responsiveness.
I’m really impressed by the speed and responsiveness.
This website is amazing, with a clean design and easy navigation.
The layout is visually appealing and very functional.
The content is engaging and well-structured, keeping visitors interested.
This is one awesome post.Really looking forward to read more. Awesome.
The content is engaging and well-structured, keeping visitors interested.
A perfect blend of aesthetics and functionality makes browsing a pleasure.
The layout is visually appealing and very functional.
The content is well-organized and highly informative.
Major thanks for the post.Thanks Again. Really Cool.
The design and usability are top-notch, making everything flow smoothly.
The content is engaging and well-structured, keeping visitors interested.
AQUA SCULPT REVIEWS
The content is well-organized and highly informative.
I really like and appreciate your blog.Much thanks again. Will read on…
The design and usability are top-notch, making everything flow smoothly.
The layout is visually appealing and very functional.
The content is engaging and well-structured, keeping visitors interested.
It provides an excellent user experience from start to finish.
The design and usability are top-notch, making everything flow smoothly.
Thanks a lot for the article post.Thanks Again. Much obliged.
I love how user-friendly and intuitive everything feels.
A perfect blend of aesthetics and functionality makes browsing a pleasure.
Awesome article.Really thank you! Much obliged.
The layout is visually appealing and very functional.
I’m really impressed by the speed and responsiveness.
The design and usability are top-notch, making everything flow smoothly.
I love how user-friendly and intuitive everything feels.
Thank you for your article.Really thank you! Cool.
This website is amazing, with a clean design and easy navigation.
I love how user-friendly and intuitive everything feels.
I love how user-friendly and intuitive everything feels.
I’m really impressed by the speed and responsiveness.
I love how user-friendly and intuitive everything feels.
The content is well-organized and highly informative.
This site truly stands out as a great example of quality web design and performance.
This site truly stands out as a great example of quality web design and performance.
A perfect blend of aesthetics and functionality makes browsing a pleasure.
Muchos Gracias for your blog.Much thanks again. Want more.
The layout is visually appealing and very functional.
I’m really impressed by the speed and responsiveness.
The content is well-organized and highly informative.
This site truly stands out as a great example of quality web design and performance.
I’m really impressed by the speed and responsiveness.
The content is engaging and well-structured, keeping visitors interested.
Analysts : Bitcoin experiencing ‘shakeout,’ not end of 4-year cycle
The design and usability are top-notch, making everything flow smoothly.
I’m really impressed by the speed and responsiveness.
Hi there, i read your blog from time to
time and i own a similar one and i was just curious if you get a lot of spam comments?
If so how do you stop it, any plugin or anything you can suggest?
I get so much lately it’s driving me crazy so any help is
very much appreciated.
The design and usability are top-notch, making everything flow smoothly.
ICE WATER HACK FOR WEIGHT LOSS
This is a topic that’s near to my heart… Many thanks! Where are your contact details though?
What’s up, the whole thing is going sound here and ofcourse every one is sharing facts, that’s in fact excellent, keep up writing.
Arbitrum whales transfer $18.5M in tokens following $2.3B unlock
The content is well-organized and highly informative.
Enjoyed every bit of your blog post.Really thank you! Great.
The content is engaging and well-structured, keeping visitors interested.
Rocket Pool’s Ethereum staking service reaches $1B in TVL
The design and usability are top-notch, making everything flow smoothly.
Very neat article.Thanks Again. Awesome.
It provides an excellent user experience from start to finish.
Ethereum Foundation confirm $1.25M to Tornado Cash defense
Vausen – sildenafil generic mexico Yrdvfa pwgixc
Muchos Gracias for your blog.Thanks Again. Keep writing.
I really liked your blog article. Great.
I love how user-friendly and intuitive everything feels.
I needed to thank you for this excellent read!! I certainly loved every little bit of it. I have got you saved as a favorite to look at new stuff you postÖ
Major thanks for the blog post.Much thanks again. Awesome.
anonymous bitcoin casinos without deposit
It provides an excellent user experience from start to finish.
really fulfilling. Vermont has always been my living place although i will ought to move in a year or few
Thanks for sharing your thoughts on 온라인카지노.Regards
You could certainly see your enthusiasm in the workyou write. The arena hopes for even more passionate writerssuch as you who aren’t afraid to say how they believe.Always go after your heart.
Thanks again for the blog article. Want more.
US Bitcoin reserve prompts $370 million in ETF outflows: Farside
A big thank you for your blog. Fantastic.
This website is amazing, with a clean design and easy navigation.
Thanks for the blog article. Awesome.
Do you have any video of that? I’d like to find out more details.
The layout is visually appealing and very functional.
Phantom takes second spot in Apple’s US App Store utilities category
I love how user-friendly and intuitive everything feels.
You made some nice points there. I did a search on the subject matter and found most guys will go along with with your site.
I’m really impressed by the speed and responsiveness.
Hey, thanks for the article.Thanks Again. Keep writing.
Elon Musk’s X eyeing capital raise at $44B valuation: Report
Why visitors still use to read news papers when in this technological globe everything is accessible on web?
Very good article.Really thank you! Cool.
US Bitcoin reserve prompts $370 million in ETF outflows: Farside
This site truly stands out as a great example of quality web design and performance.
I truly appreciate this blog.Really thank you! Awesome.
This website is amazing, with a clean design and easy navigation.
Analysts : Bitcoin experiencing ‘shakeout,’ not end of 4-year cycle
The design and usability are top-notch, making everything flow smoothly.
Thank you for your blog article. Want more.
It provides an excellent user experience from start to finish.
Trading Bitcoin’s halving: 3 traders share their thoughts
Trading Bitcoin’s halving: 3 traders share their thoughts
Heya i’m for the primary time here. I found this board and I in finding It truly helpful & ithelped me out much. I hope to offer something again and aid others like you helped me.
Trump Opens 300x Leverage Trade After Call with Putin – Is This the Trade of the Century?
Analysts : Bitcoin experiencing ‘shakeout,’ not end of 4-year cycle
Every expert was once a beginner. Keep pushing forward, and one day, you’ll look back and see how far you’ve come. Progress is always happening, even when it doesn’t feel like it.
Every expert was once a beginner. Keep pushing forward, and one day, you’ll look back and see how far you’ve come. Progress is always happening, even when it doesn’t feel like it.
Open-world games are the best! Nothing beats the feeling of total freedom, exploring vast landscapes, and creating your own adventure.
A good book isn’t just entertainment—it’s a portal to another world. The best stories stay with you long after you’ve turned the last page.
Japan is definitely on my bucket list! The mix of tradition and modernity is fascinating, and the food alone is enough reason to visit.
บริการเช่ารถขากรรไกร
누누티비
I am delighted that I found this blog, exactly the right info that I was searching for! .
I cannot thank you enough for the article post.Really looking forward to read more. Will read on…
I like this website because so much useful stuff on here : D.
Magnificent web site. Plenty of useful information here. I am sending it to several friends ans also sharing in delicious. And obviously, thanks for your sweat!
Thanks for the post.Thanks Again. Much obliged.
Usually I do not read article on blogs, however I would like
to say that this write-up very pressured me to try and do it!
Your writing taste has been surprised me. Thanks, quite great article.
Really appreciate you sharing this article post.Really looking forward to read more. Fantastic.
provigil side effects modafinil generic modafinil pill
Some genuinely interesting details you have written.Assisted mea lot, just what I was searching for :D.Have a look at my blog post making soap
Very neat post.Really looking forward to read more. Really Great.
I besides believe thus, perfectly indited post! .
Hey there! I just wanted to ask if you ever have any trouble with hackers?My last blog (wordpress) was hacked and I ended up losing many months of hard work dueto no back up. Do you have any solutions toprevent hackers?
Tornado Cash – Best Crypto Platform for Protects Your Crypto in 2025
How to Swap Tokens on ApeSwap: A Complete Guide 2025
How to Use Rhino Bridge for Secure and Fast Crypto Transfers
How to Use SpookySwap: A Step-by-Step Guide for DeFi Enthusiasts
Say, you got a nice blog post. Much obliged.
Awesome blog.Much thanks again. Great.
Hi! Would you mind if I share your blog with my zynga group?There’s a lot of people that I think would really enjoy your content.Please let me know. Thank you
Very informative blog.Really thank you! Great.
This week’s alpha
iZiSwap
Really informative post.
I must thank you for the efforts you’ve put in writing this blog. I’m hoping to check out the same high-grade content from you in the future as well. In truth, your creative writing abilities has encouraged me to get my very own blog now 😉
Low fees and instant transactions—perfect for DeFi users.
The cosmos is said to be an ordered place, ruled by laws and principles, yet within that order exists chaos, unpredictability, and the unexpected. Perhaps true balance is not about eliminating chaos but embracing it, learning to see the beauty in disorder, the harmony within the unpredictable. Maybe to truly understand the universe, we must stop trying to control it and simply become one with its rhythm.
The essence of existence is like smoke, always shifting, always changing, yet somehow always present. It moves with the wind of thought, expanding and contracting, never quite settling but never truly disappearing. Perhaps to exist is simply to flow, to let oneself be carried by the great current of being without resistance.
Hello! I’m at work browsing your blog from my new iphone 3gs! Just wanted to say I love reading through your blog and look forward to all your posts! Keep up the excellent work!
These are in fact wonderful ideas in regarding blogging.
The cosmos is said to be an ordered place, ruled by laws and principles, yet within that order exists chaos, unpredictability, and the unexpected. Perhaps true balance is not about eliminating chaos but embracing it, learning to see the beauty in disorder, the harmony within the unpredictable. Maybe to truly understand the universe, we must stop trying to control it and simply become one with its rhythm.
All knowledge, it is said, comes from experience, but does that not mean that the more we experience, the wiser we become? If wisdom is the understanding of life, then should we not chase every experience we can, taste every flavor, walk every path, and embrace every feeling? Perhaps the greatest tragedy is to live cautiously, never fully opening oneself to the richness of being.
All knowledge, it is said, comes from experience, but does that not mean that the more we experience, the wiser we become? If wisdom is the understanding of life, then should we not chase every experience we can, taste every flavor, walk every path, and embrace every feeling? Perhaps the greatest tragedy is to live cautiously, never fully opening oneself to the richness of being.
Friendship, some say, is a single soul residing in two bodies, but why limit it to two? What if friendship is more like a great, endless web, where each connection strengthens the whole? Maybe we are not separate beings at all, but parts of one vast consciousness, reaching out through the illusion of individuality to recognize itself in another.
Virtue, they say, lies in the middle, but who among us can truly say where the middle is? Is it a fixed point, or does it shift with time, perception, and context? Perhaps the middle is not a place but a way of moving, a constant balancing act between excess and deficiency. Maybe to be virtuous is not to reach the middle but to dance around it with grace.
Thank you for your post. Really Great.
All knowledge, it is said, comes from experience, but does that not mean that the more we experience, the wiser we become? If wisdom is the understanding of life, then should we not chase every experience we can, taste every flavor, walk every path, and embrace every feeling? Perhaps the greatest tragedy is to live cautiously, never fully opening oneself to the richness of being.
Even the gods, if they exist, must laugh from time to time. Perhaps what we call tragedy is merely comedy from a higher perspective, a joke we are too caught up in to understand. Maybe the wisest among us are not the ones who take life the most seriously, but those who can laugh at its absurdity and find joy even in the darkest moments.
The cosmos is said to be an ordered place, ruled by laws and principles, yet within that order exists chaos, unpredictability, and the unexpected. Perhaps true balance is not about eliminating chaos but embracing it, learning to see the beauty in disorder, the harmony within the unpredictable. Maybe to truly understand the universe, we must stop trying to control it and simply become one with its rhythm.
A big thank you for your article.Much thanks again. Great.
Love how simple you made cross-chain transfers look.
Smooth demo of how to avoid failed transfers.
Appreciate the heads-up on gas fees and timing.
The visuals really helped make it all click.
Thanks-a-mundo for the blog article.Much thanks again.
I really enjoy the blog article.Much thanks again. Keep writing.
I’m really impressed with your writing skills and also with the layout on your blog. Is this a paid theme or did you customize it yourself? Either way keep up the excellent quality writing, it is rare to see a nice blog like this one nowadays.
Neat blog! Is your theme custom made or did you download
it from somewhere? A design like yours with a few simple adjustements would really make
my blog stand out. Please let me know where you got your design. With thanks
It’s truly a great and useful piece of info.
I am glad that you simply shared this useful info
with us. Please keep us up to date like this. Thanks for sharing.
Hi there mates, its enormous piece of writing regarding educationand fully defined, keep it up all the time.
Thanks for sharing, this is a fantastic blog post.Really thank you! Great.
Your style is unique in comparison to other people I’ve
read stuff from. Thanks for posting when you have the opportunity,
Guess I will just bookmark this page.
Magnificent web site. A lot of useful information here.
I’m sending it to some pals ans also sharing in delicious.
And obviously, thank you in your sweat!
Virtue, they say, lies in the middle, but who among us can truly say where the middle is? Is it a fixed point, or does it shift with time, perception, and context? Perhaps the middle is not a place but a way of moving, a constant balancing act between excess and deficiency. Maybe to be virtuous is not to reach the middle but to dance around it with grace.
Great beat ! I wish to apprentice at the same time as you amend your website,
how can i subscribe for a blog website? The account helped me a
acceptable deal. I were a little bit acquainted of this your broadcast provided bright transparent idea
Pretty nice post. I just stumbled upon your blog and wanted to say that
I have really enjoyed browsing your blog posts.
In any case I’ll be subscribing to your rss feed and I hope you write again soon!
Hi! Do you know if they make any plugins to assist
with Search Engine Optimization? I’m trying to get my blog to rank
for some targeted keywords but I’m not seeing very good success.
If you know of any please share. Appreciate it!
Solid was full of solid breakdowns for anyone looking
to get legit genetics. Learned a lot here.
you are in reality a good webmaster. The web site loading
velocity is amazing. It kind of feels that you are doing any
unique trick. Also, The contents are masterwork.
you’ve performed a great process in this subject!
Attractive component to content. I simply stumbled upon your blog and in accession capital
to say that I acquire in fact enjoyed account your blog posts.
Any way I will be subscribing for your feeds and even I success you get right
of entry to persistently fast.
It’s really a nice and helpful piece of information. I am glad that you shared this useful information with us.
Please keep us up to date like this. Thanks for sharing.
Hi there, everything is going sound here and ofcourse every one is sharing
data, that’s in fact fine, keep up writing.
Can you tell us more about this? I’d like to find out some additional information.
I value the article.Thanks Again.
Everyone loves it when people get together and share views.
Great blog, continue the good work!
Its like you read my mind! You appear to know a lot about
this, like you wrote the book in it or something. I
think that you could do with some pics to drive the message home a little bit, but other
than that, this is excellent blog. A great read.
I will definitely be back.
I got this web page from my friend who informed me concerning this
website and now this time I am visiting this web site and reading very informative articles or reviews here.
Appreciate you sharing, great blog post. Want more.
Now I can move assets faster and cheaper—huge plus.
This could be like catching Arbitrum or ENS early.
The visuals and examples really helped me understand IL.
Great blog here! Also your site loads up very fast!
What web host are you using? Can I get your affiliate link to your host?
I wish my web site loaded up as quickly as yours lol
WOW just what I was looking for. Came here by searching for situs slot gacor
Im thankful for the post. Keep writing.
Great article.
Thanks again for the blog.Thanks Again.
If you are going for most excellent contents like me, simply pay a quick visit this website everyday since it
gives quality contents, thanks
Thankfulness to my father who stated to me about this web site,
this web site is truly amazing.
It’s hard to find well-informed people on this subject, but you seem like you know what you’re talking
about! Thanks
Major thanks for the blog.Really looking forward to read more. Cool.
We absolutely love your blog and find nearly all of
your post’s to be precisely what I’m looking for. Do you offer guest writers to write content for yourself?
I wouldn’t mind creating a post or elaborating on most of the subjects you write
concerning here. Again, awesome web site!
Fantastic beat ! I would like to apprentice at the same time as you amend your website, how
can i subscribe for a weblog web site? The account aided me a acceptable deal.
I had been a little bit familiar of this your broadcast provided bright
clear concept
Good day! This is my first visit to your blog! We are a group of volunteers and starting a new initiative in a communityin the same niche. Your blog provided us useful information to work on. You have done awonderful job!
Im grateful for the post.Really thank you! Really Cool.
I loved your blog post.Really looking forward to read more. Really Cool.
I do agree with all the ideas you have presented in your post.They are really convincing and can definitely work. Still, the postsare very quick for novices. May you please lengthen them a little from subsequent time?Thanks for the post.
Appreciate you sharing, great article. Fantastic.
I am extremely impressed with your writing skills as well as with
the layout on your blog. Is this a paid theme or did you customize
it yourself? Anyway keep up the excellent quality writing, it is rare to
see a nice blog like this one these days.
Really informative article post.Really thank you! Fantastic.
Im thankful for the blog.Really looking forward to read more. Much obliged.Loading…
It’s the best time to make some plans for the long run and it is time
to be happy. I’ve learn this put up and if I may just I
desire to suggest you some attention-grabbing things or suggestions.
Perhaps you could write next articles referring to this article.
I want to read more issues about it!
I really enjoy the blog post. Much obliged.
This post is genuinely a fastidious one it assists new web users,
who are wishing in favor of blogging.
Pretty nice post. I just stumbled upon your blog and wanted to say that I have really enjoyed browsing your blog posts.
After all I will be subscribing to your feed and I hope
you write again very soon!
Thanks again for the article. Great.
I got this site from my friend who told me about this web site and at the moment this time I am
visiting this website and reading very informative content at this place.
Looking forward to reading more. Great blog post. Cool.
It’s very effortless to find out any matter on web as compared to books, as I found this piece of writing at this web page.
Its not my first time to pay a quick visit this web site, i am browsing this site dailly
and obtain good facts from here daily.
Im obliged for the article.Really thank you! Much obliged.
I get pleasure from, lead to I discovered exactly what I used to
be looking for. You’ve ended my four day long hunt!
God Bless you man. Have a great day. Bye
Looking forward to reading more. Great post. Cool.
Dani Alves is one of the club’s most successful players. He has been with the team since 2008-2016, playing a total of 391 games, scoring 21 goals, winning 23 major trophies over eight years with the La Furia Roja club.
Hello I am so grateful I found your website,
I really found you by error, while I was browsing on Aol for something else, Nonetheless I am here now
and would just like to say cheers for a marvelous post and a all round interesting blog (I also
love the theme/design), I don’t have time to browse it all at the moment but
I have saved it and also added your RSS feeds, so when I have time I will
be back to read a lot more, Please do keep up the excellent work.
It’s awesome to pay a visit this web site and reading the views of
all mates concerning this post, while I am also keen of getting know-how.
I value the blog post. Keep writing.
Greetings! I know this is kind of off topic but I was wondering which blog platform are you using for this website?
I’m getting sick and tired of WordPress because I’ve
had problems with hackers and I’m looking at alternatives for
another platform. I would be awesome if you could point me in the direction of a good platform.
Hey! Do you know if they make any plugins to help with Search Engine
Optimization? I’m trying to get my blog to rank for some targeted keywords but
I’m not seeing very good success. If you know of any please
share. Appreciate it!
amoxicillin no script500g amoxicillincan you purchase amoxicillin in mexico Sah joync
Friendship, some say, is a single soul residing in two bodies, but why limit it to two? What if friendship is more like a great, endless web, where each connection strengthens the whole? Maybe we are not separate beings at all, but parts of one vast consciousness, reaching out through the illusion of individuality to recognize itself in another.
Good day! Do you use Twitter? I’d like to follow you if that would be okay.
I’m absolutely enjoying your blog and look forward to new posts.
Thank you for the good writeup. It in fact was a enjoyment account
it. Look complicated to far brought agreeable from you!
However, how could we be in contact?
My partner and I absolutely love your blog and find nearly all of your post’s to be precisely what I’m looking for.
can you offer guest writers to write content available for you?
I wouldn’t mind creating a post or elaborating on most of
the subjects you write related to here. Again, awesome web log!
My spouse and I absolutely love your blog and find a lot of your post’s to be just what I’m
looking for. Would you offer guest writers to write content
for you? I wouldn’t mind writing a post or elaborating on a number
of the subjects you write regarding here. Again,
awesome website!
Im obliged for the blog.Much thanks again. Keep writing.
Every weekend i used to pay a visit this website, as i wish for enjoyment, since this this site conations actually good funny data too.
I truly appreciate this blog.Thanks Again. Awesome.
Hello there! I could have sworn I’ve visited this site before but after looking at many
of the articles I realized it’s new to me.
Anyways, I’m certainly happy I discovered it and I’ll be book-marking it and checking back regularly!
Hello my loved one! I wish to say that this post is amazing, great written and
come with almost all vital infos. I’d like to look extra posts like this
.
If you are going for finest contents like me, simply
go to see this web page everyday since it presents feature contents, thanks
Thanks-a-mundo for the blog post.Much thanks again. Much obliged.
If some one wants expert view regarding running a blog after that i propose him/her to
pay a visit this weblog, Keep up the nice job.
Hi there, yup this piece of writing is actually fastidious and I have learned lot of things fromit regarding blogging. thanks.
Incredible story there. What occurred after?
Good luck!
Hello, i think that i saw you visited my weblog thus i came to
“return the favor”.I’m attempting to find things to improve my web site!I suppose
its ok to use a few of your ideas!!
I wanted to thank you for this fantastic read!! I definitely loved every little bit of it. I have got you book marked to check out new stuff you postÖ
I’m really enjoying the design and layout of
your site. It’s a very easy on the eyes which makes it much more pleasant for me to come here and visit
more often. Did you hire out a developer to create your theme?
Outstanding work!
I just like the helpful info you supply on your articles.
I will bookmark your weblog and take a look at again right here regularly.
I’m slightly sure I will be informed many new stuff right right
here! Good luck for the following!
Muchos Gracias for your article.Much thanks again.
I pay a quick visit each day a few blogs and information sites to read content, but this weblog offers feature based content.
Hey I know this is off topic but I was wondering if you knew of
any widgets I could add to my blog that automatically tweet my newest twitter updates.
I’ve been looking for a plug-in like this for quite some time and was hoping maybe you would have some experience with something like
this. Please let me know if you run into anything.
I truly enjoy reading your blog and I look forward to your new updates.
I am always searching online for articles that can help me. Thx!
I like what you guys are up too. This sort of clever work and reporting!
Keep up the excellent works guys I’ve included you guys to my own blogroll.
Good way of telling, and good piece of writing to get information regarding my
presentation topic, which i am going to present in university.
This design is wicked! You certainly know how to keep a reader entertained.
Between your wit and your videos, I was almost moved to start my own blog (well, almost…HaHa!) Excellent
job. I really enjoyed what you had to say, and more than that, how you presented it.
Too cool!
Usually I don’t read article on blogs, but I would like to say that this write-up very forced me to try and do so! Your writing style has been amazed me. Thanks, quite nice article.
Right here is the right web site for everyone who hopes to find out about this topic.
You understand a whole lot its almost tough to argue with you (not that I
actually will need to…HaHa). You definitely put a new spin on a subject
which has been written about for decades. Great stuff, just
great!
I for all time emailed this blog post page to all my
friends, for the reason that if like to read it after
that my friends will too.
Friendship, some say, is a single soul residing in two bodies, but why limit it to two? What if friendship is more like a great, endless web, where each connection strengthens the whole? Maybe we are not separate beings at all, but parts of one vast consciousness, reaching out through the illusion of individuality to recognize itself in another.
Marvelous, what a weblog it is! This blog presents helpful facts to us,
keep it up.
I enjoy what you guys are usually up too. This kind of clever work and coverage!
Keep up the terrific works guys I’ve included you guys to blogroll.
Thanks in favor of sharing such a pleasant opinion, piece of writing is pleasant, thats why i have read it entirely
When I originally left a comment I appear to have
clicked the -Notify me when new comments are added- checkbox and from now on every time a comment is added
I receive 4 emails with the same comment. Is there a
means you can remove me from that service?
Thank you!
Thanks for the concepts you talk about through your blog. In addition, several young women who seem to become pregnant never even try and get medical insurance because they fear they might not qualify. Although many states today require that insurers present coverage despite the pre-existing conditions. Rates on these kinds of guaranteed programs are usually larger, but when thinking about the high cost of medical care bills it may be a safer way to go to protect one’s financial potential.
Great post.
Really appreciate you sharing this article.Really thank you! Cool.
I will right away seize your rss feed as I
can’t to find your email subscription hyperlink or newsletter service.
Do you’ve any? Kindly allow me know in order that I could subscribe.
Thanks.
This is my first time visit at here and i am genuinely impressed to read everthing at one place.
Hello There. I found your blog using msn. This is a really well written article.
I’ll make sure to bookmark it and come back to read more of your useful information. Thanks for the post.
I will certainly comeback.
My brother recommended I might like this web site.
He was once totally right. This put up actually made my day.
You can not imagine just how much time I had spent for this info!
Thank you!
Thanks for sharing, this is a fantastic post.Much thanks again. Awesome.
Thanks for the good writeup. It in reality was once a leisure account it.
Look complex to far delivered agreeable from you! By the way, how can we be in contact?
I think this is a real great post. Really Cool.
Your style is very unique in comparison to other people I
have read stuff from. Thank you for posting when you have the opportunity, Guess I will just book mark this web site.
Thanks again for the article.Much thanks again. Will read on…
I appreciate you sharing this blog post.Really looking forward to read more. Want more.
Asking questions are truly fastidious thing if you are not understanding
something entirely, but this article gives fastidious understanding yet.
I am so grateful for your blog post.Much thanks again. Keep writing.
I am sure this post has touched all the internet visitors,
its really really nice piece of writing on building up
new blog.
A round of applause for your post.Much thanks again. Great.
I think this is one of the most vital information for me.
And i’m glad reading your article. But wanna remark on some general things,
The website style is wonderful, the articles is really great : D.
Good job, cheers
Way cool! Some very valid points! I appreciate you writing this write-up plus
the rest of the site is very good.
I am in fact happy to glance at this blog posts which carries plenty of helpful facts, thanks for providing
such data.
Good day! This is kind of off topic but I need some help from an established blog.
Is it very difficult to set up your own blog?
I’m not very techincal but I can figure things out pretty quick.
I’m thinking about making my own but I’m not sure where
to start. Do you have any ideas or suggestions?
With thanks
When I initially commented I clicked the “Notify me when new comments are added” checkbox and
now each time a comment is added I get three emails with
the same comment. Is there any way you can remove people from that service?
Thanks!
wonderful points altogether, you just gained a logo
new reader. What would you suggest in regards to your post that you just made some days ago?
Any positive?
When someone writes an paragraph he/she retains the idea of a user in his/her
mind that how a user can be aware of it. Therefore that’s why this paragraph is perfect.
Thanks!
What i don’t realize is in fact how you are no longer really much more smartly-favored than you might be now.
You are very intelligent. You already know thus considerably with
regards to this subject, produced me in my opinion consider it from a lot of numerous angles.
Its like men and women aren’t interested until it is one thing to
accomplish with Lady gaga! Your individual stuffs excellent.
Always deal with it up!
indian pharmacies safe pharmacy clothes store
I have read several good stuff here. Definitely worth bookmarking for revisiting. I wonder how much effort you put to make such a great informative website.
Link exchange is nothing else but it is just placing the other person’s
website link on your page at suitable place and other person will also do same in support
of you.
I love your blog.. very nice colors & theme. Did you make this website yourself or did you hire someone to do it for you? Plz reply as I’m looking to create my own blog and would like to know where u got this from. kudos
You can definitely see your expertise within the paintings you write. The world hopes for even more passionate writers like you who are not afraid to mention how they believe. All the time follow your heart.
I every time used to study piece of writing in news
papers but now as I am a user of net thus from now I am using net for articles or reviews, thanks to web.
Do you mind if I quote a few of your posts as long as I provide
credit and sources back to your site? My website is in the very same area
of interest as yours and my users would definitely benefit from a lot of the information you
provide here. Please let me know if this okay with you.
Thank you!
Thank you for any other magnificent article. Where else may anybody get that kind of
info in such a perfect way of writing? I have a presentation next week,
and I’m at the look for such information.
Fantastic items from you, man. I have be aware your stuff prior to
and you are just too excellent. I actually like what you’ve acquired here,
really like what you’re saying and the best way through which you are saying it.
You make it entertaining and you continue to take care of to stay it smart.
I cant wait to learn far more from you. That is actually a great site.
When I initially commented I appear to have
clicked on the -Notify me when new comments are added- checkbox and now every
time a comment is added I get four emails with the exact same
comment. There has to be a way you are able to remove me from that service?
Thanks a lot!
hey there and thank you for your info – I have certainly picked up something new from right here.
I did however expertise a few technical points using
this site, as I experienced to reload the web site many times previous to
I could get it to load properly. I had been wondering if your hosting is OK?
Not that I’m complaining, but slow loading instances times will sometimes affect your placement in google
and can damage your high quality score if advertising and marketing with Adwords.
Anyway I am adding this RSS to my e-mail and could look out for much
more of your respective fascinating content. Make sure you update this again soon.
What’s Going down i am new to this, I stumbled
upon this I’ve discovered It positively useful and it has helped
me out loads. I am hoping to give a contribution & help
other customers like its helped me. Great job.
Informative article, totally what I wanted to find.
Hello there, There’s no doubt that your web site could possibly be having internet browser compatibility issues.
Whenever I take a look at your website in Safari, it looks
fine but when opening in Internet Explorer, it has some overlapping issues.
I simply wanted to give you a quick heads up! Aside from that, excellent
website!
Itís difficult to find well-informed people about this topic, but you sound like you know what youíre talking about! Thanks
If you are going for most excellent contents like me, simply visit this web site every day because it offers feature contents, thanks
When some one searches for his essential thing, so he/she desires
to be available that in detail, so that thing is maintained over here.
Thank you for your post.Really looking forward to read more. Cool.
Hey there! Do you know if they make any plugins to protect against hackers?
I’m kinda paranoid about losing everything I’ve worked hard on. Any tips?
hi!,I like your writing so much! share we communicate more about your article on AOL? I require an expert on this area to solve my problem. Maybe that’s you! Looking forward to see you.
I have been browsing online more than three hours today,
yet I never found any interesting article like yours. It’s pretty worth enough for me.
In my opinion, if all site owners and bloggers made good content as you did, the internet
will be much more useful than ever before.
Everyone loves what you guys are up too. This sort of clever work and reporting! Keep up the terrific works guys I’ve you guys to blogroll.
Lift detox
Thanks very interesting blog!
Greetings! Very helpful advice in this particular post!It’s the little changes that produce the largest changes.Thanks for sharing!
I believe everything published was very reasonable. But, what
about this? suppose you added a little information? I ain’t suggesting your information is not solid., however suppose you
added a title that grabbed folk’s attention? I mean Instagram Basic Display API: Obtaining an Access Token – Justin Stolpe is a little boring.
You ought to look at Yahoo’s home page and note how they write news headlines to
get people to click. You might add a video or a related pic or two to get readers interested about everything’ve written. Just my
opinion, it would make your blog a little bit more interesting.
Hi there! I could have sworn I’ve been to this website before but after checking through some of
the post I realized it’s new to me. Anyhow, I’m definitely
happy I found it and I’ll be bookmarking and checking back often!
bookmarked!!, I like your blog!
Hey there! Someone in my Facebook group shared this website with us so I
came to take a look. I’m definitely loving the information. I’m book-marking and will be tweeting this to my followers!
Fantastic blog and wonderful design and style.
Really appreciate you sharing this blog.Really looking forward to read more. Really Cool.
Link exchange is nothing else but it is only placing the other person’s blog link on your page at
proper place and other person will also do similar in favor of you.
ed treatment pills: ed pills comparison – injections for ed
There’s a kind of quiet beauty in your words — they don’t shout for attention, but they capture it nonetheless.
Itís hard to find experienced people about this subject, but you sound like you know what youíre talking about! Thanks
I love reading through an article that will make men and women think. Also, many thanks for permitting me to comment!
When I initially commented I clicked the “Notify me when new comments are added” checkbox and now each time a comment is added I get several e-mails with the same comment.
Is there any way you can remove people from that service?
Many thanks!
express scripts pharmacy erectile dysfunction medications – pharmacypharmacy home delivery
Hi there Amazing! Its really awesome paragraph, I have got much clear idea regarding from this post. vielen dank
It’s a shame you don’t have a donate button! I’d
most certainly donate to this brilliant blog! I suppose for now i’ll settle for bookmarking and adding
your RSS feed to my Google account. I look forward
to fresh updates and will talk about this website with my Facebook group.
Talk soon!
Asking questions are really good thing if you are not understanding anything totally, but this post presents pleasant understanding even.
Everyone loves what you guys are up too. This sort of clever
work and coverage! Keep up the fantastic works
guys I’ve incorporated you guys to my blogroll.
I really enjoy the blog.Really thank you! Fantastic.
Thank you ever so for you blog post.Much thanks again. Will read on…
Hello there! This post could not be written any better! Reading through this article reminds me of my previous roommate! He always kept preaching about this. I’ll forward this post to him. Fairly certain he will have a good read. Thanks for sharing!
sildenafil tablet in india
Greetings! Very helpful advice within this post!It is the little changes that produce the most significant changes.Many thanks for sharing!
Hi, this weekend is fastidious for me, for the reason that thistime i am reading this fantastic informative piece of writing here at my home.
I conceive you have observed some very interesting points , thanks for the post.
Yesterday, while I was at work, my cousin stole my iPad and
tested to see if it can survive a 25 foot drop, just so she can be a youtube sensation.
My iPad is now destroyed and she has 83 views. I know this is entirely off topic but I had to share it with someone!
Ill right away snatch your rss as I can not in finding your e-mail subscription hyperlink or e-newsletter service. Do you’ve any? Please let me recognize in order that I may subscribe. Thanks.
Looking forward to reading more. Great article. Great.
I love it whenever people get together and share views. Great blog, stick with it!
Hello, always i used to check blog posts here early in the dawn, since i love to find out more andmore.
Ahaa, its fastidious discussion about this paragraph at this
place at this website, I have read all that, so at this time me also commenting at this
place.
Super great article. I’ll return to view more. Thanks for creating it.
Really informative article post.Thanks Again. Keep writing.
Hello There. I found your blog using msn. This is an extremely well
written article. I’ll make sure to bookmark it and come back to read more of your useful information.
Thanks for the post. I’ll definitely comeback.
Wow, this post is fastidious, my sister is analyzing such things,
thus I am going to let know her.
Hey, thanks for the blog article.Really looking forward to read more. Keep writing.
You actually make it seem so easy with your presentation however I to find this topic to be actually one thing which I think I might never understand.
It seems too complicated and extremely broad for me.
I’m taking a look ahead to your next submit, I’ll try to get the cling of it!
I really liked your blog post.Much thanks again. Will read on…
This post offers clear idea for the new visitors of blogging, that actually how to do blogging.
Heya are using WordPress for your blog platform? I’m new to the blog world but I’m trying to get started and set up my own. Do you need any coding knowledge to make your own blog? Any help would be really appreciated!
A round of applause for your post.Really thank you! Will read on…
I like reading through an article that can make people think. Also, thanks for allowing me to comment!
Wonderful blog! I found it while searching on Yahoo News. Do you have
any tips on how to get listed in Yahoo News?
I’ve been trying for a while but I never seem to get there!
Cheers