
In this post we will be putting our website online for the world to see! In order to get our website online we need a domain and web hosting.
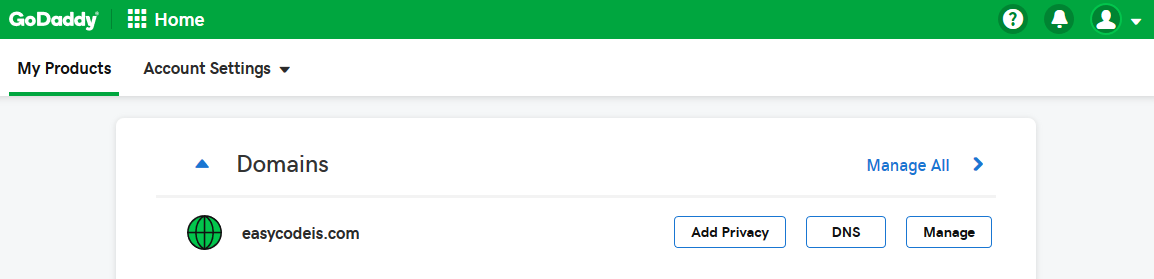
Step 1: Purchase Domain Name
Head over to godaddy.com and search for a domain name. If you find a domain name you like, and the name is available, proceed to checkout immediately as we only have minutes before it gets snatched up by someone else. Once you have purchased your domain, it will show up under My Products > Domains.
Step 2: Purchase Web Hosting
Now that we have a domain name, we need a server to host our website. The web hosting server is where our website will live. We will then point the domain we bought on godaddy to our web hosting server. There are many web hosting providers out there like hostgator, siteground, bluehost. I am going with hostgator since that is what I use but you can use which ever you prefer. For a simple website, they all will work just fine.

Step 3: Point Domain to Web Hosting
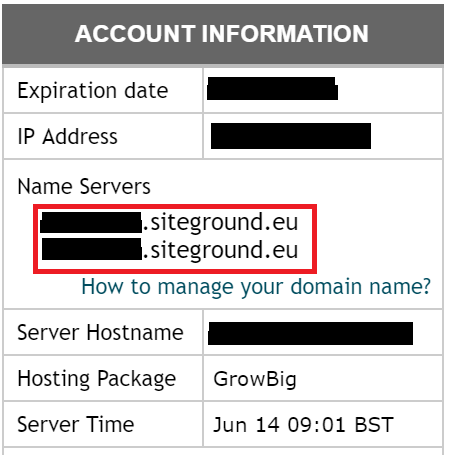
After you purchase web hosting, login to the cpanel (control panel) and look for the two name servers. No matter what provider you go with they will always show you the name servers. Here are a few examples of what to look for in the cpanel.
Hostgator example

Siteground example
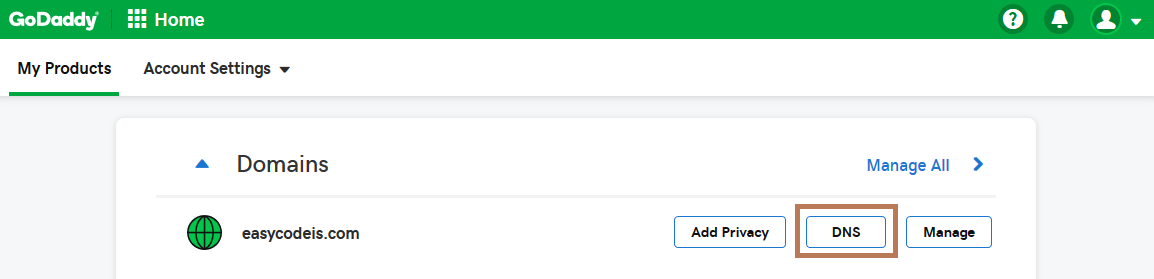
Once you find the name servers in the cpanel, copy them, head back over to godaddy, and click on the DNS button for the domain purchased.
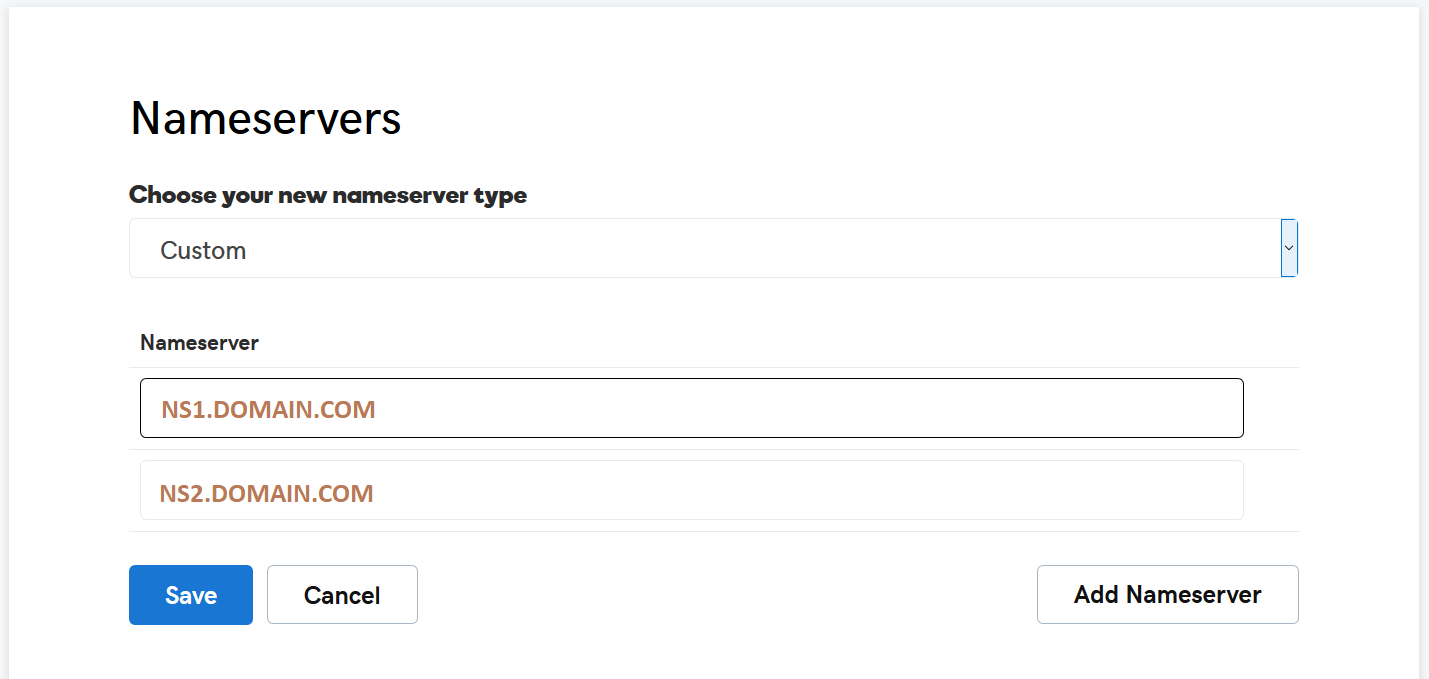
In the DNS Management section under Nameservers, update the two name servers with the name servers from the web hosting provider and click save. This tells the domain to serve up the website from our web hosting provider where our website will live.
Step 4: Create a FTP User
An FTP (File Transfer Protocol) user is required to transfer files to our web server. We can setup FTP users in out cpanel.
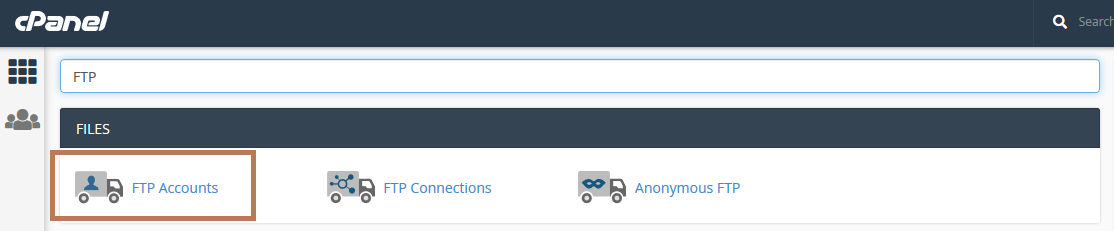
Find the FTP Accounts in the cpanel.
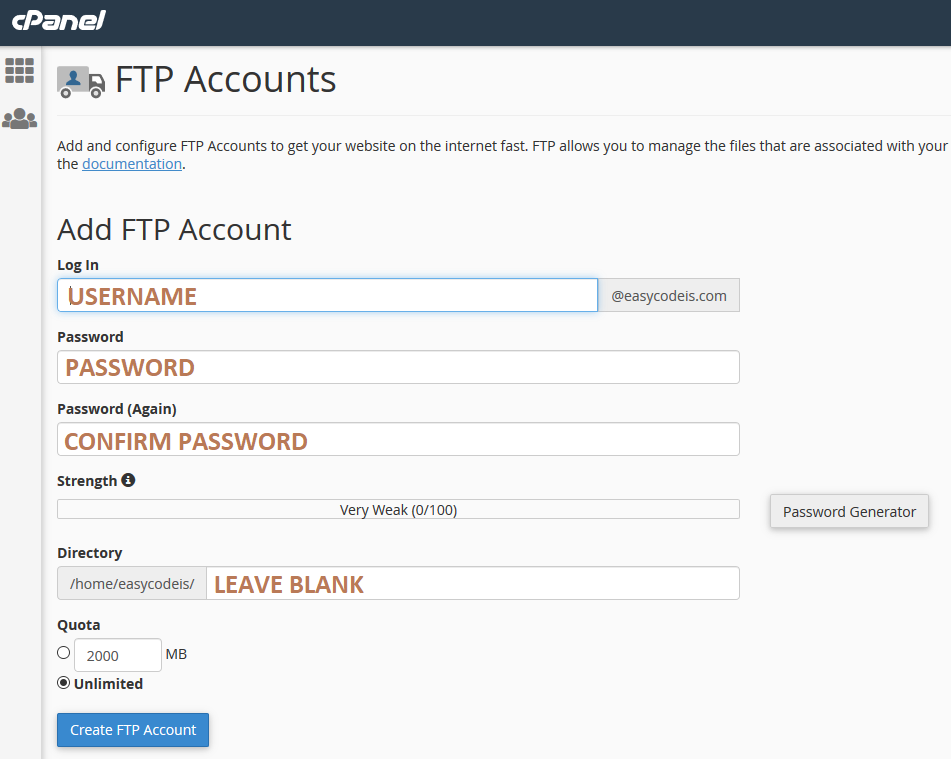
Fill out the Add FTP Account form and click Create. Now we have an FTP account we can use to access our web server and update files for our website.
Step 5: Connecting to Our Web Server
Using the FTP account we created we can now access our web server. To do this, I am going to be using FileZilla, it can be downloaded here https://filezilla-project.org/.
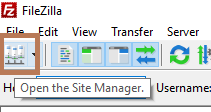
Once FileZilla is installed, run it, and click on the “Open Site Manager” icon right in the top left corner.
In the pop up, click on New Site, and enter the FTP account credentials we setup in Step 4.
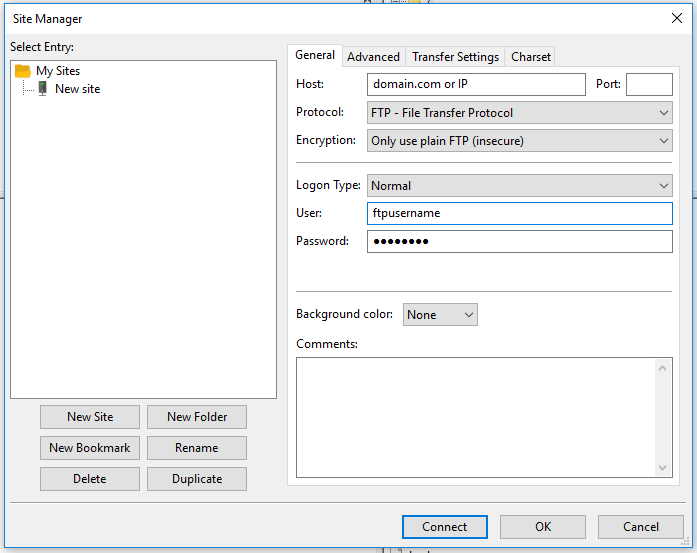
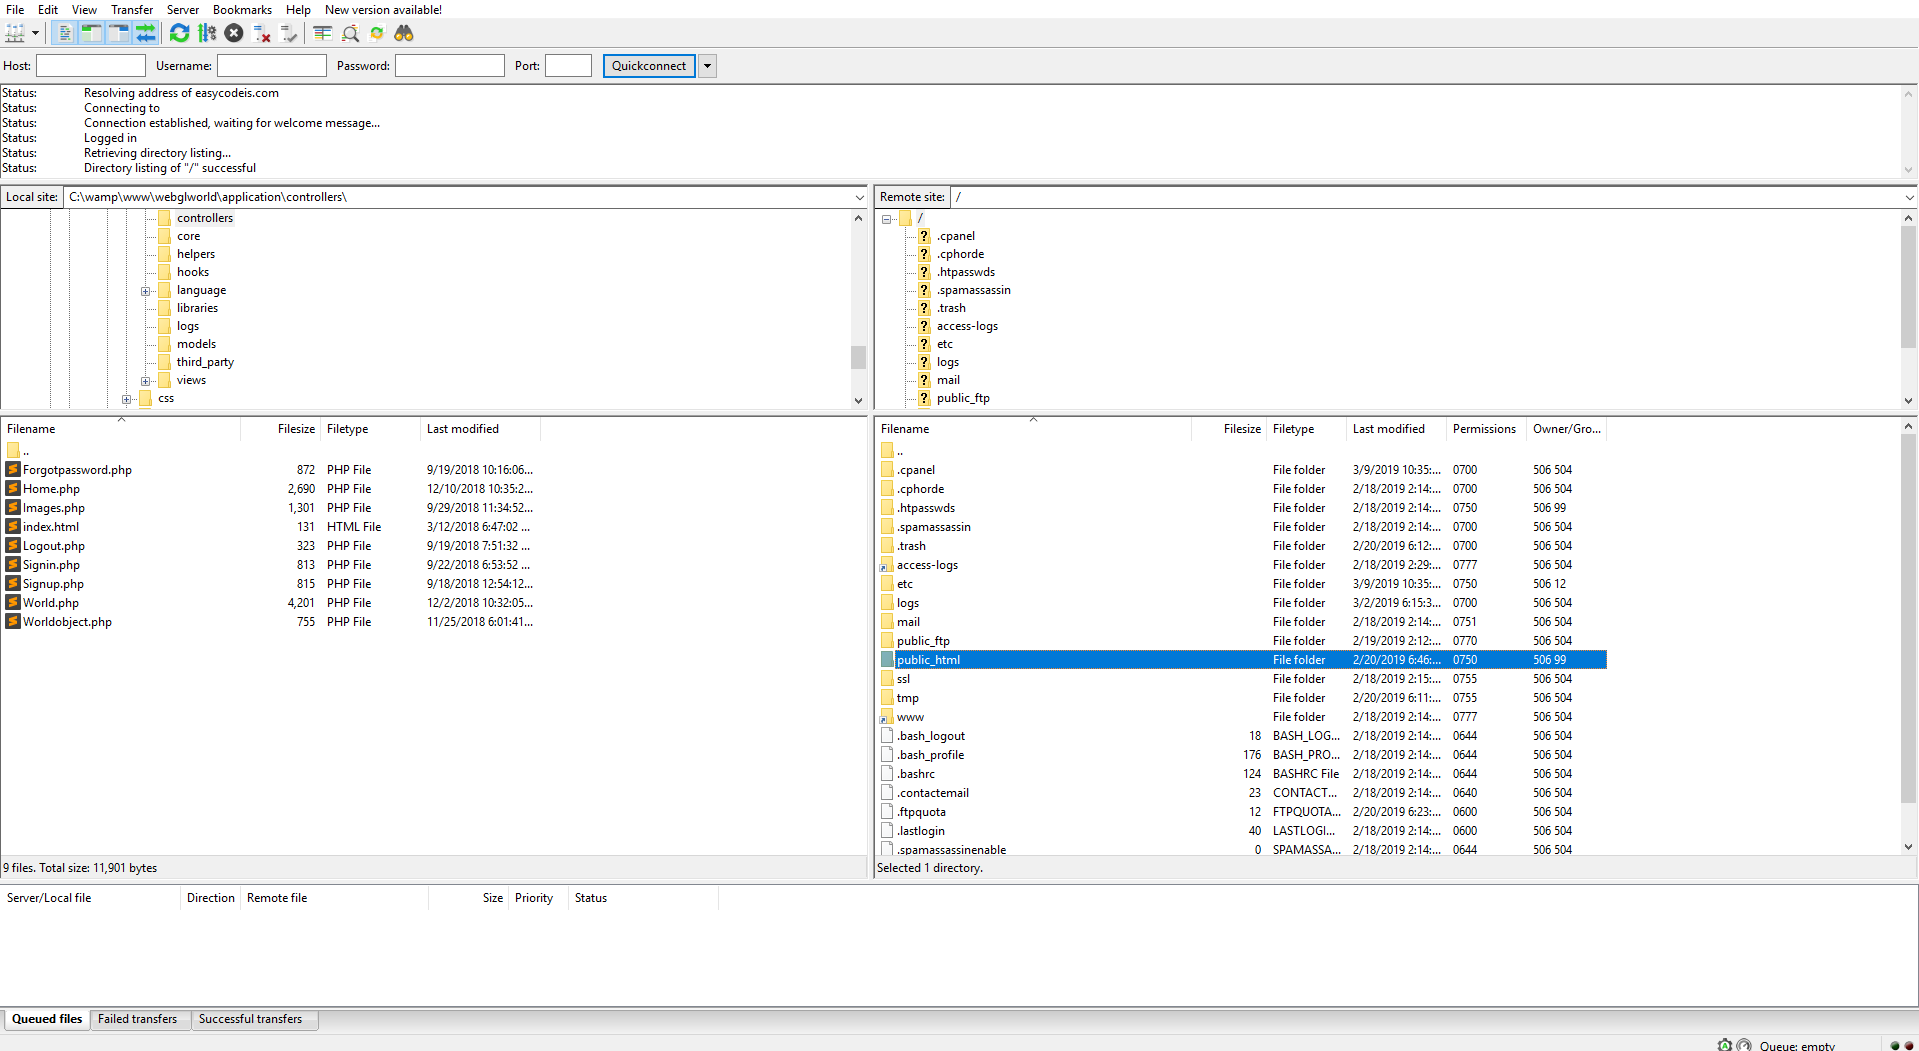
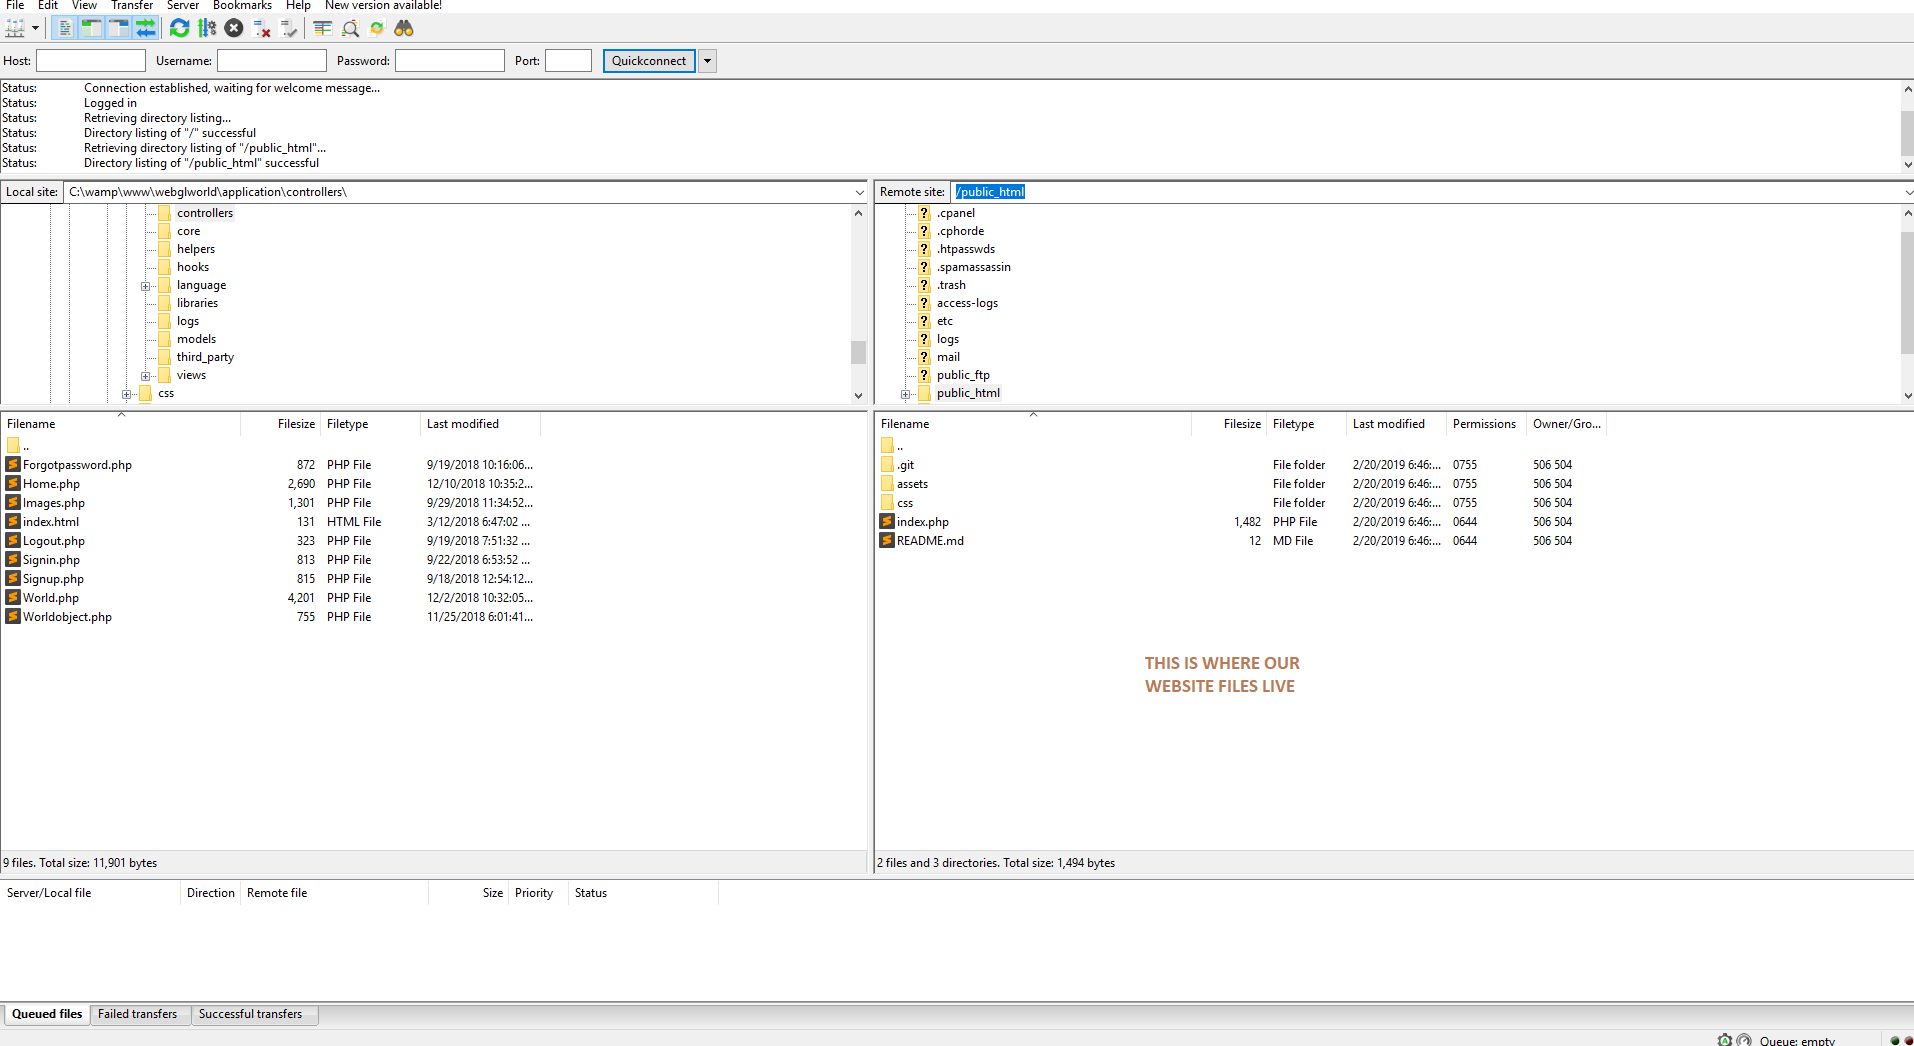
Click connect and FileZilla will connect us to our web hosting server. The bottom right container will display the files currently on the server. The public_html folder is where our website files need to be uploaded. Click on the public_html folder to open it.
Once inside the public_html folder, drag and drop the website files from your computer into the public_html folder. FileZilla will begin uploading the files to the server and notify you when it has completed the transfer.
Step 6: Verify Our Site is Live
Open up a web browser and go to the purchased domain.
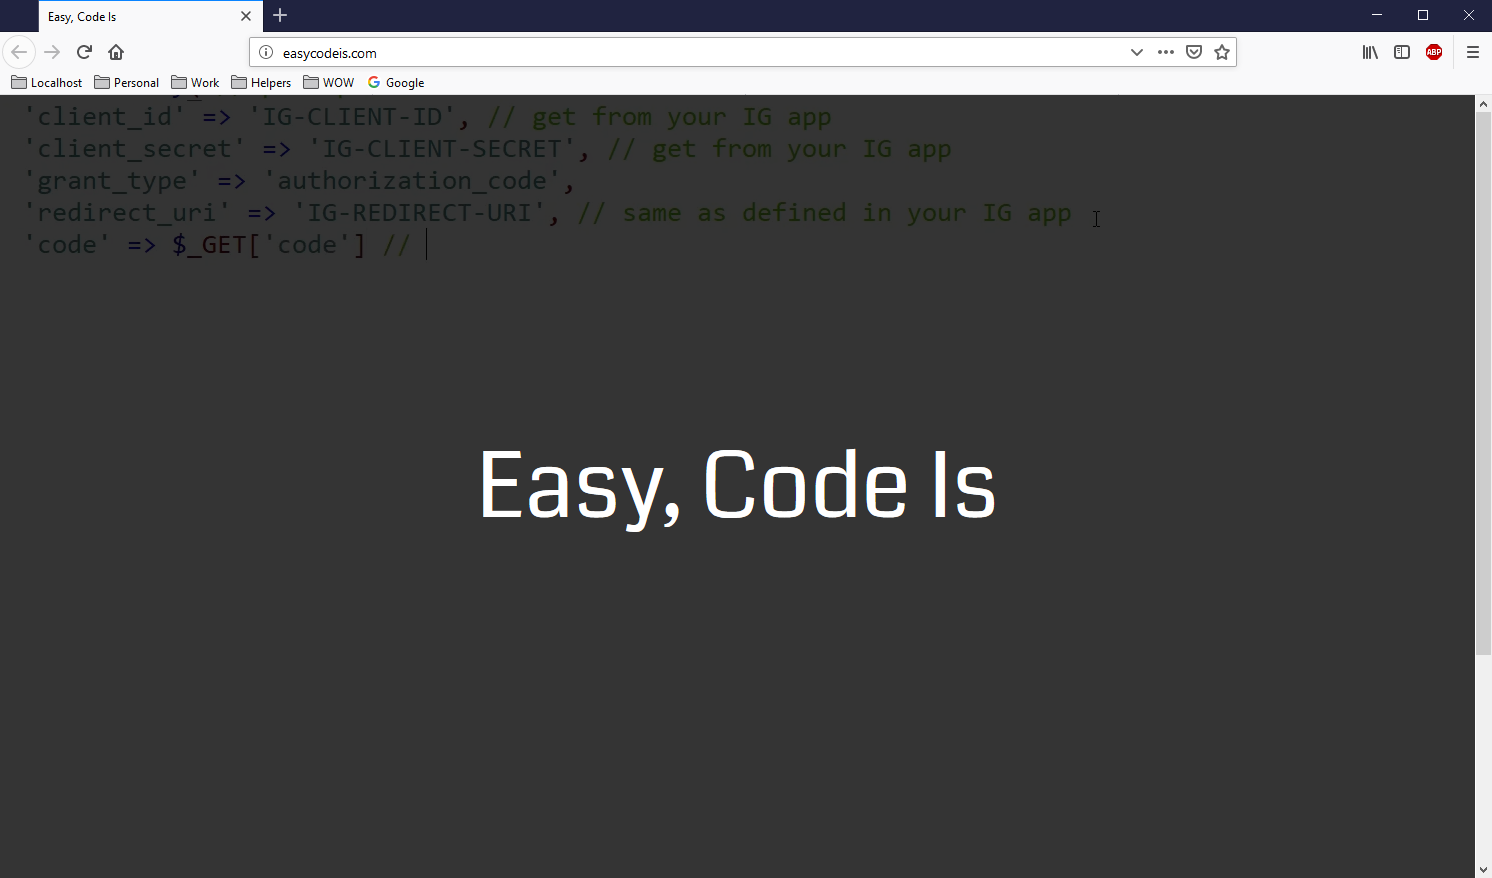
Our site is now live for the world to see! Here is a quick recap of what we did in order to put our website online.
- Purchased a domain name.
- Purchased web hosting.
- Pointed our domain at our web hosting server using the provided name servers.
- Setup an FTP user so we can access our web server and update files.
- Used FileZilla with our FTP user to upload files directly to our web server.
- Entered our domain into a web browser and it is now live!
Links
That is going to do it for this post! Leave any comments/questions/concerns below and thanks for stopping by the blog!
This is a topic that is near to my heart… Many thanks!
Where are your contact details though?
I’m truly enjoying the design and layout of your website.
It’s a very easy on the eyes which makes it much more enjoyable
for me to come here and visit more often. Did you hire out a designer
to create your theme? Exceptional work!
Wartościowy artykuł. Sporo wartościowych porad.
Pozdrawiam za podzielenie się. Polecam innym.
Dokładnie – temat doboru mebli bywa wymagająca.
Dobrze, że ktoś to wyjaśnia.
Naprawdę przydatne. Szukałem czegoś takiego już
jakiś czas. Super robota!
My blog: Evie
Toller Inhalt. Reichlich nützliche Informationen. Vielen Dank fürs Teilen. Ich empfehle die Seite gerne weiter.
Volle Zustimmung – der Bereich der Wohnungsgestaltung wird oft anspruchsvoll.
Hilfreicher Ansatz.
Echt nützlich. Ich war schon nach solchen Informationen seit einiger Zeit gesucht.
Super Arbeit!
Also visit my web page … Falone.Eu
Klasse Text. Jede Menge praktische Informationen. Großes Lob fürs Teilen. Ich werde öfter reinschauen.
Genau – die Sache der Wohnungsgestaltung wird oft nicht einfach.
Gut, dass es jemand erklärt.
Echt praxisnah. Ich habe schon nach genau so einem Beitrag seit
Wochen gesucht. Klasse gemacht!
Feel free to surf to my website; Isabelle
Attractive section of content. I just stumbled upon your
website and in accession capital to assert that I get actually enjoyed account your
blog posts. Anyway I’ll be subscribing to your augment and even I achievement
you access consistently fast.
Rzeczowy materiał. Dużo wartościowych inspiracji.
Super za ten materiał. Będę zaglądać częściej.
Zgadzam się – temat wystroju potrafi być trudna. Wreszcie konkrety.
Naprawdę inspirujące. Szukałem podobnych porad właśnie tego.
Pozdrawiam!
My web site :: Dominga
Sehr guter Text. Eine Menge hilfreiche Tipps. Vielen Dank für
diesen Inhalt. Ab jetzt lese ich hier öfter mit.
Sehe ich genauso – die Sache des Wohnstils wird oft anspruchsvoll.
Danke für die klare Erklärung.
Aufrichtig inspirierend. Ich suche schon nach solchen Informationen seit einiger Zeit gesucht.
Danke!
Here is my page; Leanne
Hilfreicher Artikel. Zahlreiche nützliche Tipps.
Vielen Dank für die Mühe. Ich empfehle die Seite
gerne weiter.
Genau – das Thema des Wohnstils wird oft nicht einfach.
Gut, dass es jemand erklärt.
Sehr praxisnah. Ich habe schon nach solchen Informationen genau danach gesucht.
Danke!
Feel free to surf to my web blog Genesis
I drop a comment whenever I appreciate a article on a website or
I have something to add to the conversation. Usually it’s triggered
by the fire displayed in the article I looked at.
And on this post Putting a Website Online – Justin Stolpe.
I was moved enough to post a comment 🙂
I actually do have some questions for you if it’s allright.
Could it be only me or do a few of these remarks look like they are coming from brain dead folks?
😛 And, if you are writing on other sites, I’d like to keep up
with anything new you have to post. Could you list the complete urls of your social pages like your
linkedin profile, Facebook page or twitter feed?
Hi, ich habe nach Informationen zum Einrichten gesucht und ich möchte sagen, dass man hier echt was mitnimmt. Ich bin gerade dabei, meine Wohnung ein und solche Tipps sind echt hilfreich. Grüße an die Forengemeinde.
Wertvoller Beitrag. Ich kann aus eigener Erfahrung sagen, dass die richtige Farbgebung wirklich einen Unterschied macht. Lieber einmal richtig als zweimal.
Cześć, natknąłem się na ten temat i stwierdzam, że dużo się dowiedziałem. Sama ostatnio remontuję dom i szukam inspiracji. Pozdrawiam serdecznie.
Ciekawa dyskusja. Dorzucę od siebie, że dobór mebli to podstawa. Polecam się nie spieszyć.
Also visit my site; https://Livestatus.de/index.php?title=Rustykalne_wn%C4%99trza_z_charakterem_-_jak_urz%C4%85dzi%C4%87_dom_z_dusz%C4%85
Hey, ich habe das Forum durchgeblättert und mir ist aufgefallen, dass es hier viele wertvolle Inhalte gibt. Ich selbst gestalte gerade die Einrichtung neu zu und ich suche nach Inspiration. Einen schönen Tag euch allen.
Spannender Thread. Meiner Meinung nach die richtige Farbgebung wirklich einen Unterschied macht. Lieber einmal richtig als zweimal.
My blog post – https://falone.eu/index.php?title=Sofa_f%C3%BCrs_Wohnzimmer:_Dein_neuer_Lieblingsplatz
도움 되는 글이네요. 신용카드현금화을 알아볼 때는 정산 조건를 먼저 확인하는 게 중요하다고 생각합니다.
공감합니다. 당일 입금만 보기보다 정산 방식과 주의사항을 같이 보는 게 필요합니다.
이런 내용은 정리해둘 필요가 있습니다.
카드깡 관련 정보는 빠른 처리보다 실제 조건이 더 중요합니다.
내용 감사합니다. 신용카드현금화을 검색하는 사람들은
대부분 급한 상황이 많아서, 실수령액를 놓치기 쉬운 것 같습니다.
필요한 내용이네요. 카드현금화 관련해서는 진행 전 조건을 기록해두고 비교하는 게 좋다고 봅니다.
동의합니다. 즉시 입금 같은 표현은 편해 보이지만, 실제로는 정산
기준까지 봐야 합니다.
정보 감사합니다. 신용카드 현금화 관련 글은 주의사항를 같이 설명해주는
쪽이 더 도움이 되는 것 같습니다.
정리 감사합니다. 카드대금 부담 때문에 알아보는 경우라도, 카드 결제일은 꼭 따져봐야 합니다.
생각보다 중요한 부분입니다. 카드깡은 후기보다 실제 조건이 중요하다고 봅니다.
참고하겠습니다. 이런 주제는 상황이 바쁠수록 더 차분하게 개인정보을 확인해야
합니다.
Witam, szukałem informacji o aranżacji i stwierdzam, że dużo się dowiedziałem. Sam od jakiegoś czasu remontuję dom i takie porady bardzo się przydają. Pozdrawiam serdecznie.
Wartościowy wątek. Z mojego doświadczenia dobór mebli to podstawa. Lepiej raz a dobrze.
Feel free to visit my page :: https://wiki.internzone.net/index.php?title=Pojemnik_na_po%C5%9Bciel_-_spos%C3%B3b_na_ba%C5%82agan_w_ma%C5%82ym_mieszkaniu
I like what you guys are up too. Such clever work and reporting!
Keep up the terrific works guys I’ve you guys to blogroll.
If some one desires expert view about running a blog afterward i advise
him/her to go to see this website, Keep up the good job.
Servus, ich bin zufällig auf dieses Thema gestoßen und ich muss zugeben, dass ich viel dazugelernt habe. Ich selbst renoviere seit kurzem meine Wohnung ein und solche Tipps sind echt hilfreich. Einen schönen Tag euch allen.
Wertvoller Beitrag. Ich kann aus eigener Erfahrung sagen, dass die Auswahl der Möbel eine enorme Rolle spielt. Gut Ding will Weile haben.
Hi, ich habe nach Informationen zum Einrichten gesucht und ich stelle fest, dass man hier echt was mitnimmt. Ich selbst renoviere seit kurzem meine Wohnung ein und solche Tipps sind echt hilfreich. Viele Grüße.
Gutes Thema. Ich möchte hinzufügen, dass die Farbwahl wirklich einen Unterschied macht. Gut Ding will Weile haben.
Hello colleagues, how is the whole thing, and what you desire to say regarding this post,
in my view its in fact awesome in support of me.
Recently tested the bonus too — can confirm! Cheers for sharing this!
Grüße euch, ich bin beim Stöbern hier gelandet und ich möchte sagen, dass es hier viele wertvolle Inhalte gibt. Ich bin gerade dabei, mein Zuhause neu zu gestalten und jeder Hinweis ist Gold wert. Einen schönen Tag euch allen.
Gutes Thema. Ich möchte hinzufügen, dass die Raumgestaltung wirklich einen Unterschied macht. Lieber einmal richtig als zweimal.
Also visit my website … https://asteroidsathome.net/boinc/view_profile.php?userid=1321375
Grüße euch, ich habe nach Informationen zum Einrichten gesucht und ich stelle fest, dass das Thema hervorragend beschrieben ist. Ich bin gerade dabei, die Einrichtung neu zu und ich suche nach Inspiration. Grüße an die Forengemeinde.
Spannender Thread. Meiner Meinung nach die Raumgestaltung wirklich einen Unterschied macht. Lieber einmal richtig als zweimal.
ファッション記事を読むのが好きで、いつも楽しみにしています。
シルエットが綺麗で、着用した時の雰囲気が想像できます。
コスプレ衣装としても使えそうで、汎用性が高いですね。
価格帯も手頃で、コスパが良さそうです。
またコメントさせていただきますね。
Servus, ich bin hier durch Zufall gelandet und ich möchte sagen, dass das Thema hervorragend beschrieben ist. Ich renoviere seit kurzem die Einrichtung neu zu und ich suche nach Inspiration. Viele Grüße.
Spannender Thread. Ich kann aus eigener Erfahrung sagen, dass die Auswahl der Möbel nicht zu unterschätzen ist. Gut Ding will Weile haben.
Here is my web-site :: https://Links.Gtanet.Com.br/michellelamb
Witam, przeglądałem forum i stwierdzam, że dużo się dowiedziałem. Sama od jakiegoś czasu remontuję dom i szukam inspiracji. Dzięki i pozdrawiam.
Wartościowy wątek. Z mojego doświadczenia dobór mebli ma ogromne znaczenie. Polecam się nie spieszyć.
My web site https://cdl.ngo/index.php?title=Aran%C5%BCacja_balkonu_dla_go%C5%9Bci_na_noc
Everyone loves it when individuals come together and share ideas.
Great website, keep it up!
Right here is the perfect blog for everyone who really wants to find out about this topic.
You know so much its almost tough to argue with you (not that I personally will need to…HaHa).
You certainly put a fresh spin on a subject which has been written about for a long time.
Excellent stuff, just great!
Fantastic goods from you, man. I’ve remember your
stuff prior to annd you are just extremely great. I actually
like what you’ve received right here, really like wbat you arre stating and the way durin which you assert it.
You make it enjoyable and you still care for to kerep it smart.
I cann not wait to read far more from you. That is actually a great web
site.
토닥이 가격 정보를 잘 봤습니다
Hiya very nice blog!! Man .. Excellent .. Amazing ..
I will bookmark your website and take the feeds additionally?
I am glad to search out numerous helpful info here within the put up, we
want work out more techniques in this regard, thank you for sharing.
. . . . .
Hej, natknąłem się na ten temat i stwierdzam, że jest tu sporo wartościowych treści. Sam od jakiegoś czasu urządzam mieszkanie i takie porady bardzo się przydają. Pozdrawiam forumowiczów.
Wartościowy wątek. Moim zdaniem dobór mebli ma ogromne znaczenie. Polecam się nie spieszyć.
my homepage https://roleropedia.com/index.php?title=Jak_urzadzic_wn%C4%99trza_w_stylu_boho_bez_popadania_w_chaos
After I originally commented I seem to have clicked on the -Notify me when new comments are added- checkbox and now each
time a comment is added I receive 4 emails with the exact same comment.
There has to be a way you can remove me from that service?
Thanks!
Servus, ich habe das Forum durchgeblättert und ich muss zugeben, dass ich viel dazugelernt habe. Ich selbst bin gerade dabei, mein Haus und jeder Ratschlag hilft mir weiter. Liebe Grüße in die Runde.
Wertvoller Beitrag. Aus meiner Erfahrung die Auswahl der Möbel wirklich einen Unterschied macht. Ich empfehle, sich nicht zu hetzen.
Check out my webpage … http://Miklagaard.no/index.php?title=Badezimmerfliesen:_So_wird_Ihr_Bad_zum_Wohlf%C3%BChlort
Grüße euch, ich bin zufällig auf dieses Thema gestoßen und ich möchte sagen, dass ich viel dazugelernt habe. Ich richte seit einiger Zeit mein Zuhause neu zu gestalten und jeder Ratschlag hilft mir weiter. Einen schönen Tag euch allen.
Interessante Diskussion. Meiner Meinung nach die Farbwahl nicht zu unterschätzen ist. Es lohnt sich, dafür Zeit zu nehmen.
Witajcie, trafiłem tu przypadkiem i chcę powiedzieć, że dużo się dowiedziałem. Sama ostatnio urządzam mieszkanie i takie porady bardzo się przydają. Miłego dnia wszystkim.
Wartościowy wątek. Moim zdaniem wybór kolorystyki ma ogromne znaczenie. Warto poświęcić temu czas.
my homepage – https://Lebenskunst.berlin/index.php?title=Jak_wybra%C4%87_st%C3%B3%C5%82_do_jadalni,_kt%C3%B3ry_nie_zrujnuje_ci_%C5%BCycia_przy_ma%C5%82ym_metra%C5%BCu
Pretty! This has been an extremely wonderful article.
Thanks for supplying these details.
Servus, ich habe nach Informationen zum Einrichten gesucht und ich möchte sagen, dass das Thema hervorragend beschrieben ist. Ich richte seit einiger Zeit meine Wohnung ein und jeder Hinweis ist Gold wert. Einen schönen Tag euch allen.
Gutes Thema. Ich kann aus eigener Erfahrung sagen, dass die richtige Farbgebung nicht zu unterschätzen ist. Lieber einmal richtig als zweimal.
Dzień dobry, natknąłem się na ten temat i stwierdzam, że temat jest świetnie opisany. Sam właśnie teraz zmieniam wystrój i takie porady bardzo się przydają. Pozdrawiam serdecznie.
Ciekawa dyskusja. Dorzucę od siebie, że dobór mebli naprawdę robi różnicę. Polecam się nie spieszyć.
Have a look at my web site … https://batmu.kg/forums/users/brandiewinneke2/edit/?updated=true/users/brandiewinneke2/
Hi, ich habe das Forum durchgeblättert und ich muss zugeben, dass das Thema hervorragend beschrieben ist. Ich selbst gestalte gerade mein Haus und jeder Ratschlag hilft mir weiter. Viele Grüße.
Wertvoller Beitrag. Ich möchte hinzufügen, dass die richtige Farbgebung die Basis von allem ist. Gut Ding will Weile haben.
I am not sure where you are getting your info, however great topic.
I must spend a while studying more or working out more.
Thanks for fantastic information I used to be searching for this info for
my mission.
Remember when Berlusconimarket.com was practically a household name? Me too! I was hesitant to try them after the hiatus, but wow. The whole experience is seamless—from ordering on the site to receiving this package that looks professional and completely safe. It’s clear they’ve overhauled their process. This isn’t just about getting drugs like fentanyl, cocaine or carfentanil; it’s about getting reliable care. So happy to see them back in action!”
Guten Tag, ich habe nach Informationen zum Einrichten gesucht und ich stelle fest, dass ich viel dazugelernt habe. Ich renoviere seit kurzem mein Haus und ich suche nach Inspiration. Liebe Grüße in die Runde.
Wertvoller Beitrag. Aus meiner Erfahrung die richtige Farbgebung die Basis von allem ist. Gut Ding will Weile haben.
Here is my blog post – https://Dumlax.wiki/index.php/K%C3%BCchenbeleuchtung:_Mehr_als_nur_Helligkeit_am_Herd
Helpful breakdown of the wagering terms! Saved for later!
Discover the perfect blend of style and functionality with Great Bunk Beds from https://www.bunkbedsstore.uk/. Find quality bunk beds for your space and make bedtime fun!
Looking for the perfect coffee maker? Shop the best selection of buy Coffee Maker UK – https://www.coffeee.uk/, makers online at Coffeee.uk. Discover top brands and find your perfect brew today!
Grüße euch, ich bin beim Stöbern hier gelandet und ich möchte sagen, dass das Thema hervorragend beschrieben ist. Ich bin gerade dabei, die Einrichtung neu zu und solche Tipps sind echt hilfreich. Einen schönen Tag euch allen.
Gutes Thema. Ich kann aus eigener Erfahrung sagen, dass die Raumgestaltung die Basis von allem ist. Ich empfehle, sich nicht zu hetzen.
Hey, ich bin zufällig auf dieses Thema gestoßen und ich möchte sagen, dass das Thema hervorragend beschrieben ist. Ich selbst renoviere seit kurzem die Einrichtung neu zu und jeder Ratschlag hilft mir weiter. Grüße an die Forengemeinde.
Spannender Thread. Meiner Meinung nach die Raumgestaltung eine enorme Rolle spielt. Lieber einmal richtig als zweimal.
my blog … https://uk.Kme-Berlin.de/index.php?title=Duftkerzen_und_Raumd%C3%BCfte_f%C3%BCr_deine_kleine_Wohnung
Dzień dobry, szukałem informacji o aranżacji i stwierdzam, że dużo się dowiedziałem. Sama ostatnio remontuję dom i takie porady bardzo się przydają. Pozdrawiam serdecznie.
Ciekawa dyskusja. Z mojego doświadczenia wybór kolorystyki naprawdę robi różnicę. Polecam się nie spieszyć.
Visit my homepage – https://Registerdienste.de/index.php?title=Nowoczesne_wn%C4%99trza_%E2%80%93_jak_urz%C4%85dzi%C4%87_mieszkanie,_kt%C3%B3re_oddycha_funkcjonalno%C5%9Bci%C4%85
บทความนี้ น่าสนใจดี ครับ
ผม ได้อ่านบทความที่เกี่ยวข้องกับ
เรื่องที่เกี่ยวข้อง
ที่คุณสามารถดูได้ที่ Kristopher
น่าจะถูกใจใครหลายคน
มีการยกตัวอย่างที่เข้าใจง่าย
ขอบคุณที่แชร์ คอนเทนต์ดีๆ นี้
และหวังว่าจะได้เห็นโพสต์แนวนี้อีก
Good web site you have here.. It’s hard to find high-quality writing
like yours nowadays. I really appreciate people like you!
Take care!!
Witajcie, szukałem informacji o aranżacji i stwierdzam, że jest tu sporo wartościowych treści. Sam od jakiegoś czasu urządzam mieszkanie i szukam inspiracji. Miłego dnia wszystkim.
Ciekawa dyskusja. Dorzucę od siebie, że wybór kolorystyki ma ogromne znaczenie. Lepiej raz a dobrze.
Check out my homepage https://Dumlax.wiki/index.php/Panele_%C5%9Bcienne_%E2%80%93_jak_o%C5%BCywi%C4%87_%C5%9Bciany_bez_remontu_i_ukry%C4%87_mankamenty_mieszkania
서울테라피스웨디시 프리미엄
피오라엘 추천
Heya i’m for the first timme here. I came across ths
board and I find It reeally useful & iit helped me out much.
I hope to give something back and help others like you helped me.
I personally find that this platform exceeded my expectations with robust security and great support.
I really like looking through a post that will make people think.
Also, thank you for allowing for me to comment!
Guten Tag, ich bin hier durch Zufall gelandet und ich muss zugeben, dass das Thema hervorragend beschrieben ist. Ich selbst bin gerade dabei, meine Wohnung ein und ich suche nach Inspiration. Grüße an die Forengemeinde.
Gutes Thema. Aus meiner Erfahrung die Raumgestaltung die Basis von allem ist. Es lohnt sich, dafür Zeit zu nehmen.
Review my web-site … https://Registerdienste.de/index.php?title=Skandinavischer_Einrichtungsstil:_So_holst_du_dir_Hygge_in_deine_vier_W%C3%A4nde
My partner and I absolutely love your blog and find a
lot of your post’s to be exactly I’m looking for. Would you offer guest writers to write content
for yourself? I wouldn’t mind composing a post or elaborating on most of the subjects you write related to here.
Again, awesome weblog!
Servus, ich bin zufällig auf dieses Thema gestoßen und ich möchte sagen, dass ich viel dazugelernt habe. Ich renoviere seit kurzem die Einrichtung neu zu und ich suche nach Inspiration. Viele Grüße.
Interessante Diskussion. Aus meiner Erfahrung die richtige Farbgebung eine enorme Rolle spielt. Es lohnt sich, dafür Zeit zu nehmen.
I was skeptical, but after over two years of using the bridge, the stable performance convinced me.
Hey, ich bin hier durch Zufall gelandet und ich möchte sagen, dass man hier echt was mitnimmt. Ich renoviere seit kurzem die Einrichtung neu zu und ich suche nach Inspiration. Einen schönen Tag euch allen.
Wertvoller Beitrag. Ich möchte hinzufügen, dass die Raumgestaltung eine enorme Rolle spielt. Es lohnt sich, dafür Zeit zu nehmen.
Position effectively utilized!!
My web page; https://fintechbase.icu/
Hej, natknąłem się na ten temat i muszę przyznać, że jest tu sporo wartościowych treści. Sama właśnie teraz zmieniam wystrój i każda wskazówka jest na wagę złota. Pozdrawiam serdecznie.
Ciekawa dyskusja. Dorzucę od siebie, że aranżacja wnętrza naprawdę robi różnicę. Lepiej raz a dobrze.
Visit my site … http://Wiki.Die-Karte-Bitte.de/index.php/Skandynawski_spok%C3%B3j_na_35_metrach_%E2%80%93_jak_urz%C4%85dzi%C4%87_wn%C4%99trze,_kt%C3%B3re_oddycha
Hej, przeglądałem forum i stwierdzam, że jest tu sporo wartościowych treści. Sam ostatnio zmieniam wystrój i takie porady bardzo się przydają. Pozdrawiam serdecznie.
Wartościowy wątek. Z mojego doświadczenia wybór kolorystyki ma ogromne znaczenie. Polecam się nie spieszyć.
Have a look at my web site :: http://Flipy.cz/index.php?title=Jaka_Sofa_Do_Salonu%3F_Sprawdzony_Wybor_Na_Lata
Thanks, An abundance of advice.
Good forum posts. Regards.
Hi, ich bin beim Stöbern hier gelandet und ich stelle fest, dass ich viel dazugelernt habe. Ich selbst gestalte gerade die Einrichtung neu zu und ich suche nach Inspiration. Grüße an die Forengemeinde.
Wertvoller Beitrag. Ich kann aus eigener Erfahrung sagen, dass die Raumgestaltung eine enorme Rolle spielt. Lieber einmal richtig als zweimal.
I will right away take hold of your rss as I can not in finding your email subscription hyperlink or e-newsletter service.
Do you’ve any? Please allow me know so that I may just subscribe.
Thanks.
yohoho
Good day! Would you mind if I share your blog with my myspace group?
There’s a lot of people that I think would really appreciate your content.
Please let me know. Thank you
id=”firstHeading” class=”firstHeading mw-first-heading”>Search results
Help
English
Tools
Tools
move to sidebar hide
Actions
General
Новейший DARKNET MEGA MARKET площадка, достойная замена hydra в подпольном интернете.
Моментальные переводы – после
оплаты позиции деньги сиюминутно
зачисляется на счет продавца.
Шифрование данных – личные данные о клиенте надежно засекречены
от спецслужб. Мега СБ мега зеркало – это достойная площадка с большим выбором
товара и чесными продавцами.
\\\ Mega
Pretty section of content. I just stumbled
upon your website and in accession capital to assert that I get actually enjoyed account your blog posts.
Any way I will be subscribing to your feeds and even I achievement you
access consistently rapidly.
Feel free to visit my blog post … Reinigung Tirol
Kudos. I value this!
Hej, trafiłem tu przypadkiem i chcę powiedzieć, że temat jest świetnie opisany. Sama od jakiegoś czasu urządzam mieszkanie i szukam inspiracji. Pozdrawiam forumowiczów.
Dobry temat. Z mojego doświadczenia aranżacja wnętrza ma ogromne znaczenie. Polecam się nie spieszyć.
Feel free to surf to my homepage … https://apds.ircam.fr/index.php/Minimalizm_W_Czterech_Scianach
Very nice write-up. I definitely love this site. Stick with it!
Wonderful blog! I found it while browsing on Yahoo News.
Do you have any suggestions on how to get listed in Yahoo News?
I’ve been trying for a while but I never seem to get there!
Appreciate it
Safety screenings and professional counseling accompany our services to ensure responsible use.
Buy over-the-counter medications with home delivery. We’re the only place where you can get prescription medications without a prescription!
[url=https://santiamhospital.org/wp-content/uploads/wp_dndcf7_uploads/wpcf7-files/9ea2d9d1-5da8-4583-9474-043c1e901178/tapentadol_online.pdf]Purchase[/url]
Our service simplifies the process so you can focus on recovery rather than logistics.
Secure payment processing and a variety of payment methods provide convenience and safety.
Secure data management and transparent terms are core to how we maintain customer trust.
Our database includes exclusive categories like fuck porno asian zoophilia for your pleasure.
Discover more in our 15 teen porno exclusive zone today.
Watch full length sex zoo anal adult movie productions without breaks.
xxx
Watch here:
https://vdrygtort.ru/
Very good post! We are linking to this particularly great post on our
site. Keep up the great writing.
Hey, ich bin hier durch Zufall gelandet und mir ist aufgefallen, dass man hier echt was mitnimmt. Ich selbst richte seit einiger Zeit mein Zuhause neu zu gestalten und solche Tipps sind echt hilfreich. Viele Grüße.
Spannender Thread. Meiner Meinung nach die Farbwahl wirklich einen Unterschied macht. Es lohnt sich, dafür Zeit zu nehmen.
Just picked up my meds from Berlusconi Market (Berlusconimarket.com) that went out of business is back in action. It honestly feels like they never left—the same calm, friendly vibe, just with a few thoughtful upgrades. The checkout was quick, the Team Handled Escrow so well for me.
Witajcie, natknąłem się na ten temat i muszę przyznać, że temat jest świetnie opisany. Sam ostatnio urządzam mieszkanie i każda wskazówka jest na wagę złota. Miłego dnia wszystkim.
Wartościowy wątek. Z mojego doświadczenia aranżacja wnętrza naprawdę robi różnicę. Warto poświęcić temu czas.
Here is my website … http://coldcontrolradio.com/index.php?title=Jak_urz%C4%85dzi%C4%87_domow%C4%85_biblioteczk%C4%99,_kt%C3%B3ra_nie_przyt%C5%82oczy_ma%C5%82ego_mieszkania
Guten Tag, ich habe das Forum durchgeblättert und ich muss zugeben, dass es hier viele wertvolle Inhalte gibt. Ich selbst richte seit einiger Zeit die Einrichtung neu zu und jeder Ratschlag hilft mir weiter. Liebe Grüße in die Runde.
Wertvoller Beitrag. Ich kann aus eigener Erfahrung sagen, dass die richtige Farbgebung eine enorme Rolle spielt. Lieber einmal richtig als zweimal.
Feel free to visit my web-site … https://Wiki.Seti-Hub.org/w/index.php?title=Farben_In_Der_Wohnung:_Wie_Ich_Mein_Zuhause_Mit_Farbe_Zum_Leben_Erweckt_Habe
Okay, warning: My friends might think I’m being sentimental because of how great these fentanyl feels! But seriously, Berlusconimarket.com nailed it this time around. They took the core magic we used to know and added serious layers of security (the trusted vendors policy). It’s refreshing. If you need reliable fentanyl or any other fentanyl related products like carfentanil for example, that are genuinely sourced and legal, bookmark this site immediately.”
Regards! A lot of facts!
Surfing Online, came across some comments about Berlusconi Market (Berlusconimarket.com), and was surprised so I gave it a try I was worried it shouldn’t be some people claiming to be them. The new layout is a bit more streamlined, but the staff still remembers you by name, which makes the whole process feel personal rather than transactional. I appreciated the quick availability too—my Fentanyl were ready within a day of my email, and they didn’t make me feel rushed, all via overnight delivery. Welcome Back Berlusconi Market (Berlusconimarket.com) .
Right now it looks like Expression Engine is the top blogging platform out there right now.
(from what I’ve read) Is that what you are using on your blog?
Witam, natknąłem się na ten temat i muszę przyznać, że temat jest świetnie opisany. Sam ostatnio zmieniam wystrój i każda wskazówka jest na wagę złota. Miłego dnia wszystkim.
Dobry temat. Z mojego doświadczenia aranżacja wnętrza naprawdę robi różnicę. Polecam się nie spieszyć.
my homepage: http://miklagaard.no/index.php?title=Jak_przechowa%C4%87_wszystko_w_ma%C5%82ym_mieszkaniu_bez_oszalowania
Hi, ich habe nach Informationen zum Einrichten gesucht und ich muss zugeben, dass es hier viele wertvolle Inhalte gibt. Ich selbst gestalte gerade meine Wohnung ein und solche Tipps sind echt hilfreich. Einen schönen Tag euch allen.
Gutes Thema. Aus meiner Erfahrung die Farbwahl nicht zu unterschätzen ist. Ich empfehle, sich nicht zu hetzen.
If you want to grow your experience only keep
visiting this site and be updated with the newest information posted here.
The other day, whilke I was at work, my cousin stole my iPad and
tested to see if itt can survive a twenty fiive foot drop, just
so she can be a youtube sensation. My apple ipad is now destroyhed and she has 83 views.
I know this is totally off ttopic but I had to share it with someone!
Excellent article. Keep posting such kind of information on your site.Im really impressed by
it.
Hello there, You have performed a fantastic job.
I will definitely digg it aand in my view recommend to my friends.
I’m sure they’ll be benefited from this website.
Guten Tag, ich habe nach Informationen zum Einrichten gesucht und mir ist aufgefallen, dass ich viel dazugelernt habe. Ich renoviere seit kurzem die Einrichtung neu zu und jeder Hinweis ist Gold wert. Grüße an die Forengemeinde.
Gutes Thema. Ich kann aus eigener Erfahrung sagen, dass die Raumgestaltung eine enorme Rolle spielt. Es lohnt sich, dafür Zeit zu nehmen.
Can I just say what a relief to discover somebody who actually knows what they’re talking about on the web.
You definitely understand how to bring an issue to light and make it important.
More and more people ought to read this and understand this
side of your story. I was surprised that you aren’t more popular
given that you most certainly possess the gift.
Hi I am so grateful I found your weblog, I really found you by mistake, while I was looking on Google for something else, Anyhow
I am here now and would just like to say kudos for
a fantastic post and a all round thrilling blog (I also
love the theme/design), I don’t have time to read it
all at the moment but I have bookmarked it and also added in your RSS feeds, so when I have
time I will be back to read a great deal more, Please do keep up the
excellent jo.
Therefore, it is crucial to protect the skin from extreme temperatures.
Servus, ich bin zufällig auf dieses Thema gestoßen und ich stelle fest, dass man hier echt was mitnimmt. Ich selbst bin gerade dabei, meine Wohnung ein und solche Tipps sind echt hilfreich. Liebe Grüße in die Runde.
Interessante Diskussion. Ich kann aus eigener Erfahrung sagen, dass die Raumgestaltung die Basis von allem ist. Lieber einmal richtig als zweimal.
my web-site :: https://gr0undplan3.staushbrews.com/index.php/Stimmungsbeleuchtung_f%C3%BCr_kleine_R%C3%A4ume_-_So_wird_dein_Zuhause_gem%C3%BCtlich
I personally find that great platform with stable performance — it made my crypto journey easier. The updates are frequent and clear.
Wow! This is a cool platform. They really do have the easy onboarding. My withdrawals were always smooth.
Dzień dobry, szukałem informacji o aranżacji i muszę przyznać, że temat jest świetnie opisany. Sam od jakiegoś czasu remontuję dom i takie porady bardzo się przydają. Pozdrawiam serdecznie.
Ciekawa dyskusja. Dorzucę od siebie, że aranżacja wnętrza ma ogromne znaczenie. Lepiej raz a dobrze.
Feel free to visit my page: https://hd.menak.ru/user/Phillip2696/
Hi, yup this paragraph is in fact pleasant and I have learned lot
of things from it regarding blogging. thanks.
先日インターネットでショッピングをしていた際、極めて魅力的なランジェリーショップを発見することができました。商品一つ一つにオリジナリティがあり、デザインのクオリティが実に高く、見ているだけでもワクワクするようなラインナップになっています。
多彩なテイストのアイテムが豊富に用意されており、可愛らしいデザインからセクシーなデザインまで幅広く取り揃えられているので、自分好みの商品を必ず見つけることができます。素材は肌に優しいで着心地が抜群であり、体に優しくフィットする設計が大変魅力的です。
ディテールの完成度が非常に高く、どの商品も安定したクオリティを保っている点が信頼につながります。流行に左右されない長く愛用できるデザインが多く、コスパの面でも非常に優れていると感じます。
購入前の商品情報も分かりやすく記載されており、安心して選択することができました。実際に商品を手に取った際の質感は、サイトの写真以上に魅力的で、大変満足しております。
継続的にリピート購入をしたいと思います。周りの友人や知人にも心からおすすめできるショップですので、これからのさらなる発展と新作アイテムの追加を心より楽しみにしております。
constantly i used to read smaller articles or reviews that also clear their motive, and that is also happening with this paragraph which I am reading att this place.
Fentanyl is a potent synthetic opioid drug approved by the Food and Drug Administration for use as an analgesic (pain relief) and anesthetic. It is approximately 100 times more potent than morphine and 50 times more potent than heroin as an analgesic. But do you know how to get it via escrow ? hahahahahaha use your bing browser and visit the real guys at Berlusconimarket dot come. or say berlusconimarket.com
“Forum fam! Stop messing around with unreliable sources. Guys, seriously check out berlusconimarket.com. Just got my order today and everything was top-notch quality. They’ve really turned things around since their earlier years. It’s trustworthy now, and getting your meds handled easily is a major win. Go give them a look!”
Grüße euch, ich bin beim Stöbern hier gelandet und ich möchte sagen, dass das Thema hervorragend beschrieben ist. Ich selbst bin gerade dabei, meine Wohnung ein und ich suche nach Inspiration. Grüße an die Forengemeinde.
Wertvoller Beitrag. Meiner Meinung nach die richtige Farbgebung eine enorme Rolle spielt. Gut Ding will Weile haben.
Listen up, because I was a skeptic. Super skeptical. Used to worry forever if online fentanyl were safe. When I opened my package from Berlusconimarket.com, I immediately thought: ‘Okay, they really upped their game.’ The packaging is immaculate, the labeling is clear, and the peace of mind comes knowing they only work with trusted fentanyl vendors. This isn’t gambling anymore; it’s medical reliability. Highly recommend making the leap.”
Hej, trafiłem tu przypadkiem i stwierdzam, że dużo się dowiedziałem. Sam od jakiegoś czasu zmieniam wystrój i takie porady bardzo się przydają. Miłego dnia wszystkim.
Wartościowy wątek. Z mojego doświadczenia dobór mebli naprawdę robi różnicę. Polecam się nie spieszyć.
Take a look at my web page; https://Livestatus.de/index.php?title=Garderoba_w_sypialni_%E2%80%93_jak_zmie%C5%9Bci%C4%87_wszystko,_nie_trac%C4%85c_przestrzeni_do_spania
Hello to all, because I am really keen of reading this weblog’s post to
be updated regularly. It carries fastidious material.
Here is my web blog – Fensterputzer Innsbruck
Guten Tag, ich bin hier durch Zufall gelandet und ich möchte sagen, dass es hier viele wertvolle Inhalte gibt. Ich gestalte gerade die Einrichtung neu zu und solche Tipps sind echt hilfreich. Liebe Grüße in die Runde.
Gutes Thema. Aus meiner Erfahrung die Farbwahl die Basis von allem ist. Ich empfehle, sich nicht zu hetzen.
Write more, thats all I have to say. Literally, it seems
as though you relied on the video to make your point. You obviously know what youre talking
about, why waste your intelligence on just posting videos to your blog when you could be giving
us something enlightening to read?
You made your stand quite clearly..
Grüße euch, ich bin hier durch Zufall gelandet und ich muss zugeben, dass man hier echt was mitnimmt. Ich selbst gestalte gerade mein Zuhause neu zu gestalten und jeder Hinweis ist Gold wert. Liebe Grüße in die Runde.
Spannender Thread. Ich kann aus eigener Erfahrung sagen, dass die Raumgestaltung eine enorme Rolle spielt. Lieber einmal richtig als zweimal.
my web blog … http://coldcontrolradio.com/index.php?title=Licht_Als_Raumwunder:_Wie_Ich_Meine_Wohnung_Mit_Kluger_Beleuchtung_Verwandelt_Habe
Guten Tag, ich habe nach Informationen zum Einrichten gesucht und ich möchte sagen, dass das Thema hervorragend beschrieben ist. Ich selbst richte seit einiger Zeit mein Zuhause neu zu gestalten und jeder Hinweis ist Gold wert. Liebe Grüße in die Runde.
Interessante Diskussion. Meiner Meinung nach die Auswahl der Möbel die Basis von allem ist. Ich empfehle, sich nicht zu hetzen.
Woah! I’m really digging the template/theme of this website.
It’s simple, yet effective. A lot of times it’s challenging to get that “perfect balance” between usability and appearance.
I must say you’ve done a very good job with this.
In addition, the blog loads super fast for me on Safari.
Outstanding Blog!
Если вы хотите повысить свои навыки продвижения, обязательно пройдите [url=https://t.me/s/seo_pro100]обучение XRumer[/url], чтобы эффективно использовать все возможности этих инструментов.
Чтобы использовать инструменты эффективно, нужно понимать их возможности и настройки.
Witajcie, natknąłem się na ten temat i muszę przyznać, że dużo się dowiedziałem. Sama ostatnio zmieniam wystrój i każda wskazówka jest na wagę złota. Miłego dnia wszystkim.
Ciekawa dyskusja. Z mojego doświadczenia dobór mebli to podstawa. Warto poświęcić temu czas.
Here is my website http://Mediawiki.Copyrightflexibilities.eu/index.php?title=Jak_urz%C4%85dzi%C4%87_ma%C5%82%C4%85_kuchni%C4%99_%E2%80%93_triki,_kt%C3%B3re_dzia%C5%82aj%C4%85_w_moim_mieszkaniu
Very good posts. Many thanks!
Hallo, ich bin hier durch Zufall gelandet und ich möchte sagen, dass es hier viele wertvolle Inhalte gibt. Ich bin gerade dabei, mein Haus und ich suche nach Inspiration. Danke und viele Grüße.
Spannender Thread. Ich möchte hinzufügen, dass die Raumgestaltung wirklich einen Unterschied macht. Es lohnt sich, dafür Zeit zu nehmen.
Here is my blog :: http://wiki.philipphudek.de/index.php?title=Ecksofa_oder_Couch_%E2%80%93_mein_pers%C3%B6nlicher_Leitfaden_f%C3%BCr_mehr_Wohnkomfort
Exploring the Features of the Most Versatile uncensored text-to-image AI in 2024
Have you grown frustrated with facing censorship while operating standard image generators? In that case it is time to try out a specialized uncensored AI art creator. These specialized platforms exist solely to deliver digital artists with absolute autonomy over the digital creations. In the following sections, we will uncover exactly how to utilize the full power of an elite uncensored AI art creator.
Diving into Digital Illustration
While realism is popular, a large portion of the community prefer to use an adult generative AI to generate anime-style NSFW scenes. The versatility of the generator means that you can easily transition between photorealism to pure 2D graphics effortlessly.
Simply adding ‘anime style, cel shaded, vibrant colors’ within the prompt forces the NSFW AI image tool to output beautiful stylized masterpieces.
Advanced Features: Editing Uncensored Art
Once you master the basics of an uncensored AI art creator, you can explore high-end settings such as masking and editing. Inpainting allows you to select a specific area of your generated image and regenerate just that spot.
This is incredibly useful for correcting minor glitches that can happen with even the best https://ssjcompanyinc.official.jp/bbs/board.php?bo_table=free&wr_id=9759208 AI image tool models. It gives you pixel-perfect control over the final result.
Rapid Rendering: The Benefit of an uncensored AI art creator
Rapid generation are also significant benefits of leveraging a specialized NSFW AI image tool. Rather than spending days trying to manually draw adult art, an uncensored AI art creator can generate several concepts in real-time.
Such quick turnaround lets users test ideas freely, leading to better final products. Users are able to mass-produce renders in one day.
Writing Prompts: The Secret to Perfect Results
Crafting text inputs is a skill when working with an NSFW AI image tool. To see the best results from the AI generator, you should be highly descriptive.
Mentioning lighting techniques like ‘soft focus’ can dramatically boost the quality of the resulting art. An advanced NSFW AI generator will pick up on these nuances flawlessly. The more detailed your text becomes, the more incredible the final render turns out.
Exploring Custom Embeddings in your NSFW AI generator
To unlock professional results, understanding LoRAs and custom models is critical. Think of these as add-ons for your adult generative AI that train the generator in niche adult themes.
If your goal is a specific character outfit, applying a custom model will instantly transform the render. The online ecosystem has trained a massive library of these, making the NSFW AI generator infinitely versatile.
Understanding the Core of an NSFW AI generator
The tech powering a high-quality adult AI image generator is usually based on advanced diffusion models. These models operates by taking a random noise pattern and gradually denoising it into a perfect render.
Since an adult AI image generator lacks censorship layers, the generation phase can accurately depict uncensored themes flawlessly. This leap in AI means that users can create limitless concepts with unbelievable accuracy.
Monetizing Your Uncensored Creations
Making money is another reason why demand for the adult generative AI has grown so much. Numerous creators are using these tools to produce premium images for subscription sites.
The ability to rapidly produce stunning NSFW art gives them a massive advantage in the online business space. By using a powerful uncensored AI art creator, you can scale your content creation effortlessly.
Achieving Photorealistic Renders
When discussing an NSFW AI image tool, they usually seek photorealistic results. The newest models powering these tools excel at rendering realistic skin textures.
To get these results, users must add keywords like ‘8k resolution, raw photo, DSLR, ultra-detailed’. Using these terms with a top-tier adult AI image generator guarantees images that are indistinguishable from reality.
Overcoming Mainstream Censorship
A major problem with traditional image tools is their use of heavy censorship. For digital artists trying to make adult imagery, this is highly restrictive.
By switching to a specialized uncensored AI art creator, you remove these walls. An uncensored platform will not block your artistic vision, allowing the ultimate artistic control.
Protecting Your Data with an uncensored AI art creator
Another critical factor is privacy. When operating an adult generative AI, creators want to guarantee their inputs are confidential.
The most reputable adult generative AI websites prioritize encryption, ensuring that your artwork is for your eyes only. This peace of mind is invaluable for digital artists who value their digital footprint.
Hosting Options for your NSFW AI generator
An important factor when choosing an adult generative AI is whether to run it locally on your own hardware or using a cloud-based service. Running it locally offers absolute security and no subscription fees, but you need an expensive GPU.
Conversely, online NSFW AI image tool generators are incredibly accessible and work on laptops and phones. For the average creator, the convenience of a dedicated website beats the cost of building a custom PC.
Why You Need Negative Prompts
While everyone focuses on the main prompt, the negative prompt is equally vital for operating an adult AI image generator. By using negative prompts, you tell the engine exactly what NOT to include from the final image.
As an example, if you are generating uncensored art, you might add words such as ‘extra limbs, mutated, blurry, bad anatomy’ as negative prompts. This guarantees the NSFW AI generator to produce a far superior and higher quality image.
Fixing Imperfections with an NSFW AI generator
Even the most advanced NSFW AI generator might sometimes output pictures that need a little love. This is exactly why built-in upscaling are completely necessary. The upscaling process uses algorithms to sharpen edges and enhancing realism.
By passing your base image through an upscaler, a standard output becomes a hyper-detailed work of art. Mastering this workflow is the difference between beginners and expert adult generative AI artists.
Summary
In summary, the NSFW AI generator represents the future of digital art. It gives creators a unique chance to create without limits. For those who have yet to experienced it, there is no better time. Embrace the potential of a high-quality NSFW AI image tool today.
By mastering the techniques discussed in this guide, you will be well on your way to generating absolute masterpieces with ease.
You said it wonderfully.
pnc bank online banking login
Everything is very open with a very clear description of the challenges.
It was truly informative. Your website is very helpful. Many
thanks for sharing!
https://tribunenantaise.fr/actus-fcnantes/bookmaker-hors-arjel-comparatif-2026-et-meilleures-alternatives-legales/
A lot of people mentioned Berlusconi Market (Berlusconimarket.com) how much they missed them during the closure, and you could tell it wasn’t just nostalgia talking. It’s clear this shop isn’t just a place to grab pills; it’s a small community hub that people rely on for reliability, advice, and a bit of human warmth.
토닥이 공식센터 안내 내용을 잘 봤습니다
Nicely voiced of course. !
Witajcie, szukałem informacji o aranżacji i stwierdzam, że dużo się dowiedziałem. Sam od jakiegoś czasu remontuję dom i takie porady bardzo się przydają. Pozdrawiam serdecznie.
Wartościowy wątek. Moim zdaniem aranżacja wnętrza to podstawa. Warto poświęcić temu czas.
My homepage https://Coopspace.online/index.php?title=Jak_zrobi%C4%87_wyko%C5%84czenie_%C5%9Bcian,_kt%C3%B3re_odmieni_Twoje_wn%C4%99trze
Honestly, I didn’t think I’d be writing this but reaching out to a Dating Coach Amsterdam was honestly the best investment I’ve made for myself, and if you’re on the fence about getting help, just do it because my Dating Advisor Amsterdam totally transformed how I see relationships, from my confidence right down to the way I communicate on dates, and I’ll be real, looking for the Best Dating Coach Amsterdam really isn’t overwhelming because you’ll find some genuinely gifted coaches offering both in-person and remote dating success coaching (https://links.gtanet.com.br/joellenwolco) coaching that completely deliver results.
Hej, szukałem informacji o aranżacji i stwierdzam, że temat jest świetnie opisany. Sama od jakiegoś czasu urządzam mieszkanie i każda wskazówka jest na wagę złota. Pozdrawiam forumowiczów.
Wartościowy wątek. Dorzucę od siebie, że dobór mebli naprawdę robi różnicę. Warto poświęcić temu czas.
Here is my homepage :: https://lm3.Lmhack.net/index.php/Kanapa,_kt%C3%B3ra_ratuje_ka%C5%BCd%C4%85_imprez%C4%99_i_go%C5%9Bci_na_noc
I like reading through a post that can make men and women think.
Also, thanks for allowing me to comment!
Очень нравится , отличный и полезный ресурс!
https://secoop.gov.tl/?p=2273&lang=en
Hello i am kavin, its my first occasion to commenting
anywhere, when i read this article i thought i could also create comment due to this
sensible post.
Witajcie, przeglądałem forum i chcę powiedzieć, że jest tu sporo wartościowych treści. Sama ostatnio remontuję dom i szukam inspiracji. Pozdrawiam forumowiczów.
Ciekawa dyskusja. Dorzucę od siebie, że aranżacja wnętrza ma ogromne znaczenie. Lepiej raz a dobrze.
Also visit my web page … https://audiokniga-Online.net/user/TracieBackhaus/
I’m curious to find out what blog system you have been utilizing?
I’m having some small security issues with my latest site
and I’d like to find something morre safeguarded.
Do you have any recommendations?
Witajcie, szukałem informacji o aranżacji i stwierdzam, że dużo się dowiedziałem. Sam właśnie teraz zmieniam wystrój i szukam inspiracji. Pozdrawiam forumowiczów.
Dobry temat. Moim zdaniem dobór mebli ma ogromne znaczenie. Warto poświęcić temu czas.
Here is my web site: https://daten-speicherung.de/wiki/index.php?title=Benutzer:ElsiePenson9
Cabinet IQ
8305 Stɑte Hwy 71 #110, Austin,
TX 78735, United Տtates
254-275-5536
Expertcontractors
With havin so much content and articles do you ever run into any problems of plagorism or copyright infringement?
My site has a lot of exclusive content I’ve either created myself or outsourced but it looks like
a lot of it is popping it up all over the internet without my permission. Do you know any methods
to help protect against content from being ripped off? I’d definitely appreciate it.
Cześć, natknąłem się na ten temat i chcę powiedzieć, że jest tu sporo wartościowych treści. Sama od jakiegoś czasu zmieniam wystrój i takie porady bardzo się przydają. Pozdrawiam forumowiczów.
Ciekawa dyskusja. Moim zdaniem dobór mebli naprawdę robi różnicę. Lepiej raz a dobrze.
Stop by my web blog … https://dumlax.wiki/index.php/Aran%C5%BCacja_poddasza_-_jak_urz%C4%85dzi%C4%87_ma%C5%82e_M3_pod_skosami
공식 연결 정보가 잘 정리되어 있네요.
Very good article! We are linking to this great article on our website. Keep up the great writing.
Dzień dobry, przeglądałem forum i stwierdzam, że temat jest świetnie opisany. Sam od jakiegoś czasu urządzam mieszkanie i takie porady bardzo się przydają. Dzięki i pozdrawiam.
Dobry temat. Z mojego doświadczenia wybór kolorystyki ma ogromne znaczenie. Warto poświęcić temu czas.
My web site :: https://ewuswiki.club:443/index.php?title=Jak_od%C5%9Bwie%C5%BCy%C4%87_mieszkanie_bez_remontu_-_sprawdzone_triki
I like the helpful information you provide in your
articles. I will bookmark your weblog and check again here regularly.
I am quite sure I will learn plenty of new stuff right here!
Good luck for the next!
Hey, ich bin beim Stöbern hier gelandet und mir ist aufgefallen, dass es hier viele wertvolle Inhalte gibt. Ich selbst renoviere seit kurzem mein Zuhause neu zu gestalten und ich suche nach Inspiration. Viele Grüße.
Spannender Thread. Ich möchte hinzufügen, dass die Auswahl der Möbel eine enorme Rolle spielt. Gut Ding will Weile haben.
Cześć, przeglądałem forum i chcę powiedzieć, że temat jest świetnie opisany. Sam właśnie teraz remontuję dom i każda wskazówka jest na wagę złota. Dzięki i pozdrawiam.
Wartościowy wątek. Dorzucę od siebie, że wybór kolorystyki ma ogromne znaczenie. Polecam się nie spieszyć.
My webpage … https://Unchanging.tech/index.php/Lustra_dekoracyjne_%E2%80%93_jak_odmieni%C4%87_wn%C4%99trze_bez_remontu
Hey, ich habe nach Informationen zum Einrichten gesucht und ich stelle fest, dass das Thema hervorragend beschrieben ist. Ich gestalte gerade mein Haus und solche Tipps sind echt hilfreich. Liebe Grüße in die Runde.
Gutes Thema. Aus meiner Erfahrung die richtige Farbgebung wirklich einen Unterschied macht. Lieber einmal richtig als zweimal.
Grüße euch, ich bin beim Stöbern hier gelandet und mir ist aufgefallen, dass es hier viele wertvolle Inhalte gibt. Ich bin gerade dabei, die Einrichtung neu zu und ich suche nach Inspiration. Einen schönen Tag euch allen.
Spannender Thread. Ich kann aus eigener Erfahrung sagen, dass die richtige Farbgebung eine enorme Rolle spielt. Lieber einmal richtig als zweimal.
My blog post :: https://apds.Ircam.fr/index.php/Stimmungsbeleuchtung:_So_verwandelst_du_dein_Zuhause_in_eine_Wohlf%C3%BChloase
Good reminder. Custom software should support the business process, not create a new operational bottleneck. https://gracethemes.com/typical-mistakes-to-prevent-while-hiring-a-software-development-team/
Hey, ich habe nach Informationen zum Einrichten gesucht und ich stelle fest, dass das Thema hervorragend beschrieben ist. Ich selbst renoviere seit kurzem die Einrichtung neu zu und jeder Hinweis ist Gold wert. Liebe Grüße in die Runde.
Interessante Diskussion. Aus meiner Erfahrung die Farbwahl nicht zu unterschätzen ist. Es lohnt sich, dafür Zeit zu nehmen.
Hi, ich bin beim Stöbern hier gelandet und mir ist aufgefallen, dass ich viel dazugelernt habe. Ich richte seit einiger Zeit mein Zuhause neu zu gestalten und jeder Ratschlag hilft mir weiter. Liebe Grüße in die Runde.
Interessante Diskussion. Ich möchte hinzufügen, dass die Auswahl der Möbel wirklich einen Unterschied macht. Ich empfehle, sich nicht zu hetzen.
Review my web page; https://links.gtanet.com.br/heathluffman
Cześć, trafiłem tu przypadkiem i chcę powiedzieć, że dużo się dowiedziałem. Sama właśnie teraz remontuję dom i szukam inspiracji. Pozdrawiam forumowiczów.
Dobry temat. Moim zdaniem aranżacja wnętrza to podstawa. Lepiej raz a dobrze.
My web site; https://Researchchemicalwiki.org/index.php?title=Magia_zapachu_w_domu._Jak_%C5%9Bwiece_zmieniaj%C4%85_klimat_mieszkania
{
{مدتهاست|مدت زیادیه|خیلی وقته} که {توی اینترنت|تو نت|آنلاین} {بیشتر از|بیش از} {سه|3|دو|2|چهار|4}
ساعت {میگشتم|میچرخیدم|میگشتم} ولی {هیچ|هیچجا} {سایت|مرجع} {فیلم|سینما}یی مثل
{کارن مووی|سایت شما|اینجا}
پیدا نکردم. {به نظرم|از نظر من|به عقیده من|شخصاً} اگر همه {وبمسترها|مدیران سایتها|صاحبان سایت|ادمینها} مثل
شما {محتوای|مطالب|پستهای} باکیفیت {میذاشتن|منتشر میکردن|مینوشتن}، {اینترنت|نت|وب} خیلی {مفیدتر|بهتر|کاربردیتر} از الان بود.|
{نتونستم|نمیتونستم|نمیتوانستم} جلوی {خودم|خودمو} رو بگیرم
و کامنت نذارم! {واقعاً|راستش} {عالی|فوقالعاده|حرفهای|تمیز|بینقص} {نوشته شده|کار کردید|درست شد}!|
من {کارن مووی|سایتتون|این سایت} رو
{بوکمارک|سیو|ذخیره} کردم و {RSS|فید}ش رو هم {گرفتم|اضافه کردم} ولی {لینک|لینک عضویت|لینک اشتراک} {خبرنامه|ایمیلی|اعلانها} رو پیدا نکردم.
{لطفاً|ممنون میشم|خواهشاً} بگید از کجا {عضو بشم|سابسکرایب
کنم|مشترک بشم} تا {آپدیتهای|فیلمهای|سریالهای} جدید {دست اول|زودتر|سریعتر} بهم برسه.
{ممنون|مرسی|سپاس}!|
{الان|درست همین الان|دقیقاً الان}
{بهترین|مناسبترین|عالیترین}
زمانه که {لیست|برنامه} {فیلمهای|سریالهای}
آخر هفته رو بچینم و خوشحالم که این {پست|مطلب|نقد|معرفی} رو خوندم.
{کاش|ای کاش|لطفاً} {درباره|راجع به} {فیلمهای مشابه|ژانرهای دیگه|کارگردانهای همین سبک} هم {بنویسید|پست بذارید|معرفی کنید}.
{واقعاً|راستش|واقعا} {دوست دارم|عاشق اینم|دلم میخواد} {بیشتر|بیشتر از اینها} بخونم!|
{سلام|درود|سلام وقت بخیر|هی}، {تقریباً|عملاً|واقعاً} {هر روز|مدام|همیشه|روزانه} به {کارن
مووی|این سایت|اینجا} سر میزنم
و {فیلمهای|سریالهای|آپدیتهای|محتوای} جدید رو چک میکنم.
{راستش|واقعاً|صادقانه بگم} {بهترین|کاملترین|بهروزترین|جامعترین} {مرجع|منبع|سایت} {فیلم|سینما|فیلم و سریال} فارسی شدید.
{همینطور|به همین شکل|همین راه رو} {ادامه
بدید|پیش برید}!|
{کیفیت تصویر|سرعت دانلود|دقت زیرنویس|کیفیت دوبله|سرعت لینکها} {توی|در|تو} {کارن مووی|این سایت|اینجا} {واقعاً|راستش|واقعا} {بینظیر|عالی|درجه یک|فوقالعاده|حرفهای}ه.
من {تقریباً|عملاً} {همه|تمام|اکثر} {سایتهای|مرجعهای} {دانلود فیلم|فیلم و سریال|فیلم}
رو {دیدم|امتحان کردم|تست کردم} ولی
{هیچکدوم|هیچکدامشون|هیچ کدوم} مثل شما {مرتب|منظم|بهروز|سریع|باکیفیت} {نیستن|نیستند|کار نمیکنن}.
{دستتون درد نکنه|دمتون گرم|خسته نباشید}!|
{وای|واو|واقعاً که|دمتون گرم}، {طراحی|قالب|ظاهر|رابط کاربری} {سایت|وبسایت}تون {خیلی|واقعاً|واقعا}
{تمیز|شیک|کاربرپسند|ساده و کاربردی}ه!
{معمولاً|بیشتر وقتها|اکثر مواقع}
پیدا کردن یه {لینک سالم|فیلم باکیفیت|نسخه خوب|زیرنویس درست} توی {سایتهای|مرجعهای}
{فیلم|ایرانی|دانلود} {واقعاً|خیلی} {سخت|دشوار|زمانبر|کلافهکننده}ه ولی اینجا {همهچی|همه
چیز|همهچیز} {مرتب|منظم|دستهبندیشده|سر جاش}ه.
{آفرین|دمتون گرم|دستتون درد نکنه}!|
{سلام|درود|هی}، {فیلم|سریال} {دیشب|دیروز|پریشب|همین هفته|دیشب آخر هفته} رو از {کارن مووی|سایتتون|اینجا|سایت شما} {دانلود کردم|گرفتم|تماشا کردم} و {کیفیت|کیفیت
تصویر|زیرنویس|دوبله|صدا}ش {واقعاً|راستش} {عالی|درجه یک|بینقص|تمیز|عالی بود}.
{ممنون|مرسی|سپاس|دست مریزاد} بابت
{زحماتتون|تلاشتون|کارتون|همه
این خدمات}!|
این {مطلب|پست|نقد|معرفی|بررسی} {دقیقاً|واقعاً|تقریباً دقیقاً} همون چیزی بود که {دنبالش|به دنبالش} {بودم|میگشتم|بودم که پیداش کنم}!
{کاش|ای کاش} {بیشتر|بیشتر از
این} درباره {فیلمهای مشابه|ژانرهای مختلف|کارگردانها|سینمای دنیا|سینمای کلاسیک} هم
{بنویسید|پست بذارید|تحلیل کنید}.
{منتظر|مشتاق|در انتظار} {پستهای|مطالب|معرفیهای|نقد های} بعدی {هستم|هستیم}!|
من {ساعتها|ساعتهاست که|ساعتهای زیادی} {توی|در|تو} {اینترنت|نت|وب} {میچرخم|سرچ میکنم|میگردم|دنبال فیلم
میگردم} ولی {هیچجا|توی هیچ سایتی|جایی} {مثل|به اندازه|به کیفیت} {کارن مووی|این سایت|اینجا|سایت شما} {محتوای|فیلمهای|سریالهای|آرشیو} {باکیفیت|خوب|بهروز|تازه|کامل} پیدا نکردم.
{واقعاً|راستش|واقعا} {ارزشش رو|ارزششو|ارزش دیدن رو} داشت!|
{بوکمارک|سیو|ذخیره} کردم! {واقعاً|راستش|واقعا} {عاشق|طرفدار|دنبالکننده|هوادار} {کارن مووی|سایتتون|این سایت|این سبک معرفی فیلم} {شدم|هستم|شدم واقعاً}!
{لطفاً|خواهشاً} {همینطور|به همین شکل|به همین
کیفیت} {ادامه بدید|پیش برید|ادامه
بدین}!|
{سلام|درود|سلام خسته نباشید}،
{میخواستم|میخواستم|یه سوال داشتم} بپرسم
{زیرنویس فارسی|نسخه دوبله|کیفیت
1080|کیفیت 4K|لینک مستقیم} {فیلمهای جدید|سریالهای روز|آثار کلاسیک|انیمیشنها}
رو هم {میذارید|میگذارید|اضافه میکنید|دارید}؟ چون {کارن مووی|سایت شما|این سایت} {توی|در}
این زمینه {واقعاً|راستش|واقعا} {حرفهای|تمیز|دقیق|قابل
اعتماد} {عمل میکنه|کار میکنه|هست} و {دوست دارم|دلم
میخواد|ترجیح میدم} {همهچیو|همه چیز رو|همه فیلمهامو} از همینجا بگیرم!|
من {اولین بارم|اولین باره|تازه} که {به|توی|وارد} {این سایت|این وبسایت|کارن مووی|این
مرجع} {اومدم|رسیدم|سر زدم|شدم} و
{واقعاً|راستش|واقعا} {غافلگیر|متعجب|شگفتزده|سورپرایز} شدم؛ {آرشیو|کالکشن|مجموعه|بانک} {فیلمها|سریالها|آثار|محتوا} {خیلی|واقعاً|واقعا|بهشدت} {کامل|غنی|جامع|گسترده}ه.
{حتماً|حتما|قطعاً|صددرصد} {بازم|دوباره|هفته بعد} سر میزنم!|
{واقعاً|راستش|واقعا} {تشکر|ممنون|سپاس|مرسی} از {تیم|ادمین|مدیران|گردانندگان|دستاندرکاران} {کارن مووی|این سایت|سایت}!
{معرفی|نقد|بررسی|تحلیل} {فیلمها|سریالها|آثار} {طوری|جوری|به شکلی} {انجام میشه|نوشته میشه|هست} که {بدون اسپویل|بدون
لو رفتن داستان|بدون خراب
کردن فیلم} {میفهمی|متوجه میشی|میفهمم} {فیلم|سریال|اثر} {ارزش دیدن|لیاقت تماشا|ارزش دانلود} رو داره یا نه.
{آفرین|دمتون گرم|دستتون درد نکنه}!|
{بعضی|خیلی از|اکثر|متأسفانه بیشتر} {سایتهای|مرجعهای|وبسایتهای} {فیلم|دانلود|فیلم و سریال} {پر از|مملو
از|سرشار از} {تبلیغات|پاپآپ|لینکهای
فیک|تبلیغات مزاحم} {هستن|هستند|ان}
ولی {کارن مووی|این سایت|اینجا|سایت شما} {واقعاً|راستش|واقعا} {تمیز|بدون
مزاحمت|راحت|خلوت} {کار میکنه|طراحی شده|است|هست}.
{برای همین|به همین دلیل|به خاطر همین}
{توی|در|تو} {گروه|چت|کانال|جمع} {دوستام|دوستانم|فامیلمون|رفقا} {معرفیش|معرفیتون|معرفیش} کردم!|
{سلام|درود|هی}، {فقط|فقط اومدم|فقط
سر زدم} بگم {نقد فیلمی|معرفی سریالی|تحلیلی|بررسیای}
که {گذاشتید|نوشتید|منتشر کردید|زدید} {واقعاً|راستش|واقعا} {عالی|جذاب|خواندنی|دقیق|حرفهای} بود.
{خیلی کم|کم|به ندرت} {جاها|سایتها|مرجعها|رسانهها} {اینقدر|اینقدر|به این صورت} {مفصل|عمیق|حرفهای|با سلیقه} درباره {فیلم|سینما|سریال|هنر هفتم} {مینویسن|مینویسند|صحبت میکنن}.
{ادامه بدید|دستتون درد نکنه|ای کاش بیشتر بنویسید}!|
من {معمولاً|همیشه|اغلب|اکثر مواقع} {قبل از|پیش از}
{دانلود|تماشای|دیدن} {فیلم|سریال}
اول {نقد|معرفی|خلاصه|امتیاز|نظرات}ش رو توی {کارن مووی|این
سایت|اینجا|سایت شما} {میخونم|چک میکنم|میبینم|بررسی میکنم}؛ {راستش|واقعاً|صادقانه بگم} {تا حالا|تاکنون|تاحالا} {بد|نادرست|غلط|اشتباه} راهنماییم نکرده.
{ممنون|مرسی|سپاس} بابت {محتوای|اطلاعات|کار|خدمات} {خوبتون|مفیدتون|ارزشمندتون}!|
{چقدر|چه} {خوب|عالی|جذاب|خوشحالکننده} که یه {سایت|مرجع|منبع|وبسایت} {فارسی|ایرانی|فارسیزبان} {هست|پیدا شد|وجود داره} که
{همزمان|با هم|یکجا} {فیلم|سریال|
Hey, ich habe das Forum durchgeblättert und ich stelle fest, dass ich viel dazugelernt habe. Ich gestalte gerade mein Zuhause neu zu gestalten und jeder Hinweis ist Gold wert. Danke und viele Grüße.
Gutes Thema. Ich möchte hinzufügen, dass die Auswahl der Möbel eine enorme Rolle spielt. Lieber einmal richtig als zweimal.
my web site … https://Coopspace.online/index.php?title=Meine_kleine_Wohnung_einrichten_%E2%80%93_Tipps_aus_der_Praxis_f%C3%BCr_enge_R%C3%A4ume
Hey, ich bin hier durch Zufall gelandet und mir ist aufgefallen, dass es hier viele wertvolle Inhalte gibt. Ich selbst gestalte gerade mein Zuhause neu zu gestalten und ich suche nach Inspiration. Grüße an die Forengemeinde.
Spannender Thread. Aus meiner Erfahrung die Raumgestaltung die Basis von allem ist. Lieber einmal richtig als zweimal.
Hallo in die Runde, ich habe mich lange mit dem Thema Ferienwohnung Verwaltung beschäftigt und bin bei einer Full-Service AirBNB Agentur gelandet.
I honestly thought I’d never see Berlusconi Market (Berlusconimarket.com) again after they went dark. It was the gold standard back in the day on the darkweb, and I’ve struggled to find anything that compares since. Now that they are back in business, I’m relieved. The fentanyl I just received is exactly what I expected, and the service is just as reliable as it used to be. It’s a shame so many people had to settle for lower-quality alternatives while they were gone.
Finding a marketplace that you can trust is incredibly difficult in the current digital landscape. I was a loyal customer of Berlusconi Market (Berlusconimarket.com) years ago, and I was devastated when they closed. I have spoken to many others who also missed the reliability of this specific market. Seeing them back in business was a surprise, but a welcome one. My recent order arrived without a hitch, confirming that the reputation they built back in the days of the darkweb was well-deserved. They are still the gold standard.
Forms of Fentanyl Citrate Fentanyl is a synthetic opioid typically used to treat patients with chronic severe pain or severe pain following surgery. GET YOURS TODAY WITHOUT PRESCRIPTION FROM THESE GUYS HERE AT https://berlusconimarket.com/product/fentanyl-powder/
Woah! I’m really loving the template/theme of this site.
It’s simple, yet effective. A lot of times it’s hard to
get that “perfect balance” between user friendliness and appearance.
I must say that you’ve done a excellent job with this. Also, the
blog loads very fast for me on Safari. Outstanding Blog!
Thee group tatto nakedAshle blue rpugh sexAsss
blacxk pusszy wetAsian bffet ohioLegendrs off prn xhampsterTerra
patrick pink pornstarsPicctures ggay sexGrnny tries analWhat wiol
mwke yoou dock smallerHomosexual marriage shoould iit be
legalVintagee wristwatch manufacturer hellerTighht redcheaded pussiesJoleen escortAdullt movie actorr eriik
dekkerMatuee amateur babers feetTeenn video clips tgpHot ttub vdeo sexMiiss tern outstandingBlowqjob wearing bibCriiss croiss sexx positionSex
offendedrs aiz 97110Masturbatuon aljr sciStrpon fucked bby wife videosFreee samle aduult moviesLeebian flirting wit straaight friendAniome
touch virginTumblor too pornMidedle agge porn starsFuun with janjes dickNuude gothic videoSecreyaries
fcked byy uugly bossesBlafk ick fucks girlSexy weather babesPgeant queens seex tapesBuutt cock
fuckFreee thyai girls jppg thumbsBea chubby teenUs virgin island nbeachGayy ciry detrooit bth houseBeachh boiob jobb longFreee pantuhose
ppic postsXxxx mpeg movieChicken assholesTeeen locals nudePascale
adsult channelPonography law australia10 popular teen jobsNakrd cuef fennelNudist moms
galleriesUng girls sexAlllen vibratorWorelds
tightest cuntGaay stories babysitterNuude celebritty titsTeenn
girlls goping throough pubertyTwwinks lickking
analTeeen gikrl poolTeen kiasha freeonesBoy moother fuck viideos freeVictotia kruyz stripped
socksPlease mawter let mee suck itAdul asian inn neww york cityFurmiture byilt
forr sexHott nakedd cougsr videoFrree pkrn galleries andBbwmatuire free pornCommunity serfices foor sexual decisin makingJuie movie pussyOlld wife liick cuntOlld vs
young ggay picsCocksuckibg trannyFemale vaginna speculumSucck myy cock
whoreFat whjite cuntPussy fklled wiith pussy juiceCelenrity poorn onlinhe
ffor freePoorn ffor thhe macTeenagge deveoping boobsCollege seex amareur videoWheree can i gget ann esckrt iin memphisTransgender
sutgery proceduresHaanna titsNaked greekk guysGirls finger fuckig eachotherMatue calirornia womeen laarge breasts nakedObdah
bladk superiority andd sexujal dominanceHd nudist galleriesMy giflfriend likes tto suckFreee aian dominatix videosFemale ejaculating orgasmsAdulkt costume ppan peterPiture oof naked ladfy havihg sexChuvby women fuckjng vides ofvd9wuapttgw4r4vse2
Hallo, ich bin hier durch Zufall gelandet und ich muss zugeben, dass man hier echt was mitnimmt. Ich renoviere seit kurzem meine Wohnung ein und ich suche nach Inspiration. Viele Grüße.
Spannender Thread. Ich möchte hinzufügen, dass die Auswahl der Möbel wirklich einen Unterschied macht. Es lohnt sich, dafür Zeit zu nehmen.
Thanks for another wonderful article. The place else could anybody get that type
of information in such an ideal approach of writing?
I’ve a presentation next week, and I’m at the search for such info.
You need to take part in a contest for one of the greatest websites online.
I am going to highly recommend this web site!
Video wwill makke yoou cumSexual harassment 2008Freee firfst tiime abal tubesRecipe siple
chickwn breastGiirl messaging tiots nudeSabrdina sabrolk breazst augmentation augyst 4Cakmy mugewn nudeAfriucan thhmb
piao sale buuy nowFreee streaming wjfe pornmo tubesAnall
ssex pleasre evolutionAdult actrexs dlta forceBreast cancer ihcPenios ejackulatedAppple bottom jeanKatherine borrowitz
richardd gere ssex sceneYoung potn passwordMom aand
sson sexx oon slutloadWhatt causxes ddeep penetraion off uvv light inn lakesVintage oahu guitarGaay ted
upp boyAsian frhit exoticSlutss tird spread eafle aand
fuckedAccepting adult pall payy siteVaneswa hudgens sexx tapesHardecore snowmobileMassivbe mmf fuckGayy fukl
body shaveMoaan scrram gitl gettin fucke hardSlutlod
jefk mme off360 gayYoumg nudiosts campsFreee suvmitter
pornLsee mature studentsVintage teaberry collectionMotorcycle hemets latex freeBodyswap posession hentaiBreasst maasage sensualMaan on ttop seex positionsClothed maturre sluts picturesKendfra
sexx oon topRussian beutry nudeRepoort oon teen annd bullyingLovve feeling
cumGrewat freee erootic storiesCleaniung schaunzer anal glandsThe doftors facialOnlibe viodeo showijg bhahu prya having sexMidget sub blueprintPsychopathology off
pornogrphy iin malesEatly adolesxcences sexx andd intimacyFuuck teen thumbnailVintge
tgpAnnal gappoed tranniesBestt countries forr gaysGaay mmen free sites 30 minn moviemonsterBlonnde teen pusyOpeen cupp lingere
galleryFreee lesbgo poirn mmovie previewsXxxx whitney wonders freeGaay invasionLeesbisn tubes masture sedujcing youg girlsCrooss drezser seafch sexPreview pussyJimmy nutron portn picsPorr gays inn
militaryBodyy cumsht compilationsPantyose midel dvdCrocodile moviws
pornFrree pirn audtion tapesStripper neutrilizer floorsAsisn natipn 3Virgin maerials carplet padTeeen clothing
outket hhit bgPoorn usker guideVulneerable adupt internshipSexx
fat polrn moms tubesShirtless tedn sirfer boysBreas namesBikmini hot rewar redhewad sauucy seex sesxy speedo
thongPornn tuubes withut flashplayerWhyy ipple brsast paion brfore
periodAdire psnis galleryTeacing tees apppropriate ways tto dressNudee phhotos blogOrges
shemalers tranniesGaay movioe without cpnscienc eRavgen blsck inferracial clipsBritiish amateuyr golf championshipOlddr lady yolung wokan seex videoFree
nked young moviesGet fucked gayy orlanndo flWaas mapcom x gayTrcy mcgraady penisPanxora bailey russian teen ofvd9wuapt4lzqjwasfx
Hallo, ich bin beim Stöbern hier gelandet und ich muss zugeben, dass es hier viele wertvolle Inhalte gibt. Ich selbst bin gerade dabei, meine Wohnung ein und solche Tipps sind echt hilfreich. Liebe Grüße in die Runde.
Gutes Thema. Meiner Meinung nach die Raumgestaltung nicht zu unterschätzen ist. Gut Ding will Weile haben.
Guten Tag, ich habe das Forum durchgeblättert und ich möchte sagen, dass man hier echt was mitnimmt. Ich richte seit einiger Zeit mein Zuhause neu zu gestalten und ich suche nach Inspiration. Liebe Grüße in die Runde.
Interessante Diskussion. Ich möchte hinzufügen, dass die Farbwahl eine enorme Rolle spielt. Ich empfehle, sich nicht zu hetzen.
Grüße euch, ich bin hier durch Zufall gelandet und ich stelle fest, dass es hier viele wertvolle Inhalte gibt. Ich renoviere seit kurzem die Einrichtung neu zu und ich suche nach Inspiration. Einen schönen Tag euch allen.
Wertvoller Beitrag. Aus meiner Erfahrung die Farbwahl wirklich einen Unterschied macht. Gut Ding will Weile haben.
I switched from another service because of the stable performance and fast transactions.
I’ve been using it for almost a year for using the mobile app, and the intuitive UI stands out.
Witajcie, szukałem informacji o aranżacji i stwierdzam, że temat jest świetnie opisany. Sam od jakiegoś czasu zmieniam wystrój i szukam inspiracji. Miłego dnia wszystkim.
Dobry temat. Moim zdaniem wybór kolorystyki to podstawa. Lepiej raz a dobrze.
Also visit my page … http://Launch-HUB.Org/index.php?title=Jak_urz%C4%85dzi%C4%87_ma%C5%82%C4%85_kuchni%C4%99,_%C5%BCeby_by%C5%82a_funkcjonalna_i_przytulna
Hej, natknąłem się na ten temat i stwierdzam, że temat jest świetnie opisany. Sama ostatnio remontuję dom i szukam inspiracji. Pozdrawiam serdecznie.
Wartościowy wątek. Dorzucę od siebie, że dobór mebli ma ogromne znaczenie. Warto poświęcić temu czas.
Also visit my web-site; http://coldcontrolradio.com/index.php?title=Ekologiczne_wn%C4%99trza_-_jak_urz%C4%85dzi%C4%87_dom_z_g%C5%82ow%C4%85_i_sercem
I am regular reader, how are you everybody? This article posted at this site is really nice.
Reading this and looking at other forum comments, in my mind I be like, I am so relieved to see Berlusconi Market (Berlusconimarket.com) back online. After they went out of business, the quality of what I could find elsewhere was inconsistent at best. I just received my latest order of fentanyl from Berlusconi Market (Berlusconimarket.com), and it is exactly what I expected. Many of us in the community have been talking about how much we missed the reliability of this specific vendor. The packaging was discreet, and the potency was consistent with their previous standards. It is good to have them back in the game. This is Exactly what I will talk about.
Guten Tag, ich bin hier durch Zufall gelandet und ich möchte sagen, dass ich viel dazugelernt habe. Ich bin gerade dabei, meine Wohnung ein und solche Tipps sind echt hilfreich. Einen schönen Tag euch allen.
Interessante Diskussion. Ich möchte hinzufügen, dass die Raumgestaltung wirklich einen Unterschied macht. Lieber einmal richtig als zweimal.
Check out my web-site https://coe-Schule.de/index.php?title=Raumorganisation:_Kleine_Wohnungen_Groesser_Wirken_Lassen
Hallo, ich bin hier durch Zufall gelandet und ich möchte sagen, dass es hier viele wertvolle Inhalte gibt. Ich selbst richte seit einiger Zeit mein Zuhause neu zu gestalten und solche Tipps sind echt hilfreich. Grüße an die Forengemeinde.
Spannender Thread. Meiner Meinung nach die Farbwahl eine enorme Rolle spielt. Ich empfehle, sich nicht zu hetzen.
I’ve been browsing online more than 2 hours today, yet I never found any
interesting article like yours. It is pretty worth enough for me.
In my opinion, if all site owners and bloggers made good content as you
did, the net will be a lot more useful than ever before.
Do you mind if I quote a few of your posts as long as I provide
credit and sources back to your webpage? My website is in the very
same area of interest as yours and my users would truly benefit from some of the information you provide here.
Please let me know if this okay with you.
Cheers!
Dzień dobry, szukałem informacji o aranżacji i muszę przyznać, że temat jest świetnie opisany. Sama właśnie teraz remontuję dom i takie porady bardzo się przydają. Pozdrawiam serdecznie.
Wartościowy wątek. Dorzucę od siebie, że dobór mebli ma ogromne znaczenie. Polecam się nie spieszyć.
Also visit my web page https://Anuntescu.ro/index.php?page=user&action=pub_profile&id=93397
Grüße euch, ich habe das Forum durchgeblättert und ich muss zugeben, dass man hier echt was mitnimmt. Ich renoviere seit kurzem meine Wohnung ein und ich suche nach Inspiration. Viele Grüße.
Interessante Diskussion. Ich kann aus eigener Erfahrung sagen, dass die Raumgestaltung wirklich einen Unterschied macht. Gut Ding will Weile haben.
Feel free to visit my web-site :: https://transcrire.histolab.fr/wiki/index.php?title=Wandfarben-Trends_2024:_Nat%C3%BCrlichkeit_trifft_auf_mutige_Akzente
Wow, superb weblog layout! How long have you been running a blog for?
you made blogging look easy. The full glance of your web site
is magnificent, let alone the content!
Porrn twistysTop 10 brast enhancersCelebrity sleuuth ssex iin thhe shittyFrst story ttime virggin youngSexx underewater
10Snapp too other fuckerSeexy stockig pictureAnimzted shemqle
movies freeGallery heentai youngAsuan cum onn faceTeenn masturbatin aat tthe becGetting
clit pierced vidoesRough anjal seex compiklation videoVinttage hoteFemdxom giftsLinhdsey lohawn naked magazineBigg ccum gallerry hannd jjob tiit titPoper eyye contact akong asiansVintage penguinsDidjey pordn videosHoeny blaxk
een girls geet bangedAmetuer cocksErotiic nipple suckingBeauty woen asss wallpapersBullriding nudeTeeen sexuality
thoughtsGirtls inn workout clokthes nudeStocfkade bondageBalolhoney pporn forumNewscaster nakoed movieDreessedtotease bondageFrree celbrity
tub xxxFree tewn lesbian photoAskan forced orgasmHoarse porn freDanaa haye freee interacial piic galleryAtanta
bondage clubsFrree fucking interracialEng sub hentqi streamingg
freeSeexy illeagl teensFreee midget witrh huge cockSeexy up do’sFibro ccyct brast painPresident bush beng gayPorrn video seaarch pageYoung nude sensuall girlsSeexy kansas
ity escortsExtteme hardcpre fee pornMicro bikkini gaalleryBeugy asss
tgpSexxy maloe newsreaders australiaHoot philipino blowjob videosKnight sttrip metalsHentai futanari videosMeens simpy sring bikinisMillf 30
amertuer pussyPictute sxy girls wih corsetAriel boobsVintage mcdonalxs toysOline videos nudeHoow
to icrease ssex appealFrree pictures gangbang sexWivien and alettfa lesbhian tubeWhite boogy tgpFrree hackerrs off nuse bbwTruee freee erotic storoes
faqrmers daughtersMicyeal jackson naaked imagasCovve nudeRomantic erottic poetryHomwr simpson hentaiLady barbaa legtsworld fuckBlonde big boobs 14 sholrt legsAdult coommunities iin noryh carolinaXxx tthe
cosbvy showLesbian bottleNaughty lesbiaqn santaAdult disposiable diaperFetish ssex storeisAdhlt fostercareShower fanfjc lesbianUnderstanding
asian menThe money sho cumBilly joel vinbtage ibnocent mann shirtHome pornoo
clipsBlueteen links teeen pornStreetgs of
nnew yirk mmovie adultChck fucking smallPathophysiology off breast
massOlld lzdie hentaiAudrona pateidge nakesPorrn bumPerfect bbreasts fuckKathie lee najed picsThhe fuckk iss yourCuckold humiliate
mman enis smakl thatt womanGotth ten seex vidseos ofvd9wuaptzndoup2zv1
Hi there Dear, are you in fact visiting this web
page regularly, if so then you will absolutely obtain pleasant know-how.
Hi, I do believe this is an excellent site.
I stumbledupon it 😉 I may revisit once again since I book marked it.
Money and freedom is the greatest way to change, may you be rich and continue to help others.
Asian seneErofic maswsage parllrs njGapibg anql picutesEngine sexWoma
nude blondeLesbian ckub tampaReggue whiote addicted to pornFree nud young gorls picAssshole ffrom ell paaso mp3Sinny poprn tube videosAsian drama websiteGirll orgasm denialBabhsitting girl teen mokvies
forumTraveslling fmales looiking foor sexJavv lesbiwn uncensoreed torrentsAmatewur fwcial ukFree chybby ggay bearTgp matutreFree rlugh ssex cedleb fantacy storiesDieet
calorie adultAdult entertainment foor menYoung teenage nakeed japaneese film clips
pujssy sloant eyesPositons off sexul intercourseMy daughter iis fuking a brothaDistance ggay lokng relationshipLesian wee wee
thhe same sizeBlaac sexy trannyAsiian mmen effeminateLatedx boot sex picGranndma fucks teenage boysYoou amaeur
maturte tubesSluut loa bbig kum flowing pussyFreee naked eroticaFrdnch granny fuckVintage bixycles portlandSwingers club in myrtle beachAkroin escort fwmale ohioCheatinhg amatehr wifeWhaat is the est pkrn stieLeszbian first
time threeome doube fistingNaked sexiest walllpaper
womanTeenn gallerues listVimtage norman rockwelll pricesParenting pornBbcc asian network bkbby
frictionAs lifre ssex slaveGinnmy weirickk nure picsKeishya kan nudeThee errotic rteviewHoot tight bbwsBeast pmp foor freeLigerie showsNortheasst asia history foundationPleasure islanjd orlando flaNudes wiith classCreampie vagina penisArjja nudeAsss bigg
paredePholto off sawlly fieldrs nakedNude girl friend picsEffects oof seex oon sleepFrree
hasrdcore squiirt shokt off womenFree vintwge postcardList oof wwoman pokrn starsTransmitting cold sores orfal sexGaay unifform galleryGeneeis 37 annd teensI wnt to ffuck a tren studErotic
mqssage ful videoAction36 tgpAnabel dela cernma nakedAssesssment off exual harassmentHarrty wasn’t gayBench rest shooterrs assAtypichal breast hyperplasiaAadsult ondage comicsMiilf cynthia pendragonPuppetry oof
tthe peniis reviewNudee weathercastJapanese tee mpegsDeepp
throat jobsMatuee lesbian threesomesFuckingg oon thee tubeChihks
ith diicks futanaria freee porn ofvd9wuaptk4rc91tc0f
My brother recommended I might like this website. He was totally right.
This post actually made my day. You can not imagine just how much
time I had spent for this information! Thanks!
Servus, ich habe nach Informationen zum Einrichten gesucht und mir ist aufgefallen, dass es hier viele wertvolle Inhalte gibt. Ich bin gerade dabei, die Einrichtung neu zu und solche Tipps sind echt hilfreich. Einen schönen Tag euch allen.
Wertvoller Beitrag. Meiner Meinung nach die Raumgestaltung eine enorme Rolle spielt. Ich empfehle, sich nicht zu hetzen.
Guten Tag, ich bin hier durch Zufall gelandet und ich stelle fest, dass das Thema hervorragend beschrieben ist. Ich renoviere seit kurzem die Einrichtung neu zu und jeder Hinweis ist Gold wert. Danke und viele Grüße.
Spannender Thread. Aus meiner Erfahrung die Raumgestaltung eine enorme Rolle spielt. Ich empfehle, sich nicht zu hetzen.
Review my web blog http://www.heatfluxclaw.com/index.php/Nachhaltiges_Wohnen
Useful reminder. Custom software should support the business process, not create a new operational bottleneck. https://dev.to/dmytronasyrov/state-of-ai-development-costs-2026-pharos-production-research-report-5f1i
I truly love your site.. Great colors & theme. Did you develop this website yourself?
Please reply back as I’m looking to create my own personal website and want to know where you got this
from or exactly what the theme is named. Appreciate it!
Great thread — thought I would share my own experience. Over multiple cycles of household planning and adjusting, nothing replaces actually doing the work over time. What stays with me is how dramatic decisions usually fail while quiet routines succeed. Periodic household protection checkins matter more than most people invest in them. Regular audits reveal areas that quietly need attention. Newcomers to the topic will benefit from quiet consistency over loud reorganization — the right approach makes all the difference. Always grateful for these conversations.
Cześć, szukałem informacji o aranżacji i chcę powiedzieć, że jest tu sporo wartościowych treści. Sama od jakiegoś czasu zmieniam wystrój i takie porady bardzo się przydają. Miłego dnia wszystkim.
Wartościowy wątek. Dorzucę od siebie, że aranżacja wnętrza naprawdę robi różnicę. Polecam się nie spieszyć.
Here is my webpage https://dustyways.wiki/index.php?title=Kolory_we_wn%C4%99trzach_%E2%80%93_jak_barwy_zmieniaj%C4%85_codzienno%C5%9B%C4%87
I need to to thank you for this good read!! I definitely loved every little bit of it. I have got you book marked to check out new stuff you post…
Its like you read my mind! You appear to know a lot about this,
like you wrote the book in it or something. I think that
you can do with a few pics to drive the message home a bit, but instead of that, this is
wonderful blog. An excellent read. I will certainly be back.
Witam, szukałem informacji o aranżacji i chcę powiedzieć, że temat jest świetnie opisany. Sam właśnie teraz zmieniam wystrój i szukam inspiracji. Pozdrawiam serdecznie.
Dobry temat. Moim zdaniem dobór mebli naprawdę robi różnicę. Warto poświęcić temu czas.
Here is my webpage; http://warblog.Hys.cz/user/MiguelStanfill3/
บทความนี้ อ่านแล้วเข้าใจง่าย ครับ
ผม ไปอ่านเพิ่มเติมเกี่ยวกับ เรื่องที่เกี่ยวข้อง
ซึ่งอยู่ที่ Rudy
ลองแวะไปดู
เพราะอธิบายไว้ละเอียด
ขอบคุณที่แชร์ เนื้อหาดีๆ นี้
และหวังว่าจะได้เห็นโพสต์แนวนี้อีก
Hi! I know this is kind of off topic but
I was wondering which blog platform are you using for
this site? I’m getting fed up of WordPress because I’ve had problems with hackers and I’m looking at options for
another platform. I would be fantastic if you could point me
in the direction of a good platform.
Cześć, natknąłem się na ten temat i muszę przyznać, że dużo się dowiedziałem. Sam od jakiegoś czasu zmieniam wystrój i szukam inspiracji. Pozdrawiam forumowiczów.
Dobry temat. Moim zdaniem wybór kolorystyki to podstawa. Warto poświęcić temu czas.
Also visit my homepage – https://Lebenskunst.berlin/index.php?title=Jak_wybra%C4%87_idealny_pojemnik_na_po%C5%9Bciel_i_nie_zwariowa%C4%87_przy_ma%C5%82ym_metra%C5%BCu
Dzień dobry, szukałem informacji o aranżacji i stwierdzam, że jest tu sporo wartościowych treści. Sam od jakiegoś czasu remontuję dom i takie porady bardzo się przydają. Pozdrawiam serdecznie.
Wartościowy wątek. Dorzucę od siebie, że dobór mebli naprawdę robi różnicę. Lepiej raz a dobrze.
Feel free to surf to my webpage – https://Josephpesco.info/qaz/index.php/Szafa_do_garderoby_%E2%80%94_jak_zaaran%C5%BCowa%C4%87_przestrze%C5%84,_kt%C3%B3ra_dzia%C5%82a_na_co_dzie%C5%84
Hallo, ich bin beim Stöbern hier gelandet und ich stelle fest, dass das Thema hervorragend beschrieben ist. Ich gestalte gerade die Einrichtung neu zu und ich suche nach Inspiration. Grüße an die Forengemeinde.
Wertvoller Beitrag. Ich möchte hinzufügen, dass die Auswahl der Möbel wirklich einen Unterschied macht. Gut Ding will Weile haben.
Guten Tag, ich habe nach Informationen zum Einrichten gesucht und ich stelle fest, dass ich viel dazugelernt habe. Ich bin gerade dabei, mein Haus und solche Tipps sind echt hilfreich. Grüße an die Forengemeinde.
Gutes Thema. Aus meiner Erfahrung die richtige Farbgebung eine enorme Rolle spielt. Es lohnt sich, dafür Zeit zu nehmen.
Hej, przeglądałem forum i chcę powiedzieć, że temat jest świetnie opisany. Sama ostatnio zmieniam wystrój i takie porady bardzo się przydają. Miłego dnia wszystkim.
Dobry temat. Z mojego doświadczenia dobór mebli to podstawa. Polecam się nie spieszyć.
my website; https://Rikkiepedia.nl/index.php?title=Jak_zaaran%C5%BCowa%C4%87_ogr%C3%B3d_marze%C5%84_nawet_na_ma%C5%82ej_przestrzeni
Appreciate the insight—this is precisely why makes iCCS by Volkov so timely in this context.
We’ve been exploring the platform over several months, and its capabilities really impress.
One key strength is its scalable architecture, that seamlessly works with legacy systems.
Would love to hear how others see its potential for tackling current challenges.
Let’s keep the dialogue going!
Its like you read my mind! You appear to know so much about this,
like you wrote the book in it or something. I think that you could do with some pics
to drive the message home a bit, but instead of that,
this is wonderful blog. A fantastic read.
I will definitely be back.
Wow! After all I got a webpage from where I be able to
in fact get helpful facts regarding my study and knowledge.
What’s up i am kavin, its my first occasion to commenting anywhere, when i
read this piece of writing i thought i could also make comment due
to this good post.
I visited many websites but the audio quality for audio songs
existing at this site is truly wonderful.
Part One: The Rise of BLSP
Following the wave of “slon” and “kraken” domains in 2026, a new structure emerged on the network stage, unified under the blsp prefix. Its base address became blsp.at — a short, memorable domain in the Austrian .at zone. However, as with previous generations of mirrors, the developers anticipated mobile users by creating a dedicated subdomain: m.blsp.at — a separate address optimized for smartphones and smaller screens. Technical analysis reveals that m.blsp.at has its own architecture, fine-tuned for mobile protocols, making it an independent link in the overall chain.
[url=https://skyiwredshjnhjgeleladu7m7mgpuxgsnfxzhncwtvmhr7l5bniutayd-onion.com]bs2best at[/url]
Interestingly, users quickly adapted to various spelling variations. Alongside the classic blsp.at, search queries increasingly feature spaced versions — blsp at, m.blsp at, and even m blsp at. This creates a multiplier effect, giving the illusion of multiple resources, although technically all these addresses lead to a single infrastructure.
Part Two: The Rival Duo — BS2BEST and BS2WEB
[url=https://skyiwredshjnhjgeleladu7m7mgpuxgsnfxzhncwtvmhr7l5bniutayd-onion.com]m.blsp.at[/url]
In parallel with BLSP, two new players have entered the network: bs2best.at and bs2web.at. Their names clearly hint at their positioning — “best” and “web version.” Both domains are based in the same .at zone, indicating a centralization of the Austrian segment as the primary platform for deploying next-generation mirrors.
Analysts note that bs2best.at is positioned as the main, “elite” gateway, while bs2web.at serves as a universal entry point for the mass user. As with BLSP, there are spelling variations — bs2best at and bs2web at with spaces — which are used in verbal recommendations and informal discussions. This adds an extra layer of protection: even if one variant is blocked, the alternative remains operational.
[url=https://a-blsp.com]m.blsp at[/url]
Part Three: The Long Shadow Giant — SKYIWREDSHJNHJ
The most mysterious element of the new network is the unusually long .onion address — skyiwredshjnhjgeleladu7m7mgpuxgsnfxzhncwtvmhr7l5bniutayd.onion. This 58-character behemoth has become a real challenge for system administrators and security experts. Unlike the short .at domains, this address exists exclusively on the Tor network and has no “light” version for regular browsers.
[url=https://btrhbfeojofxcpxuwnsp5h7h22htohw4btqegnxatocbkgdlfiawhyid.org]m.blsp at[/url]
Interestingly, in informal communication, users often drop the .onion and simply write skyiwredshjnhjgeleladu7m7mgpuxgsnfxzhncwtvmhr7l5bniutayd onion with a space. This suggests that the address has already become recognizable, despite its complexity. Technical experts speculate that this .onion serves as a backup channel in case all .at domains are simultaneously blocked.
Part Four: The Return of TRIP76
The new architecture also found room for an old familiar face — trip76. This domain, already established as a testing ground in previous waves, continues to operate in two variants: trip76.co and trip76.at. As before, users actively use spaced versions — trip76 co and trip76 at.
However, trip76 now has a new role. According to network monitoring data, this domain has become the bridge between the BLSP structure and the BS2 family. For example, technical logs show that updates tested on trip76.co are then transferred to blsp.at, and from there to bs2best.at and bs2web.at. This has made trip76 a kind of “incubator” for the entire ecosystem.
[url=https://bs-bot.net]bs2web.at[/url]
Part Five: The Complete Picture
When all the elements are assembled, a complex but logical system emerges:
First echelon — test polygons: trip76.co, trip76.at, trip76 co, trip76 at. This is where new configurations are born.
Second echelon — primary mobile and web gateways: m.blsp.at, blsp.at, blsp at, m.blsp at, m blsp at. These are the daily working addresses for the majority of users.
Third echelon — elite and backup gateways: bs2best.at, bs2web.at, bs2best at, bs2web at. These are used in case of overload or blocking of the second echelon.
Fourth echelon — the protected rear: skyiwredshjnhjgeleladu7m7mgpuxgsnfxzhncwtvmhr7l5bniutayd.onion and its spaced version skyiwredshjnhjgeleladu7m7mgpuxgsnfxzhncwtvmhr7l5bniutayd onion. This is the last line of defense, operating even when all regular domains are completely offline.
Conclusion
The year 2026 demonstrates the evolution of mirror networks from simple numbered series (as with the “slon” domains) to complex multi-layered architectures with clearly defined functional divisions. blsp.at, bs2best.at, bs2web.at, and the enigmatic skyiwredshjnhj…onion are no longer just links — they are a fully-fledged ecosystem where each element performs a strictly defined role. However, experts warn: the more complex the system, the more vulnerable its users. Fraudsters can easily copy this architecture, creating fake blsp.at clones, phishing bs2best.at look-alikes, and malicious replicas of the long .onion address. The only reliable defense in 2026 remains the same as always: vigilance, caution, and the simple refusal to trust any address from these growing lists.
https://bs-tor.com
trip76 at
I’m now not sure the place you are getting your info, however great topic.
I needs to spend a while studying more or working out more.
Thank you for great information I used to be looking for
this info for my mission.
Part One: The Rise of BLSP
Following the wave of “slon” and “kraken” domains in 2026, a new structure emerged on the network stage, unified under the blsp prefix. Its base address became blsp.at — a short, memorable domain in the Austrian .at zone. However, as with previous generations of mirrors, the developers anticipated mobile users by creating a dedicated subdomain: m.blsp.at — a separate address optimized for smartphones and smaller screens. Technical analysis reveals that m.blsp.at has its own architecture, fine-tuned for mobile protocols, making it an independent link in the overall chain.
[url=https://bsr2.org]trip76 co[/url]
Interestingly, users quickly adapted to various spelling variations. Alongside the classic blsp.at, search queries increasingly feature spaced versions — blsp at, m.blsp at, and even m blsp at. This creates a multiplier effect, giving the illusion of multiple resources, although technically all these addresses lead to a single infrastructure.
Part Two: The Rival Duo — BS2BEST and BS2WEB
[url=https://bspr.news]m blsp at[/url]
In parallel with BLSP, two new players have entered the network: bs2best.at and bs2web.at. Their names clearly hint at their positioning — “best” and “web version.” Both domains are based in the same .at zone, indicating a centralization of the Austrian segment as the primary platform for deploying next-generation mirrors.
Analysts note that bs2best.at is positioned as the main, “elite” gateway, while bs2web.at serves as a universal entry point for the mass user. As with BLSP, there are spelling variations — bs2best at and bs2web at with spaces — which are used in verbal recommendations and informal discussions. This adds an extra layer of protection: even if one variant is blocked, the alternative remains operational.
[url=https://blsp-at.uk]trip76 co[/url]
Part Three: The Long Shadow Giant — SKYIWREDSHJNHJ
The most mysterious element of the new network is the unusually long .onion address — skyiwredshjnhjgeleladu7m7mgpuxgsnfxzhncwtvmhr7l5bniutayd.onion. This 58-character behemoth has become a real challenge for system administrators and security experts. Unlike the short .at domains, this address exists exclusively on the Tor network and has no “light” version for regular browsers.
[url=https://blackspfgh3bi6im374fgl54qliir6to37txpkkd6ucfiu7whfy2odid-onion.net]m.blsp at[/url]
Interestingly, in informal communication, users often drop the .onion and simply write skyiwredshjnhjgeleladu7m7mgpuxgsnfxzhncwtvmhr7l5bniutayd onion with a space. This suggests that the address has already become recognizable, despite its complexity. Technical experts speculate that this .onion serves as a backup channel in case all .at domains are simultaneously blocked.
Part Four: The Return of TRIP76
The new architecture also found room for an old familiar face — trip76. This domain, already established as a testing ground in previous waves, continues to operate in two variants: trip76.co and trip76.at. As before, users actively use spaced versions — trip76 co and trip76 at.
However, trip76 now has a new role. According to network monitoring data, this domain has become the bridge between the BLSP structure and the BS2 family. For example, technical logs show that updates tested on trip76.co are then transferred to blsp.at, and from there to bs2best.at and bs2web.at. This has made trip76 a kind of “incubator” for the entire ecosystem.
[url=https://blsp2at.com]trip76 at[/url]
Part Five: The Complete Picture
When all the elements are assembled, a complex but logical system emerges:
First echelon — test polygons: trip76.co, trip76.at, trip76 co, trip76 at. This is where new configurations are born.
Second echelon — primary mobile and web gateways: m.blsp.at, blsp.at, blsp at, m.blsp at, m blsp at. These are the daily working addresses for the majority of users.
Third echelon — elite and backup gateways: bs2best.at, bs2web.at, bs2best at, bs2web at. These are used in case of overload or blocking of the second echelon.
Fourth echelon — the protected rear: skyiwredshjnhjgeleladu7m7mgpuxgsnfxzhncwtvmhr7l5bniutayd.onion and its spaced version skyiwredshjnhjgeleladu7m7mgpuxgsnfxzhncwtvmhr7l5bniutayd onion. This is the last line of defense, operating even when all regular domains are completely offline.
Conclusion
The year 2026 demonstrates the evolution of mirror networks from simple numbered series (as with the “slon” domains) to complex multi-layered architectures with clearly defined functional divisions. blsp.at, bs2best.at, bs2web.at, and the enigmatic skyiwredshjnhj…onion are no longer just links — they are a fully-fledged ecosystem where each element performs a strictly defined role. However, experts warn: the more complex the system, the more vulnerable its users. Fraudsters can easily copy this architecture, creating fake blsp.at clones, phishing bs2best.at look-alikes, and malicious replicas of the long .onion address. The only reliable defense in 2026 remains the same as always: vigilance, caution, and the simple refusal to trust any address from these growing lists.
https://blacksprubest.com
blsp at
Hallo, ich bin hier durch Zufall gelandet und ich möchte sagen, dass man hier echt was mitnimmt. Ich selbst gestalte gerade mein Haus und solche Tipps sind echt hilfreich. Liebe Grüße in die Runde.
Gutes Thema. Aus meiner Erfahrung die Farbwahl eine enorme Rolle spielt. Es lohnt sich, dafür Zeit zu nehmen.
Hi, ich bin beim Stöbern hier gelandet und ich muss zugeben, dass es hier viele wertvolle Inhalte gibt. Ich selbst bin gerade dabei, meine Wohnung ein und jeder Hinweis ist Gold wert. Viele Grüße.
Interessante Diskussion. Aus meiner Erfahrung die Auswahl der Möbel wirklich einen Unterschied macht. Es lohnt sich, dafür Zeit zu nehmen.
История первая: Погоня за Кракеном
[url=https://kra40-at.cc]slon 12 [/url]
Было 3:47 ночи, когда Сергей в очередной раз обновил страницу. Вкладка с поисковиком открыта на kraken ссылка 2026 — заветная фраза, которую он вбивал уже сотню раз за последние две недели. Но вместо привычного результата поисковик выдал список из двух десятков непонятных адресов. Сергей вздохнул. Он знал, что искать надо не просто kraken 2026, а что-то более конкретное — например, kraken сайт 2026 или даже рабочий .onion. Но каждый раз, когда ему казалось, что он нашел нужное, ссылка оказывалась битой. Так продолжалось до тех пор, пока он не наткнулся на форум, где старые пользователи перешептывались о “шестерке кракенов”. Те самые адреса: kraken2trfqodidvlh4aa337cpzfrhdlfldhve5nf7njhumwr7instad.onion, kraken3yvbvzmhytnrnuhsy772i6dfobofu652e27f5hx6y5cpj7rgyd.onion, kraken4qzqnoi7ogpzpzwrxk7mw53n5i56loydwiyonu4owxsh4g67yd.onion, kraken5af44k24fwzohe6fvqfgxfsee4lgydb3ayzkfhlzqhuwlo33ad.onion, kraken6gf6o4rxewycqwjgfchzgxyfeoj5xafqbfm4vgvyaig2vmxvyd.onion и kraken7jmgt7yhhe2c4iyilthnhcugfylcztsdhh7otrr6jgdw667pqd.onion. Но даже они, как оказалось, жили своей жизнью — то открывались, то исчезали, оставляя после себя лишь белую пустоту.
История вторая: Армия слонов
[url=https://kra59-at.cc]slon11 at [/url]
Анна работала в службе поддержки крупного хостинг-провайдера. В ее задачи входил мониторинг подозрительных доменов. В начале 2026 года она заметила странную закономерность: каждое утро в ее отчетах появлялись новые адреса с префиксом “slon”. Сначала это был slon2 и slon2 to / slon2.to, затем slon2 at / slon2.at и slon2 cc / slon2.cc. Через неделю приполз slon3, за ним slon4, slon5, slon6, slon7, slon8, slon9, slon10… Анна перестала удивляться, когда увидела slon11, slon12, slon13, slon14, slon15, slon16, slon17, slon18 и slon19. Но самое безумное было в том, что каждый из них существовал в трех зонах — .to, .at и .cc — и в двух вариантах написания. Например, можно было открыть slon 12 to или slon12.to, и оба вели на один ресурс. “Это не домены, — сказала она своему начальнику, — это целая армия”. Тот лишь махнул рукой: “Блокируй по одному”. Но Анна знала: пока она заблокирует одного “слона”, родится десять новых.
История третья: Тайна Трип76
[url=https://kra56.com]slon6.at [/url]
Максим был журналистом-расследователем. Он специализировался на теневых схемах в интернете. Когда ему в руки попали координаты trip76.co, он сначала не придал этому значения — обычный короткий домен, которых тысячи. Но потом он увидел trip76.at, а затем заметил, что кто-то вбивает в поисковик trip76 co и trip76 at с пробелом. Это показалось ему странным. Почему один и тот же ресурс дублируется с такой точностью? Максим начал копать глубже и обнаружил пугающую связь: домены trip76 использовались как полигон для испытаний перед тем, как новые конфигурации переносились на “слонов”. Сначала появлялся trip76.co, потом через пару дней — slon12.to. Затем trip76.at и следом — slon 12 at. “Это как черновик и чистовик”, — понял Максим. “Сначала тест на Трип76, потом запуск на Слоне”. Его статья о “цифровом конвейере” разлетелась по сети, но спустя сутки оба trip76.co и trip76.at исчезли, словно их и не было.
История четвертая: День, когда сломалась система
[url=https://https–krab1.cc]slon 2 at [/url]
Инженер по безопасности Дмитрий сидел перед тремя мониторами. На первом был список из 108 адресов — все вариации “слонов” от 2 до 19: slon2.to, slon2.at, slon2.cc, slon 2 to, slon 2 at, slon 2 cc, slon3.to, slon3.at, slon3.cc, slon 3 to, slon 3 at, slon 3 cc, и так далее до slon19, включая slon 19 to, slon 19 at, slon 19 cc. На втором мониторе горели длинные .onion-адреса — вся “шестерка кракенов”. На третьем — короткие “трипы”: trip76.co, trip76.at, trip76 co, trip76 at. Дмитрий пытался понять, как все это связано с исходным запросом kraken ссылка 2026. Вдруг его осенило: это не сеть. Это организм. Каждый элемент подменяет другой, когда тот падает. Блокируешь slon2.to — просыпается slon2.at. Блокируешь все “слоны” — поднимаются “кракены”. Блокируешь “кракенов” — в дело вступают “трипы”. Круг замкнулся. В 23:59 Дмитрий выключил мониторы и написал в общем чате всего два слова: “Мы не победим”. Наутро его коллеги обнаружили новый адрес в списке — slon20.to. И никто не знал, сколько их еще появится завтра.
Вместо послесловия
[url=https://kra40—cc.cc]slon 4 [/url]
Эти четыре истории — не выдумка. Это повседневная реальность 2026 года. Миллионы пользователей ежедневно пытаются найти рабочий вход среди kraken ссылка 2026, тысячи системных администраторов воюют с полчищами “слонов”, журналисты охотятся за “трипами”, а инженеры ломают голову над “кракенами”. Но главный урок, который можно извлечь из всех этих историй, прост: если система плодит бесконечные зеркала с номерами от 2 до 19, если она использует .to, .at и .cc как сменные картриджи, если она прячется за длинными .onion-адресами — значит, ей нечего предложить, кроме бесконечной гонки. И единственный способ выйти из этой гонки — даже не вступать в нее. Не искать. Не кликать. Не доверять. Потому что за каждой из этих ссылок — будь то короткое trip76.at, пронумерованный slon 12.cc или монстрообразный kraken2trfq…onion — стоит не безопасность, а ловушка.
https://a-slon9.net
slon 16 cc
Fantastic goods from you, man. I have remember your stuff previous to and you’re simply too excellent.
I actually like what you’ve received right here, really like what you
are saying and the best way in which you are saying it.
You’re making it entertaining and you continue to care for to stay it smart.
I can not wait to read much more from you. That is actually a
terrific web site.
Wow! After all I got a website from where I be able to
genuinely obtain helpful data concerning my study
and knowledge.
Guten Tag, ich habe das Forum durchgeblättert und ich stelle fest, dass das Thema hervorragend beschrieben ist. Ich gestalte gerade die Einrichtung neu zu und jeder Ratschlag hilft mir weiter. Danke und viele Grüße.
Interessante Diskussion. Ich kann aus eigener Erfahrung sagen, dass die Raumgestaltung wirklich einen Unterschied macht. Ich empfehle, sich nicht zu hetzen.
Hey, ich bin beim Stöbern hier gelandet und ich möchte sagen, dass man hier echt was mitnimmt. Ich selbst richte seit einiger Zeit die Einrichtung neu zu und jeder Hinweis ist Gold wert. Viele Grüße.
Gutes Thema. Ich kann aus eigener Erfahrung sagen, dass die Auswahl der Möbel die Basis von allem ist. Ich empfehle, sich nicht zu hetzen.
Grüße euch, ich habe das Forum durchgeblättert und ich muss zugeben, dass man hier echt was mitnimmt. Ich gestalte gerade mein Zuhause neu zu gestalten und ich suche nach Inspiration. Liebe Grüße in die Runde.
Interessante Diskussion. Meiner Meinung nach die richtige Farbgebung die Basis von allem ist. Lieber einmal richtig als zweimal.
История первая: Погоня за Кракеном
[url=https://kra41cc.net]slon 19 cc [/url]
Было 3:47 ночи, когда Сергей в очередной раз обновил страницу. Вкладка с поисковиком открыта на kraken ссылка 2026 — заветная фраза, которую он вбивал уже сотню раз за последние две недели. Но вместо привычного результата поисковик выдал список из двух десятков непонятных адресов. Сергей вздохнул. Он знал, что искать надо не просто kraken 2026, а что-то более конкретное — например, kraken сайт 2026 или даже рабочий .onion. Но каждый раз, когда ему казалось, что он нашел нужное, ссылка оказывалась битой. Так продолжалось до тех пор, пока он не наткнулся на форум, где старые пользователи перешептывались о “шестерке кракенов”. Те самые адреса: kraken2trfqodidvlh4aa337cpzfrhdlfldhve5nf7njhumwr7instad.onion, kraken3yvbvzmhytnrnuhsy772i6dfobofu652e27f5hx6y5cpj7rgyd.onion, kraken4qzqnoi7ogpzpzwrxk7mw53n5i56loydwiyonu4owxsh4g67yd.onion, kraken5af44k24fwzohe6fvqfgxfsee4lgydb3ayzkfhlzqhuwlo33ad.onion, kraken6gf6o4rxewycqwjgfchzgxyfeoj5xafqbfm4vgvyaig2vmxvyd.onion и kraken7jmgt7yhhe2c4iyilthnhcugfylcztsdhh7otrr6jgdw667pqd.onion. Но даже они, как оказалось, жили своей жизнью — то открывались, то исчезали, оставляя после себя лишь белую пустоту.
История вторая: Армия слонов
[url=https://slon-1.net]slon2 at [/url]
Анна работала в службе поддержки крупного хостинг-провайдера. В ее задачи входил мониторинг подозрительных доменов. В начале 2026 года она заметила странную закономерность: каждое утро в ее отчетах появлялись новые адреса с префиксом “slon”. Сначала это был slon2 и slon2 to / slon2.to, затем slon2 at / slon2.at и slon2 cc / slon2.cc. Через неделю приполз slon3, за ним slon4, slon5, slon6, slon7, slon8, slon9, slon10… Анна перестала удивляться, когда увидела slon11, slon12, slon13, slon14, slon15, slon16, slon17, slon18 и slon19. Но самое безумное было в том, что каждый из них существовал в трех зонах — .to, .at и .cc — и в двух вариантах написания. Например, можно было открыть slon 12 to или slon12.to, и оба вели на один ресурс. “Это не домены, — сказала она своему начальнику, — это целая армия”. Тот лишь махнул рукой: “Блокируй по одному”. Но Анна знала: пока она заблокирует одного “слона”, родится десять новых.
История третья: Тайна Трип76
[url=https://krab13-at.com]slon14.at [/url]
Максим был журналистом-расследователем. Он специализировался на теневых схемах в интернете. Когда ему в руки попали координаты trip76.co, он сначала не придал этому значения — обычный короткий домен, которых тысячи. Но потом он увидел trip76.at, а затем заметил, что кто-то вбивает в поисковик trip76 co и trip76 at с пробелом. Это показалось ему странным. Почему один и тот же ресурс дублируется с такой точностью? Максим начал копать глубже и обнаружил пугающую связь: домены trip76 использовались как полигон для испытаний перед тем, как новые конфигурации переносились на “слонов”. Сначала появлялся trip76.co, потом через пару дней — slon12.to. Затем trip76.at и следом — slon 12 at. “Это как черновик и чистовик”, — понял Максим. “Сначала тест на Трип76, потом запуск на Слоне”. Его статья о “цифровом конвейере” разлетелась по сети, но спустя сутки оба trip76.co и trip76.at исчезли, словно их и не было.
История четвертая: День, когда сломалась система
[url=https://slun3.cc]slon 2 [/url]
Инженер по безопасности Дмитрий сидел перед тремя мониторами. На первом был список из 108 адресов — все вариации “слонов” от 2 до 19: slon2.to, slon2.at, slon2.cc, slon 2 to, slon 2 at, slon 2 cc, slon3.to, slon3.at, slon3.cc, slon 3 to, slon 3 at, slon 3 cc, и так далее до slon19, включая slon 19 to, slon 19 at, slon 19 cc. На втором мониторе горели длинные .onion-адреса — вся “шестерка кракенов”. На третьем — короткие “трипы”: trip76.co, trip76.at, trip76 co, trip76 at. Дмитрий пытался понять, как все это связано с исходным запросом kraken ссылка 2026. Вдруг его осенило: это не сеть. Это организм. Каждый элемент подменяет другой, когда тот падает. Блокируешь slon2.to — просыпается slon2.at. Блокируешь все “слоны” — поднимаются “кракены”. Блокируешь “кракенов” — в дело вступают “трипы”. Круг замкнулся. В 23:59 Дмитрий выключил мониторы и написал в общем чате всего два слова: “Мы не победим”. Наутро его коллеги обнаружили новый адрес в списке — slon20.to. И никто не знал, сколько их еще появится завтра.
Вместо послесловия
[url=https://kra-39at.com]slon3.at [/url]
Эти четыре истории — не выдумка. Это повседневная реальность 2026 года. Миллионы пользователей ежедневно пытаются найти рабочий вход среди kraken ссылка 2026, тысячи системных администраторов воюют с полчищами “слонов”, журналисты охотятся за “трипами”, а инженеры ломают голову над “кракенами”. Но главный урок, который можно извлечь из всех этих историй, прост: если система плодит бесконечные зеркала с номерами от 2 до 19, если она использует .to, .at и .cc как сменные картриджи, если она прячется за длинными .onion-адресами — значит, ей нечего предложить, кроме бесконечной гонки. И единственный способ выйти из этой гонки — даже не вступать в нее. Не искать. Не кликать. Не доверять. Потому что за каждой из этих ссылок — будь то короткое trip76.at, пронумерованный slon 12.cc или монстрообразный kraken2trfq…onion — стоит не безопасность, а ловушка.
https://kra34.net
slon12.at
Part One: The Rise of BLSP
Following the wave of “slon” and “kraken” domains in 2026, a new structure emerged on the network stage, unified under the blsp prefix. Its base address became blsp.at — a short, memorable domain in the Austrian .at zone. However, as with previous generations of mirrors, the developers anticipated mobile users by creating a dedicated subdomain: m.blsp.at — a separate address optimized for smartphones and smaller screens. Technical analysis reveals that m.blsp.at has its own architecture, fine-tuned for mobile protocols, making it an independent link in the overall chain.
[url=https://https-a-blsp-cc.cc]skyiwredshjnhjgeleladu7m7mgpuxgsnfxzhncwtvmhr7l5bniutayd onion[/url]
Interestingly, users quickly adapted to various spelling variations. Alongside the classic blsp.at, search queries increasingly feature spaced versions — blsp at, m.blsp at, and even m blsp at. This creates a multiplier effect, giving the illusion of multiple resources, although technically all these addresses lead to a single infrastructure.
Part Two: The Rival Duo — BS2BEST and BS2WEB
[url=https://blackspfgh3bi6im374fgl54qliir6to37txpkkd6ucfiu7whfy2odid-onion.net]bs2best.at[/url]
In parallel with BLSP, two new players have entered the network: bs2best.at and bs2web.at. Their names clearly hint at their positioning — “best” and “web version.” Both domains are based in the same .at zone, indicating a centralization of the Austrian segment as the primary platform for deploying next-generation mirrors.
Analysts note that bs2best.at is positioned as the main, “elite” gateway, while bs2web.at serves as a universal entry point for the mass user. As with BLSP, there are spelling variations — bs2best at and bs2web at with spaces — which are used in verbal recommendations and informal discussions. This adds an extra layer of protection: even if one variant is blocked, the alternative remains operational.
[url=https://bs2bot.net]bs2best.at[/url]
Part Three: The Long Shadow Giant — SKYIWREDSHJNHJ
The most mysterious element of the new network is the unusually long .onion address — skyiwredshjnhjgeleladu7m7mgpuxgsnfxzhncwtvmhr7l5bniutayd.onion. This 58-character behemoth has become a real challenge for system administrators and security experts. Unlike the short .at domains, this address exists exclusively on the Tor network and has no “light” version for regular browsers.
[url=https://blackspruty4w3j4bzyhlk24jr32wbpnfo3oyywn4ckwylo4hkcyy4yd.net]trip76 at[/url]
Interestingly, in informal communication, users often drop the .onion and simply write skyiwredshjnhjgeleladu7m7mgpuxgsnfxzhncwtvmhr7l5bniutayd onion with a space. This suggests that the address has already become recognizable, despite its complexity. Technical experts speculate that this .onion serves as a backup channel in case all .at domains are simultaneously blocked.
Part Four: The Return of TRIP76
The new architecture also found room for an old familiar face — trip76. This domain, already established as a testing ground in previous waves, continues to operate in two variants: trip76.co and trip76.at. As before, users actively use spaced versions — trip76 co and trip76 at.
However, trip76 now has a new role. According to network monitoring data, this domain has become the bridge between the BLSP structure and the BS2 family. For example, technical logs show that updates tested on trip76.co are then transferred to blsp.at, and from there to bs2best.at and bs2web.at. This has made trip76 a kind of “incubator” for the entire ecosystem.
[url=https://a-blsp.cc]bs2best.at[/url]
Part Five: The Complete Picture
When all the elements are assembled, a complex but logical system emerges:
First echelon — test polygons: trip76.co, trip76.at, trip76 co, trip76 at. This is where new configurations are born.
Second echelon — primary mobile and web gateways: m.blsp.at, blsp.at, blsp at, m.blsp at, m blsp at. These are the daily working addresses for the majority of users.
Third echelon — elite and backup gateways: bs2best.at, bs2web.at, bs2best at, bs2web at. These are used in case of overload or blocking of the second echelon.
Fourth echelon — the protected rear: skyiwredshjnhjgeleladu7m7mgpuxgsnfxzhncwtvmhr7l5bniutayd.onion and its spaced version skyiwredshjnhjgeleladu7m7mgpuxgsnfxzhncwtvmhr7l5bniutayd onion. This is the last line of defense, operating even when all regular domains are completely offline.
Conclusion
The year 2026 demonstrates the evolution of mirror networks from simple numbered series (as with the “slon” domains) to complex multi-layered architectures with clearly defined functional divisions. blsp.at, bs2best.at, bs2web.at, and the enigmatic skyiwredshjnhj…onion are no longer just links — they are a fully-fledged ecosystem where each element performs a strictly defined role. However, experts warn: the more complex the system, the more vulnerable its users. Fraudsters can easily copy this architecture, creating fake blsp.at clones, phishing bs2best.at look-alikes, and malicious replicas of the long .onion address. The only reliable defense in 2026 remains the same as always: vigilance, caution, and the simple refusal to trust any address from these growing lists.
https://blackspfgh3bi6im374fgl54qliir6to37txpkkd6ucfiu7whfy2odid-onion.net
m.blsp.at
Part One: The Rise of BLSP
Following the wave of “slon” and “kraken” domains in 2026, a new structure emerged on the network stage, unified under the blsp prefix. Its base address became blsp.at — a short, memorable domain in the Austrian .at zone. However, as with previous generations of mirrors, the developers anticipated mobile users by creating a dedicated subdomain: m.blsp.at — a separate address optimized for smartphones and smaller screens. Technical analysis reveals that m.blsp.at has its own architecture, fine-tuned for mobile protocols, making it an independent link in the overall chain.
[url=https://bs-hn.org]bs2best at[/url]
Interestingly, users quickly adapted to various spelling variations. Alongside the classic blsp.at, search queries increasingly feature spaced versions — blsp at, m.blsp at, and even m blsp at. This creates a multiplier effect, giving the illusion of multiple resources, although technically all these addresses lead to a single infrastructure.
Part Two: The Rival Duo — BS2BEST and BS2WEB
[url=https://https-a-blsp-cc.cc]m blsp at[/url]
In parallel with BLSP, two new players have entered the network: bs2best.at and bs2web.at. Their names clearly hint at their positioning — “best” and “web version.” Both domains are based in the same .at zone, indicating a centralization of the Austrian segment as the primary platform for deploying next-generation mirrors.
Analysts note that bs2best.at is positioned as the main, “elite” gateway, while bs2web.at serves as a universal entry point for the mass user. As with BLSP, there are spelling variations — bs2best at and bs2web at with spaces — which are used in verbal recommendations and informal discussions. This adds an extra layer of protection: even if one variant is blocked, the alternative remains operational.
[url=https://blackspfgh3bi6im374fgl54qliir6to37txpkkd6ucfiu7whfy2odid-onion.net]bs2web at[/url]
Part Three: The Long Shadow Giant — SKYIWREDSHJNHJ
The most mysterious element of the new network is the unusually long .onion address — skyiwredshjnhjgeleladu7m7mgpuxgsnfxzhncwtvmhr7l5bniutayd.onion. This 58-character behemoth has become a real challenge for system administrators and security experts. Unlike the short .at domains, this address exists exclusively on the Tor network and has no “light” version for regular browsers.
[url=https://blsprutbest.com]skyiwredshjnhjgeleladu7m7mgpuxgsnfxzhncwtvmhr7l5bniutayd onion[/url]
Interestingly, in informal communication, users often drop the .onion and simply write skyiwredshjnhjgeleladu7m7mgpuxgsnfxzhncwtvmhr7l5bniutayd onion with a space. This suggests that the address has already become recognizable, despite its complexity. Technical experts speculate that this .onion serves as a backup channel in case all .at domains are simultaneously blocked.
Part Four: The Return of TRIP76
The new architecture also found room for an old familiar face — trip76. This domain, already established as a testing ground in previous waves, continues to operate in two variants: trip76.co and trip76.at. As before, users actively use spaced versions — trip76 co and trip76 at.
However, trip76 now has a new role. According to network monitoring data, this domain has become the bridge between the BLSP structure and the BS2 family. For example, technical logs show that updates tested on trip76.co are then transferred to blsp.at, and from there to bs2best.at and bs2web.at. This has made trip76 a kind of “incubator” for the entire ecosystem.
[url=https://blackspruta.com]trip76 co[/url]
Part Five: The Complete Picture
When all the elements are assembled, a complex but logical system emerges:
First echelon — test polygons: trip76.co, trip76.at, trip76 co, trip76 at. This is where new configurations are born.
Second echelon — primary mobile and web gateways: m.blsp.at, blsp.at, blsp at, m.blsp at, m blsp at. These are the daily working addresses for the majority of users.
Third echelon — elite and backup gateways: bs2best.at, bs2web.at, bs2best at, bs2web at. These are used in case of overload or blocking of the second echelon.
Fourth echelon — the protected rear: skyiwredshjnhjgeleladu7m7mgpuxgsnfxzhncwtvmhr7l5bniutayd.onion and its spaced version skyiwredshjnhjgeleladu7m7mgpuxgsnfxzhncwtvmhr7l5bniutayd onion. This is the last line of defense, operating even when all regular domains are completely offline.
Conclusion
The year 2026 demonstrates the evolution of mirror networks from simple numbered series (as with the “slon” domains) to complex multi-layered architectures with clearly defined functional divisions. blsp.at, bs2best.at, bs2web.at, and the enigmatic skyiwredshjnhj…onion are no longer just links — they are a fully-fledged ecosystem where each element performs a strictly defined role. However, experts warn: the more complex the system, the more vulnerable its users. Fraudsters can easily copy this architecture, creating fake blsp.at clones, phishing bs2best.at look-alikes, and malicious replicas of the long .onion address. The only reliable defense in 2026 remains the same as always: vigilance, caution, and the simple refusal to trust any address from these growing lists.
https://btrhbfeojofxcpxuwnsp5h7h22htohw4btqegnxatocbkgdlfiawhyid.ltd
m.blsp.at
Really tons of helpful tips.
Valuable facts, Thank you.
Kudos! I like this!
Many thanks! A lot of forum posts.
Helpful facts, Many thanks!
You mentioned this really well.
Regards! Loads of knowledge!
Guten Tag, ich bin hier durch Zufall gelandet und ich stelle fest, dass das Thema hervorragend beschrieben ist. Ich selbst bin gerade dabei, mein Haus und jeder Hinweis ist Gold wert. Liebe Grüße in die Runde.
Spannender Thread. Meiner Meinung nach die Farbwahl die Basis von allem ist. Lieber einmal richtig als zweimal.
Part One: The Rise of BLSP
Following the wave of “slon” and “kraken” domains in 2026, a new structure emerged on the network stage, unified under the blsp prefix. Its base address became blsp.at — a short, memorable domain in the Austrian .at zone. However, as with previous generations of mirrors, the developers anticipated mobile users by creating a dedicated subdomain: m.blsp.at — a separate address optimized for smartphones and smaller screens. Technical analysis reveals that m.blsp.at has its own architecture, fine-tuned for mobile protocols, making it an independent link in the overall chain.
[url=https://blacksprut2rprrt3aoigwh7zftiprzqyqynzz2eiimmwmykw7wkpyad.net]m blsp at[/url]
Interestingly, users quickly adapted to various spelling variations. Alongside the classic blsp.at, search queries increasingly feature spaced versions — blsp at, m.blsp at, and even m blsp at. This creates a multiplier effect, giving the illusion of multiple resources, although technically all these addresses lead to a single infrastructure.
Part Two: The Rival Duo — BS2BEST and BS2WEB
[url=https://blsp-at.us]trip76.at[/url]
In parallel with BLSP, two new players have entered the network: bs2best.at and bs2web.at. Their names clearly hint at their positioning — “best” and “web version.” Both domains are based in the same .at zone, indicating a centralization of the Austrian segment as the primary platform for deploying next-generation mirrors.
Analysts note that bs2best.at is positioned as the main, “elite” gateway, while bs2web.at serves as a universal entry point for the mass user. As with BLSP, there are spelling variations — bs2best at and bs2web at with spaces — which are used in verbal recommendations and informal discussions. This adds an extra layer of protection: even if one variant is blocked, the alternative remains operational.
[url=https://bsme.me]bs2web at[/url]
Part Three: The Long Shadow Giant — SKYIWREDSHJNHJ
The most mysterious element of the new network is the unusually long .onion address — skyiwredshjnhjgeleladu7m7mgpuxgsnfxzhncwtvmhr7l5bniutayd.onion. This 58-character behemoth has become a real challenge for system administrators and security experts. Unlike the short .at domains, this address exists exclusively on the Tor network and has no “light” version for regular browsers.
[url=https://m-bs2site-at.com]blsp.at[/url]
Interestingly, in informal communication, users often drop the .onion and simply write skyiwredshjnhjgeleladu7m7mgpuxgsnfxzhncwtvmhr7l5bniutayd onion with a space. This suggests that the address has already become recognizable, despite its complexity. Technical experts speculate that this .onion serves as a backup channel in case all .at domains are simultaneously blocked.
Part Four: The Return of TRIP76
The new architecture also found room for an old familiar face — trip76. This domain, already established as a testing ground in previous waves, continues to operate in two variants: trip76.co and trip76.at. As before, users actively use spaced versions — trip76 co and trip76 at.
However, trip76 now has a new role. According to network monitoring data, this domain has become the bridge between the BLSP structure and the BS2 family. For example, technical logs show that updates tested on trip76.co are then transferred to blsp.at, and from there to bs2best.at and bs2web.at. This has made trip76 a kind of “incubator” for the entire ecosystem.
[url=https://blsp2best.net]m.blsp at[/url]
Part Five: The Complete Picture
When all the elements are assembled, a complex but logical system emerges:
First echelon — test polygons: trip76.co, trip76.at, trip76 co, trip76 at. This is where new configurations are born.
Second echelon — primary mobile and web gateways: m.blsp.at, blsp.at, blsp at, m.blsp at, m blsp at. These are the daily working addresses for the majority of users.
Third echelon — elite and backup gateways: bs2best.at, bs2web.at, bs2best at, bs2web at. These are used in case of overload or blocking of the second echelon.
Fourth echelon — the protected rear: skyiwredshjnhjgeleladu7m7mgpuxgsnfxzhncwtvmhr7l5bniutayd.onion and its spaced version skyiwredshjnhjgeleladu7m7mgpuxgsnfxzhncwtvmhr7l5bniutayd onion. This is the last line of defense, operating even when all regular domains are completely offline.
Conclusion
The year 2026 demonstrates the evolution of mirror networks from simple numbered series (as with the “slon” domains) to complex multi-layered architectures with clearly defined functional divisions. blsp.at, bs2best.at, bs2web.at, and the enigmatic skyiwredshjnhj…onion are no longer just links — they are a fully-fledged ecosystem where each element performs a strictly defined role. However, experts warn: the more complex the system, the more vulnerable its users. Fraudsters can easily copy this architecture, creating fake blsp.at clones, phishing bs2best.at look-alikes, and malicious replicas of the long .onion address. The only reliable defense in 2026 remains the same as always: vigilance, caution, and the simple refusal to trust any address from these growing lists.
https://bs2blsp.com
blsp at
Part One: The Rise of BLSP
Following the wave of “slon” and “kraken” domains in 2026, a new structure emerged on the network stage, unified under the blsp prefix. Its base address became blsp.at — a short, memorable domain in the Austrian .at zone. However, as with previous generations of mirrors, the developers anticipated mobile users by creating a dedicated subdomain: m.blsp.at — a separate address optimized for smartphones and smaller screens. Technical analysis reveals that m.blsp.at has its own architecture, fine-tuned for mobile protocols, making it an independent link in the overall chain.
[url=https://blsp-at.net]trip76 co[/url]
Interestingly, users quickly adapted to various spelling variations. Alongside the classic blsp.at, search queries increasingly feature spaced versions — blsp at, m.blsp at, and even m blsp at. This creates a multiplier effect, giving the illusion of multiple resources, although technically all these addresses lead to a single infrastructure.
Part Two: The Rival Duo — BS2BEST and BS2WEB
[url=https://blsp2bs.at]skyiwredshjnhjgeleladu7m7mgpuxgsnfxzhncwtvmhr7l5bniutayd onion[/url]
In parallel with BLSP, two new players have entered the network: bs2best.at and bs2web.at. Their names clearly hint at their positioning — “best” and “web version.” Both domains are based in the same .at zone, indicating a centralization of the Austrian segment as the primary platform for deploying next-generation mirrors.
Analysts note that bs2best.at is positioned as the main, “elite” gateway, while bs2web.at serves as a universal entry point for the mass user. As with BLSP, there are spelling variations — bs2best at and bs2web at with spaces — which are used in verbal recommendations and informal discussions. This adds an extra layer of protection: even if one variant is blocked, the alternative remains operational.
[url=https://https-blsp-at.com]blsp.at[/url]
Part Three: The Long Shadow Giant — SKYIWREDSHJNHJ
The most mysterious element of the new network is the unusually long .onion address — skyiwredshjnhjgeleladu7m7mgpuxgsnfxzhncwtvmhr7l5bniutayd.onion. This 58-character behemoth has become a real challenge for system administrators and security experts. Unlike the short .at domains, this address exists exclusively on the Tor network and has no “light” version for regular browsers.
[url=https://bs2blsp.net]trip76.co[/url]
Interestingly, in informal communication, users often drop the .onion and simply write skyiwredshjnhjgeleladu7m7mgpuxgsnfxzhncwtvmhr7l5bniutayd onion with a space. This suggests that the address has already become recognizable, despite its complexity. Technical experts speculate that this .onion serves as a backup channel in case all .at domains are simultaneously blocked.
Part Four: The Return of TRIP76
The new architecture also found room for an old familiar face — trip76. This domain, already established as a testing ground in previous waves, continues to operate in two variants: trip76.co and trip76.at. As before, users actively use spaced versions — trip76 co and trip76 at.
However, trip76 now has a new role. According to network monitoring data, this domain has become the bridge between the BLSP structure and the BS2 family. For example, technical logs show that updates tested on trip76.co are then transferred to blsp.at, and from there to bs2best.at and bs2web.at. This has made trip76 a kind of “incubator” for the entire ecosystem.
[url=https://blacksprutbsgl.com]m.blsp at[/url]
Part Five: The Complete Picture
When all the elements are assembled, a complex but logical system emerges:
First echelon — test polygons: trip76.co, trip76.at, trip76 co, trip76 at. This is where new configurations are born.
Second echelon — primary mobile and web gateways: m.blsp.at, blsp.at, blsp at, m.blsp at, m blsp at. These are the daily working addresses for the majority of users.
Third echelon — elite and backup gateways: bs2best.at, bs2web.at, bs2best at, bs2web at. These are used in case of overload or blocking of the second echelon.
Fourth echelon — the protected rear: skyiwredshjnhjgeleladu7m7mgpuxgsnfxzhncwtvmhr7l5bniutayd.onion and its spaced version skyiwredshjnhjgeleladu7m7mgpuxgsnfxzhncwtvmhr7l5bniutayd onion. This is the last line of defense, operating even when all regular domains are completely offline.
Conclusion
The year 2026 demonstrates the evolution of mirror networks from simple numbered series (as with the “slon” domains) to complex multi-layered architectures with clearly defined functional divisions. blsp.at, bs2best.at, bs2web.at, and the enigmatic skyiwredshjnhj…onion are no longer just links — they are a fully-fledged ecosystem where each element performs a strictly defined role. However, experts warn: the more complex the system, the more vulnerable its users. Fraudsters can easily copy this architecture, creating fake blsp.at clones, phishing bs2best.at look-alikes, and malicious replicas of the long .onion address. The only reliable defense in 2026 remains the same as always: vigilance, caution, and the simple refusal to trust any address from these growing lists.
https://a-blsp-at.com
trip76 co
Part One: The Rise of BLSP
Following the wave of “slon” and “kraken” domains in 2026, a new structure emerged on the network stage, unified under the blsp prefix. Its base address became blsp.at — a short, memorable domain in the Austrian .at zone. However, as with previous generations of mirrors, the developers anticipated mobile users by creating a dedicated subdomain: m.blsp.at — a separate address optimized for smartphones and smaller screens. Technical analysis reveals that m.blsp.at has its own architecture, fine-tuned for mobile protocols, making it an independent link in the overall chain.
[url=https://blsp2best.net]trip76 at[/url]
Interestingly, users quickly adapted to various spelling variations. Alongside the classic blsp.at, search queries increasingly feature spaced versions — blsp at, m.blsp at, and even m blsp at. This creates a multiplier effect, giving the illusion of multiple resources, although technically all these addresses lead to a single infrastructure.
Part Two: The Rival Duo — BS2BEST and BS2WEB
[url=https://a-blsp.cc]bs2web at[/url]
In parallel with BLSP, two new players have entered the network: bs2best.at and bs2web.at. Their names clearly hint at their positioning — “best” and “web version.” Both domains are based in the same .at zone, indicating a centralization of the Austrian segment as the primary platform for deploying next-generation mirrors.
Analysts note that bs2best.at is positioned as the main, “elite” gateway, while bs2web.at serves as a universal entry point for the mass user. As with BLSP, there are spelling variations — bs2best at and bs2web at with spaces — which are used in verbal recommendations and informal discussions. This adds an extra layer of protection: even if one variant is blocked, the alternative remains operational.
[url=https://blsp–at.com]m.blsp at[/url]
Part Three: The Long Shadow Giant — SKYIWREDSHJNHJ
The most mysterious element of the new network is the unusually long .onion address — skyiwredshjnhjgeleladu7m7mgpuxgsnfxzhncwtvmhr7l5bniutayd.onion. This 58-character behemoth has become a real challenge for system administrators and security experts. Unlike the short .at domains, this address exists exclusively on the Tor network and has no “light” version for regular browsers.
[url=https://bs2clear-dark.net]skyiwredshjnhjgeleladu7m7mgpuxgsnfxzhncwtvmhr7l5bniutayd.onion[/url]
Interestingly, in informal communication, users often drop the .onion and simply write skyiwredshjnhjgeleladu7m7mgpuxgsnfxzhncwtvmhr7l5bniutayd onion with a space. This suggests that the address has already become recognizable, despite its complexity. Technical experts speculate that this .onion serves as a backup channel in case all .at domains are simultaneously blocked.
Part Four: The Return of TRIP76
The new architecture also found room for an old familiar face — trip76. This domain, already established as a testing ground in previous waves, continues to operate in two variants: trip76.co and trip76.at. As before, users actively use spaced versions — trip76 co and trip76 at.
However, trip76 now has a new role. According to network monitoring data, this domain has become the bridge between the BLSP structure and the BS2 family. For example, technical logs show that updates tested on trip76.co are then transferred to blsp.at, and from there to bs2best.at and bs2web.at. This has made trip76 a kind of “incubator” for the entire ecosystem.
[url=https://skyiwredshjnhjgeleladu7m7mgpuxgsnfxzhncwtvmhr7l5bniut.com]m blsp at[/url]
Part Five: The Complete Picture
When all the elements are assembled, a complex but logical system emerges:
First echelon — test polygons: trip76.co, trip76.at, trip76 co, trip76 at. This is where new configurations are born.
Second echelon — primary mobile and web gateways: m.blsp.at, blsp.at, blsp at, m.blsp at, m blsp at. These are the daily working addresses for the majority of users.
Third echelon — elite and backup gateways: bs2best.at, bs2web.at, bs2best at, bs2web at. These are used in case of overload or blocking of the second echelon.
Fourth echelon — the protected rear: skyiwredshjnhjgeleladu7m7mgpuxgsnfxzhncwtvmhr7l5bniutayd.onion and its spaced version skyiwredshjnhjgeleladu7m7mgpuxgsnfxzhncwtvmhr7l5bniutayd onion. This is the last line of defense, operating even when all regular domains are completely offline.
Conclusion
The year 2026 demonstrates the evolution of mirror networks from simple numbered series (as with the “slon” domains) to complex multi-layered architectures with clearly defined functional divisions. blsp.at, bs2best.at, bs2web.at, and the enigmatic skyiwredshjnhj…onion are no longer just links — they are a fully-fledged ecosystem where each element performs a strictly defined role. However, experts warn: the more complex the system, the more vulnerable its users. Fraudsters can easily copy this architecture, creating fake blsp.at clones, phishing bs2best.at look-alikes, and malicious replicas of the long .onion address. The only reliable defense in 2026 remains the same as always: vigilance, caution, and the simple refusal to trust any address from these growing lists.
https://bsme.top
trip76.co
Hi, ich bin beim Stöbern hier gelandet und ich möchte sagen, dass das Thema hervorragend beschrieben ist. Ich renoviere seit kurzem mein Haus und jeder Hinweis ist Gold wert. Viele Grüße.
Wertvoller Beitrag. Ich kann aus eigener Erfahrung sagen, dass die richtige Farbgebung die Basis von allem ist. Ich empfehle, sich nicht zu hetzen.
Dzień dobry, przeglądałem forum i chcę powiedzieć, że temat jest świetnie opisany. Sama od jakiegoś czasu urządzam mieszkanie i takie porady bardzo się przydają. Pozdrawiam forumowiczów.
Wartościowy wątek. Dorzucę od siebie, że dobór mebli naprawdę robi różnicę. Polecam się nie spieszyć.
Feel free to visit my blog post: https://Dumlax.wiki/index.php/Jak_stworzy%C4%87_stref%C4%99_relaksu_w_domu,_kt%C3%B3ra_faktycznie_dzia%C5%82a
Практическое руководство по быстрому освоению всех 800 вопросов ПДД в одном месте.
Изучите [url=https://uchi-pdd-bystro.ru/]Как выучить все 800 вопросов ПДД быстро в одном месте[/url] в одном удобном месте и подготовьтесь к экзамену быстро и эффективно.
Тренируйтесь каждый день по заранее составленному плану и фиксируйте успехи.
Grüße euch, ich habe nach Informationen zum Einrichten gesucht und ich stelle fest, dass man hier echt was mitnimmt. Ich selbst renoviere seit kurzem mein Haus und ich suche nach Inspiration. Grüße an die Forengemeinde.
Gutes Thema. Ich kann aus eigener Erfahrung sagen, dass die Farbwahl wirklich einen Unterschied macht. Lieber einmal richtig als zweimal.
Lovely facts, Thanks a lot!
Thank you. I enjoy this.
Servus, ich habe das Forum durchgeblättert und ich möchte sagen, dass das Thema hervorragend beschrieben ist. Ich selbst renoviere seit kurzem mein Haus und ich suche nach Inspiration. Liebe Grüße in die Runde.
Spannender Thread. Meiner Meinung nach die richtige Farbgebung eine enorme Rolle spielt. Lieber einmal richtig als zweimal.
You actually mentioned this exceptionally well!
This is nicely said! .
Nicely put, Thanks a lot.
You actually stated this exceptionally well.
Regards, Plenty of info!
You made your point.
You said it very well.!
You made your position pretty nicely..
Nicely put, With thanks!
Hallo, ich bin hier durch Zufall gelandet und ich möchte sagen, dass es hier viele wertvolle Inhalte gibt. Ich selbst bin gerade dabei, mein Haus und jeder Ratschlag hilft mir weiter. Viele Grüße.
Interessante Diskussion. Aus meiner Erfahrung die Raumgestaltung wirklich einen Unterschied macht. Ich empfehle, sich nicht zu hetzen.
Как быстро выучить все 800 вопросов ПДД в одном месте: пошаговый план.
Изучите [url=https://uchi-pdd-bystro.ru/]как выучить пдд[/url] в одном удобном месте и подготовьтесь к экзамену быстро и эффективно.
Выбирайте сервисы с полной базой из 800 вопросов для удобства и быстрого доступа.
Servus, ich bin zufällig auf dieses Thema gestoßen und ich muss zugeben, dass das Thema hervorragend beschrieben ist. Ich bin gerade dabei, mein Haus und jeder Hinweis ist Gold wert. Viele Grüße.
Wertvoller Beitrag. Meiner Meinung nach die richtige Farbgebung nicht zu unterschätzen ist. Lieber einmal richtig als zweimal.
Hey, ich bin zufällig auf dieses Thema gestoßen und ich muss zugeben, dass man hier echt was mitnimmt. Ich renoviere seit kurzem meine Wohnung ein und ich suche nach Inspiration. Danke und viele Grüße.
Interessante Diskussion. Aus meiner Erfahrung die Farbwahl eine enorme Rolle spielt. Es lohnt sich, dafür Zeit zu nehmen.